Drawing a dog face can be both a joyful and rewarding experience. Whether you’re a beginner artist, an anime enthusiast, or just someone who wants to capture the charm of man’s best friend on paper, learning how to draw a dog face will help you develop your skills in animal anatomy, emotion, and expression. This ultimate guide will walk you through various techniques, tools, and step-by-step instructions to bring your dog portrait to life.
From basic sketching to adding fur textures and facial expressions, this in-depth post will equip you with everything you need to know about drawing dog faces — from cute puppies to realistic adult dogs.
Let’s dive into this creative journey.
Contents
- Understanding the Dog’s Facial Anatomy
- Essential Tools and Materials
- Step-by-Step Guide: How to Draw a Dog Face
- Drawing Dog Face Expressions
- Shading and Adding Texture
- Drawing Popular Dog Breeds’ Faces
- Using Color in Dog Portraits
- Common Mistakes to Avoid
- Tips for Beginners
- Drawing a Puppy Face
- Turning Your Dog Face Into Art
- Practicing with Digital Drawing Tools
- Final Words
Understanding the Dog’s Facial Anatomy
Observe Different Breeds
Different breeds have unique facial features. A bulldog’s face is short and broad, a greyhound’s is long and narrow, and a golden retriever has soft features with medium proportions. Knowing your dog’s breed helps you draw accurate proportions.
Key Facial Features
- Eyes: Round, almond, or droopy depending on breed
- Nose: Wide or narrow, typically moist-looking
- Muzzle: Varies from short and flat to long and thin
- Ears: Pointy, floppy, or semi-upright
- Jawline: Strong or soft depending on the dog’s age and type
Proportional Landmarks
Use rough guidelines to plot the placement of the eyes, nose, mouth, and ears. Divide the face into equal vertical and horizontal sections to center the features.
Essential Tools and Materials
Pencils and Erasers
Start with a 2H pencil for guidelines, and use an HB or 2B for darker outlines. A kneaded eraser is best for lightening lines without damaging the paper.
Paper Types
Smooth Bristol paper is ideal for clean lines and blending. Sketch pads work for rough drafts, while textured paper gives more grip for shading.
Blending Tools
Blending stumps, tissue, or your finger can help soften fur and shadows for a more realistic effect.
Optional Tools
- Colored pencils for adding coat color
- Micron pens for inking
- Markers or charcoal for high contrast work
Step-by-Step Guide: How to Draw a Dog Face
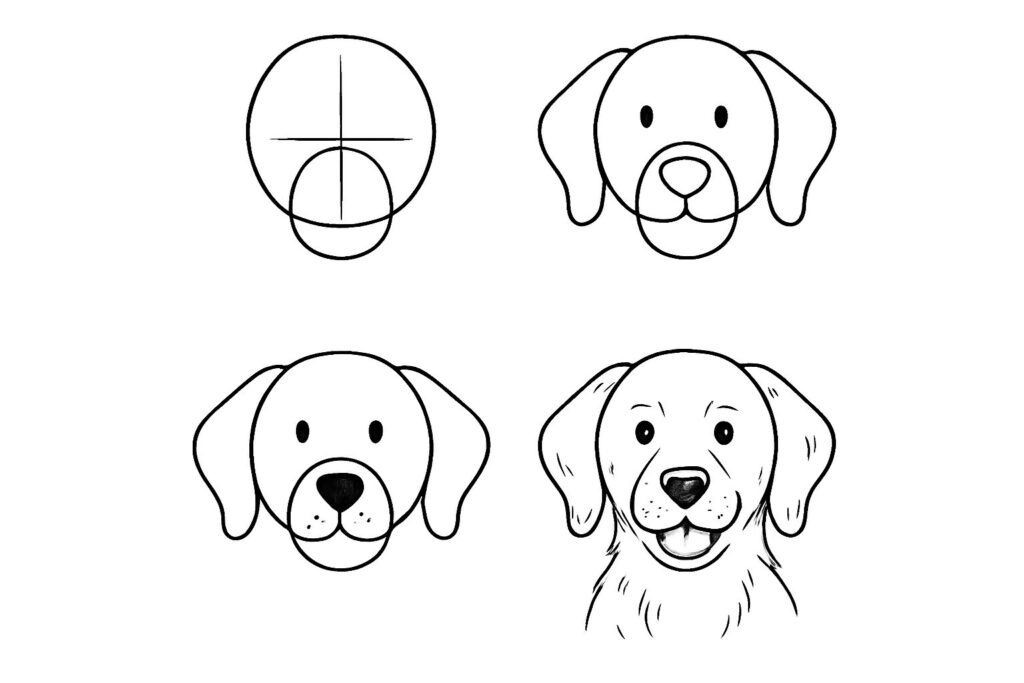
Step 1: Sketch the Basic Circle
Start by drawing a circle for the cranium. This represents the skull of the dog. Add a vertical centerline and a horizontal eye guideline.
Step 2: Add the Muzzle Shape
From the bottom of the circle, draw an elongated oval or rectangular shape depending on the breed. This will become the dog’s snout.
Step 3: Define the Nose and Eyes
- Draw a triangle or trapezoid at the end of the muzzle for the nose.
- Above the snout, sketch two oval eye sockets on either side of the vertical guideline.
- Keep the distance between the eyes proportional to the width of the snout.
Step 4: Outline the Ears
Add the ears at the top of the circle. Their shape depends on breed: triangles for German shepherds, long floppy curves for spaniels.
Step 5: Add the Mouth and Jaw
Lightly sketch a curved line below the nose for the mouth. Extend the lower jaw if the dog has a pronounced chin or jowls.
Step 6: Define the Neck and Fur Direction
Sketch the outline of the neck and shoulders. Begin mapping the fur direction using light strokes to follow the curve of the muscles.
Drawing Dog Face Expressions
Happy Expression
- Raised eyebrows
- Relaxed eyes
- Slight open mouth with visible tongue
Alert Expression
- Erect ears
- Wide eyes
- Closed mouth
Sad or Tired Look
- Droopy eyelids
- Ears pulled back
- Slightly turned-down mouth
Shading and Adding Texture
Light Source
Decide where your light source is coming from — top-left is common. Add shadows to the opposite areas of the face to create depth.
Fur Texture
- Use small, quick pencil strokes for short fur.
- Use longer strokes layered in the direction of fur growth for long-haired breeds.
- Blend lightly to soften transitions between light and shadow.
Eyes
- Add a white spot to simulate reflection
- Darken the pupil and use light shading for the iris
- Outline with darker values for emphasis
Nose Details
- Create a stippled texture with dots for realism
- Shade the sides and leave the tip slightly lighter
- Use a highlight to represent the moist look of a dog’s nose
Drawing Popular Dog Breeds’ Faces
Labrador Retriever
- Wide head
- Friendly eyes
- Floppy ears
Pug
- Flat snout
- Wrinkled skin
- Round eyes
Siberian Husky
- Almond eyes
- Medium-length snout
- Upright ears
Shih Tzu
- Short face
- Long fur around the mouth
- Tiny nose
Using Color in Dog Portraits
Choosing the Right Palette
Match the dog’s fur using tan, brown, gray, black, and cream tones. Use layering to create depth and variation in fur color.
Blending Colored Pencils
Apply the lightest color first, then layer darker tones. Use a colorless blender pencil or light pressure to smooth transitions.
Adding Highlights
Use a white gel pen or colored pencil to highlight parts of the nose, eyes, and fur tips.
Common Mistakes to Avoid
Misaligned Eyes
Ensure that the eyes are symmetrical and placed evenly on the face.
Incorrect Proportions
Use guidelines to keep the snout, ears, and jaw balanced.
Flat Shading
Avoid pressing hard with one tone. Use a gradient and build layers slowly.
Over-Blending Fur
Keep some texture to suggest real fur. Over-blending can make the fur look too smooth or fake.
Tips for Beginners
Practice with References
Start with photos of dogs from various angles. Draw the same dog multiple times to improve consistency.
Break It Down
Work in stages: sketch, refine, then shade. This approach helps control each part of the process.
Use Light Pressure
Keep your lines soft until you’re ready to commit. This makes erasing and adjusting much easier.
Explore Cartoon Styles
You can stylize dog faces for comic, anime, or children’s illustration by exaggerating certain features like eyes, nose, and mouth.
Drawing a Puppy Face
- Proportionally larger eyes
- Shorter snout
- Rounder face
- Fluffier cheeks
Use soft curves and avoid harsh lines to capture that baby-faced look.
Turning Your Dog Face Into Art
Adding Backgrounds
Frame your dog face drawing with simple backgrounds like grass, a doghouse, or sky for extra charm.
Making a Portrait
Add a name tag, collar, or a paw print to personalize your dog art.
Framing Your Drawing
Finish your work by scanning or photographing it and placing it in a frame for display.
Practicing with Digital Drawing Tools
If you draw on tablets or computers:
- Use layers for sketch, line art, and shading
- Try brushes that mimic fur texture
- Zoom in for small details and zoom out for overall composition
Procreate, Clip Studio Paint, and Adobe Fresco are excellent options for drawing dog faces digitally.
Final Words
Drawing a dog face isn’t just about mastering features — it’s about capturing the spirit of a loyal companion. Whether you’re drawing a fluffy Pomeranian, a goofy Golden Retriever, or a soulful-eyed Beagle, this process gives you a chance to connect with animals through art.
With patience, observation, and consistent practice, you’ll find your skills improving with every drawing. Try different breeds, poses, and expressions, and most importantly — have fun with the creative journey.
Now grab your pencil or tablet and let those dog faces come to life on your page!