Are you ready to unleash your inner artist? Drawing a donut is not just fun; it’s a delicious way to boost your creativity!
Imagine the joy of sketching a perfectly round treat, complete with sprinkles and frosting. Whether you’re a beginner or have some experience, this guide will walk you through each simple step. By the end, you’ll have a mouthwatering masterpiece that you can be proud of.
Grab your pencils and let’s get started on this sweet artistic adventure! You won’t want to miss it.
Credit: artprojectsforkids.org
Contents
Gather Your Materials
Gathering your materials is the first step to drawing a donut. Start with paper and pencils. Have colored markers or crayons ready for later. A reference image of a donut can help too. Being prepared makes drawing easier and more fun.
Gathering your materials is a crucial first step in your journey to draw a perfect donut. Having the right tools on hand can make the process smoother and more enjoyable. Let’s dive into what you need to get started.
Essential Drawing Tools
To create a delightful donut drawing, you’ll need some basic tools. Here’s a quick list:
- Pencil: A regular pencil will work for sketching your donut outline.
- Eraser: Keep an eraser handy to correct any mistakes.
- Paper: Use sketch paper or any paper you prefer.
- Fine-tipped markers: For outlining your donut, a black fine-tipped marker can give you a clean look.
- Colored pencils or markers: Use these for adding delicious colors to your donut.
Having these tools ready will set you up for success. Remember, the right materials can make your drawing experience enjoyable and less frustrating.
Creative Additions
Think about adding some personal flair to your drawing. Here are a few options:
- Glitter pens: Add some sparkle to your icing.
- Stickers: Use donut-themed stickers for extra decoration.
- Watercolors: If you like painting, watercolors can create a unique effect.
These creative additions can make your donut stand out. What unique features will you add to your donut design?
Setting Up Your Workspace
A clean, organized workspace can enhance your creativity. Here are some tips to create the perfect environment:
- Find a comfortable spot: Choose a well-lit area where you can focus.
- Keep everything within reach: Arrange your materials so you can easily grab them.
- Minimize distractions: Turn off notifications on your phone or computer to keep your mind clear.
Creating an inviting space can boost your motivation. What does your ideal drawing environment look like?
Gathering your materials is more than just a checklist; it’s about preparing yourself for a fun and creative experience. With the right tools, personal touches, and a conducive workspace, you’re all set to bring your donut drawing to life!

Credit: www.youtube.com
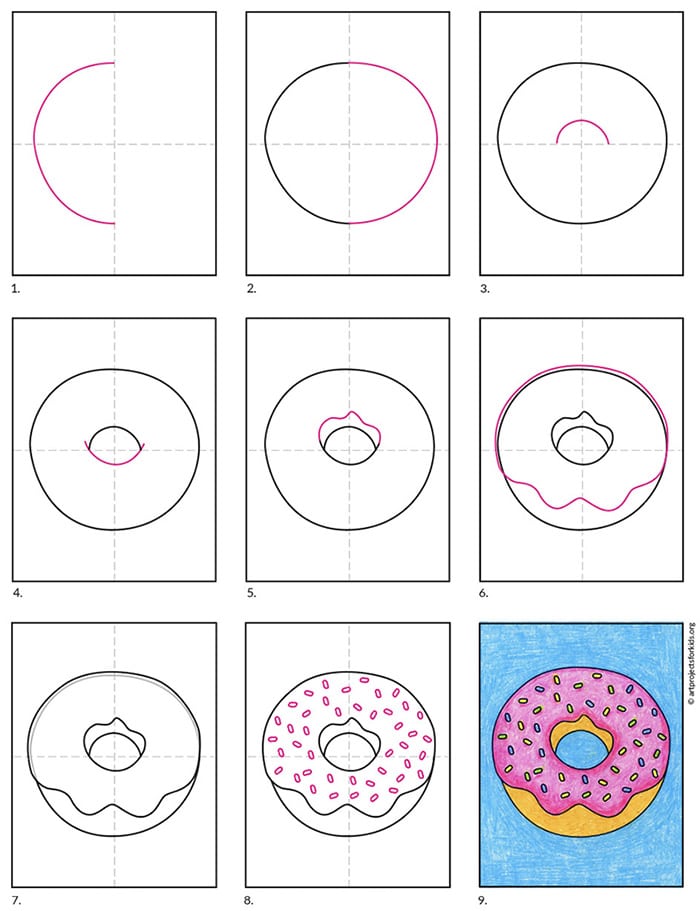
Sketch The Basic Shape
Start by sketching a simple circle for the donut’s outer shape. Then, draw a smaller circle inside to create the hole. This basic shape serves as the foundation for your drawing. Focus on getting the proportions right for a realistic look.
Sketching the basic shape of a donut is the first step toward creating a delicious-looking treat on paper. This part of the drawing process sets the foundation for all the details you’ll add later. By focusing on the simple shapes, you can make the drawing process enjoyable and stress-free. Let’s break it down into two easy steps.
Start With A Circle
Begin your donut sketch with a simple circle. This will be the outer edge of your donut.
– Use a compass for a perfect circle, or simply draw it freehand for a more personal touch.
Don’t worry about making it flawless. The charm of hand-drawn art often lies in its imperfections.
Once you have your circle, take a moment to admire your work. It may seem basic, but this is the crucial starting point for your donut masterpiece.
Add The Inner Hole
Next, you’ll want to add the inner hole. Draw a smaller circle inside your first one.
– Ensure it’s centered; this will create the classic donut shape that everyone recognizes.
You can adjust the size of the inner circle based on your preference. A larger hole gives a more airy feel, while a smaller one offers a more traditional look.
After finishing this step, step back and look at your circles. They should resemble the iconic donut shape already! It’s exciting to see how quickly you can transform simple shapes into something fun and tasty.
Do you feel a spark of creativity yet? Keep pushing forward, and soon you’ll have a delightful donut drawing that’s ready for frosting and sprinkles!
Refine The Outline
Refining the outline is a key step. It helps create a clear shape. This makes your donut look realistic. Focus on smoothing edges and defining thickness. These steps will enhance your drawing.
Smooth The Edges
Smoothing the edges gives your donut a soft look. Use a light touch with your pencil. Gradually round out any sharp corners. Check the outline frequently. Make sure the shape is even and balanced.
Pay attention to the inner circle too. The hole should look natural. Avoid making it too big or too small. A good shape makes a better donut.
Define The Donut’s Thickness
Next, define the thickness of the donut. Imagine how thick you want it to be. Draw a second circle around the first one. This will show the donut’s outer edge.
Make sure the thickness is consistent. Varying thickness can confuse the viewer. Use light lines first, then darken them. This helps you adjust before finalizing your drawing.
Think about where the donut sits. The thickness can change based on its position. Keep this in mind as you refine your outline.
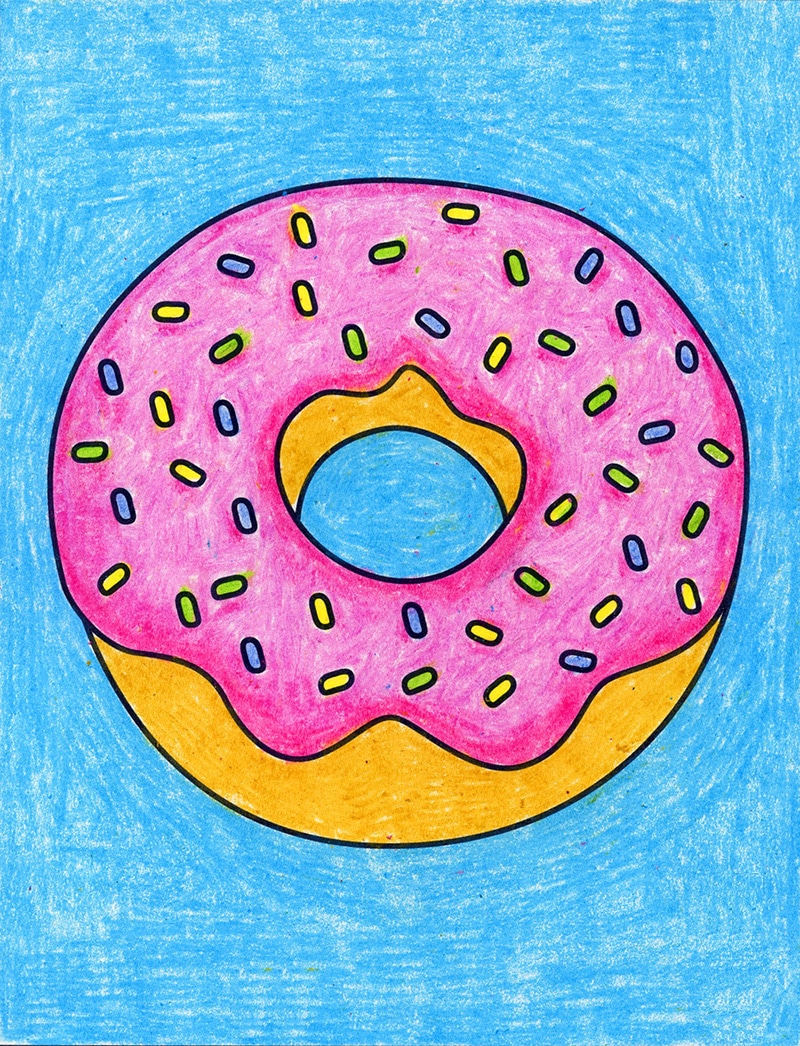
Add The Frosting
Drawing a donut can be fun and easy. Start with a circle for the base, then add a smaller circle inside. For the frosting, create a wavy line on top to show texture. Finally, add sprinkles for extra color and detail.
Enjoy bringing your donut to life!
Adding the frosting to your donut drawing can elevate it from simple to spectacular. Frosting is where you can get creative and give your donut that mouthwatering appeal. Let’s dive into how to draw it perfectly.
Draw The Wavy Frosting Edge
Start by sketching a wavy line along the top edge of your donut. This line should mimic the natural drip of frosting.
Think of how frosting pools and swirls on a freshly baked donut.
Make the waves uneven for a realistic touch.
You want to convey that it’s deliciously thick and inviting.
Don’t hesitate to adjust the wavy line as you go. It’s all about making it look scrumptious!
Cover The Top Area
Now, let’s fill in the space above the wavy line. Use a smooth, curved shape to represent the frosting layer.
Think about your favorite flavors. Is it chocolate, strawberry, or maybe a classic vanilla?
Add texture to the frosting by using short lines or dots.
These little details can mimic sprinkles or a glossy finish.
Consider adding shadows to give it depth.
How about a lighter shade on one side and a darker one on the other? This simple technique can make your drawing pop!
Take a step back and admire your work. How does it look?
Remember, the frosting is not just an addition; it’s the star of the show!
Include Details
Including details makes your donut drawing come to life. Simple shapes become delicious treats. You can add fun elements like sprinkles and toppings. These details capture attention and enhance your artwork.
Sprinkles And Toppings
Sprinkles add color and fun to your donut. Use small circles or dots in various colors. Place them randomly on the icing. This creates a playful look. You can also add chocolate chips or nuts for variety.
Consider adding a drizzle of icing on top. This adds depth and makes the donut look fresh. Use squiggly lines to show the icing. It should look smooth and tasty. Experiment with different colors for more creativity.
Highlight The Texture
Texture brings your donut to life. Use shading to show depth. Darken one side of the donut to create a shadow. This makes it look round and fluffy.
For the icing, use lighter colors. Blend them smoothly to show shine. Add tiny dots or lines to mimic gloss. This gives the icing a wet, fresh appearance.
Don’t forget the donut’s surface. Use small lines to show bumps and imperfections. This adds realism. Your donut should look as good as it tastes.
Credit: artprojectsforkids.org
Shade And Color
Adding shade and color brings your donut to life. It makes your drawing look tasty and realistic. Let’s explore how to choose colors and add depth.
Choose The Donut Base Color
Start with the base color of your donut. Think about what color you want. Common choices are light brown or golden yellow. These colors mimic a freshly baked donut.
Use colored pencils or markers to apply the base color. Lightly color the donut to keep it soft. You can always add more color later.
Add Frosting Colors
Next, choose the frosting color. Popular options include pink, chocolate, and white. Select a color that contrasts with the base.
Color the frosting on top. Be careful around the edges. Use a lighter hand to create a smooth look. This will help the frosting appear creamy.
Shade For Depth And Realism
Shading adds depth and makes your donut pop. Use a darker shade of the base color. Apply it to the edges and bottom of the donut.
For the frosting, add a slightly darker color on one side. This creates the illusion of light and shadow. Blend the colors softly for a natural look.
Remember, practice makes perfect. Keep experimenting with colors and shading techniques. Your donut drawing will improve with each attempt.
Final Touches
The final touches make your donut drawing look complete. This step adds charm and polish. It brings your artwork to life. Let’s dive into how to clean up your lines and enhance those small details.
Clean Up The Lines
Start by erasing any stray marks. Clean lines create a neat look. Use a fine eraser for precision. Smooth out the edges of the donut shape.
Next, go over your drawing with a darker pencil or pen. This adds depth and makes it stand out. Focus on the outer edges first. Then, outline the inner parts, like the hole and frosting.
Enhance Small Details
Details bring interest to your donut. Add sprinkles, shadows, and highlights. Small features make your drawing pop. Use bright colors for sprinkles to add fun.
Consider adding a shadow under the donut. This gives it a more realistic look. Highlight the frosting with a lighter color. This creates a shiny effect, making it look delicious.
Frequently Asked Questions
How To Draw Simple Doughnuts?
To draw simple doughnuts, start with a circle. Add a smaller circle inside for the hole. Outline the shape, then add icing and sprinkles for detail. Use colors to make it pop. Practice different sizes for variety. Enjoy your creative process!
How To Draw A Rainbow 🌈?
To draw a rainbow, start with a curved line for the arch. Add seven colored bands: red, orange, yellow, green, blue, indigo, and violet. Use a light hand for blending colors. Finish with clouds at each end for a whimsical touch.
Enjoy your colorful creation!
How To Draw A Drippy Doughnut?
To draw a drippy doughnut, start with a circle for the base. Add a smaller circle inside for the hole. Draw wavy lines along the top edge for icing. Sketch drips coming down the sides. Color it in with vibrant shades to enhance the drippy effect.
Enjoy your creation!
How To Draw A Pizza 🍕?
To draw a pizza, start with a large circle for the crust. Add a smaller circle inside for the sauce. Sketch toppings like pepperoni, mushrooms, or peppers. Use colors like yellow for cheese and red for sauce. Finish with brown edges for a baked look.
Enjoy your pizza drawing!
Conclusion
Drawing a donut can be a fun and simple activity. Use the steps shared in this post. Practice your skills with different colors and designs. Remember, there is no right or wrong way to draw. Enjoy the process and let your creativity shine.
Share your drawings with friends or family. They may even want to join in on the fun. Keep practicing, and soon you’ll draw donuts with ease. Happy drawing!