Are you ready to unleash your creativity and learn how to draw a lamp? Whether you’re a beginner or looking to sharpen your skills, this guide will make the process simple and enjoyable.
Drawing a lamp can seem daunting, but with the right steps, you’ll find it easier than you think. Imagine impressing your friends with your artistic talents or adding a personal touch to your home decor. By the end of this article, you’ll not only know how to draw a lamp, but you’ll also feel a sense of accomplishment.
Grab your pencil and paper, and let’s get started!
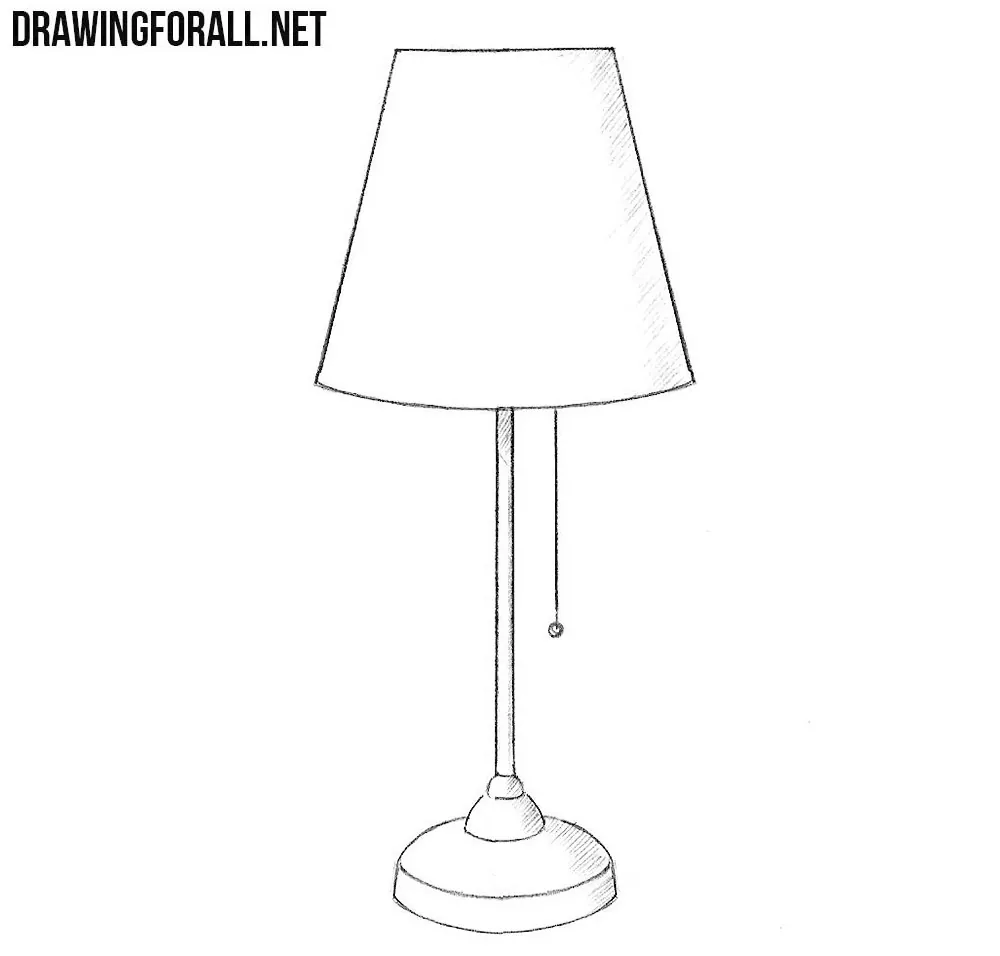
Credit: www.drawingforall.net
Contents
Gather Your Materials
Before you start drawing a lamp, gather your materials. Having everything ready makes the process easier. You will need some basic tools. Let’s look at what you need.
Paper
Choose a good quality paper. Sketching paper is ideal. It should be thick enough to handle pencil and eraser. This helps avoid tears while you work.
Pencils
Use a range of pencils. A soft pencil is great for shading. A harder pencil helps create fine lines. Having different types will improve your drawing.
Eraser
An eraser is a must-have. It helps fix mistakes. Choose one that works well on your paper type. A kneaded eraser can be useful for shading.
Ruler
A ruler helps create straight lines. It is important for drawing the lamp’s base. Precision makes your drawing look more professional.
Reference Image
Find a good reference image of a lamp. This can be a photo or a drawing. Having a visual guide helps you understand shapes and proportions.
Colored Pencils Or Markers
If you want to add color, gather colored pencils or markers. These will enhance your drawing. Choose colors that match your reference image.
Choose Your Lamp Design
Creating a lamp drawing can be fun and easy. Start by sketching the base and shade. Then, add details to make your lamp unique. Enjoy the process of designing your perfect lamp!
Choosing your lamp design is a crucial step in the drawing process. It sets the stage for your creative expression and determines the overall aesthetic of your artwork. Whether you want to go for a classic look or something more modern, the design you pick will influence how you approach the drawing.
Consider Your Style
Think about what reflects your personality. Do you prefer sleek and minimalistic designs, or are you drawn to ornate, vintage styles?
– Minimalistic lamps often have clean lines and simple shapes.
– Vintage lamps can feature intricate details and unique bases.
Selecting a style that resonates with you will make the drawing process more enjoyable.
Choose The Lamp Type
Different types of lamps offer various shapes and features. You can choose from table lamps, floor lamps, or hanging lamps. Each type has its own charm and challenges.
– Table lamps are usually compact and can be more straightforward to draw.
– Floor lamps allow for a more extended silhouette and can introduce dynamic angles.
– Hanging lamps can add a sense of depth to your artwork.
Which type intrigues you the most?
Incorporate Unique Features
Adding distinctive features can elevate your lamp design. Think about the lampshade, base, and any additional elements like patterns or textures.
– A geometric lampshade can create a modern vibe.
– A decorative base adds character to your drawing.
Consider what unique aspects you would like to see in your lamp. This will make your artwork stand out.
Sketch Variations
Don’t hesitate to play around with different designs. Create quick sketches of various lamp styles to see what works best.
1. Draw a simple outline of a lamp.
2. Experiment with different lampshade shapes.
3. Test out various base designs.
This exploration can lead to unexpected ideas. Which design surprised you the most?
Choosing your lamp design is not just about aesthetics; it’s about expressing yourself. Make sure to pick something that excites you and feels personal.
Sketch The Lamp Base
Start by drawing the base of the lamp. This part can be round or square. Keep it simple, focusing on the shape and size. Once the base is done, you can add details for a more realistic look. This is the foundation for your lamp drawing.
Sketching the lamp base is an essential step in creating a well-balanced and visually appealing lamp drawing. The base provides the foundation for your lamp design and can vary in shape and style. By focusing on the lamp base, you’ll set the stage for the rest of your drawing, allowing for creativity and expression.
Draw The Outline Shape
Start by choosing the basic shape of your lamp base. It can be round, square, or even an abstract form. Use light pencil strokes to create the outline.
– For a round base: Draw a circle or an oval.
– For a square base: Sketch a simple square or rectangle.
– For an abstract design: Think outside the box! Maybe a star or a heart shape?
Once you have your outline, ensure it’s symmetrical. This symmetry will help your lamp look polished and balanced. Take a step back and visualize how the lamp will look as a whole. Is the base too wide or too narrow? Adjust as needed.
Add Details To The Base
Now it’s time to add details to your lamp base. Consider the style you want to achieve.
– For a modern look: Keep the lines clean and minimal.
– For a vintage vibe: Add curves and decorative elements like swirls or floral patterns.
You can also introduce texture. A smooth finish can suggest a sleek design, while a rough texture can add character.
Think about materials too. Is your lamp base made of wood, metal, or ceramic? Sketch lines that indicate these textures.
Don’t forget to give your lamp base some depth. Adding shadows can create a three-dimensional effect. Imagine where the light would hit and where shadows would fall. This will enhance the realism of your drawing.
Are you excited to bring your lamp base to life? What unique touches will you add to make it truly yours?
Draw The Lamp Stem
Drawing the lamp stem is an important step. It gives your lamp shape and balance. Let’s explore how to create a strong base for your lamp.
Create A Straight Or Curved Stem
Start by deciding the style of your lamp. A straight stem looks modern. A curved stem adds elegance. Use a pencil to draw lightly.
For a straight stem, draw two parallel lines. Keep them the same length. For a curved stem, draw a gentle arc. Make sure it connects to the lamp base.
Refine The Stem Lines
Once you have the basic shape, refine the lines. Erase any extra marks. Make the lines smooth and clear. This will make your lamp look neat.
Consider adding details. You can add small curves or ridges. These features give your lamp character. Keep your lines consistent for a polished look.
Add The Lampshade
Drawing a lamp can be simple and fun. Start with the base, then sketch the lamp post. Finally, add the lampshade on top. This process helps create a cozy atmosphere in your artwork.
Adding the lampshade to your drawing is a crucial step. It brings character and completeness to your lamp. This is where your creativity can shine through. Let’s break down how to do it effectively.
Outline The Lampshade Shape
Start by deciding on the style of your lampshade. Do you want it to be a classic drum shape or a more modern geometric design?
Draw a light outline of the shape you choose. Use simple lines to sketch the top and bottom edges of the lampshade.
Consider the following tips:
– Use a pencil: This allows you to erase easily if you need to make adjustments.
– Keep it symmetrical: A well-balanced shape makes your lamp look polished.
– Add flair: You can curve the edges or add decorative elements like ruffles or a patterned design.
Your personal touch will make it unique. What kind of vibe do you want your lamp to give off?
Adjust The Proportions
Once you have the basic shape, it’s time to refine it. Look closely at the proportions of your lampshade compared to the lamp base.
Ask yourself:
– Is the shade too wide or too narrow?
– Does it sit comfortably on the lamp?
Make adjustments as needed. You can widen the bottom for a more dramatic effect or narrow it for a sleek look.
After adjusting, consider adding details. Lightly sketch lines to indicate the fabric folds or the texture of the lampshade. These small details can enhance realism and depth.
Always step back and view your drawing from a distance. This will help you see if the proportions feel right. What adjustments can elevate your artwork?
Taking the time to outline and adjust will elevate your lamp drawing from basic to beautiful.
Include The Light Bulb
Adding the light bulb to your lamp drawing brings it to life. It completes the lamp’s look. A well-drawn bulb shines with character. Follow these steps to draw it effectively.
Draw The Bulb Inside The Shade
Start by sketching the shape of the bulb. It should be round at the top and narrow at the bottom. Make sure it fits well inside the lampshade. The bulb should not touch the shade’s edges.
Next, add the base of the bulb. This is a small rectangle at the bottom. It connects the bulb to the lamp’s socket. Keep the lines smooth and even for a clean look.
Add Details To The Bulb
Now, focus on the bulb’s details. Draw a thin line around the bulb’s edge. This represents the glass outline. It makes the bulb look more realistic.
Include some shading to show depth. Lightly shade one side of the bulb. This gives it a rounded appearance.
Finally, add a small light reflection. This can be a tiny oval shape on the glass. It shows the bulb is shiny and bright.
Enhance With Decorative Details
Decorative details make your lamp unique. Small touches add personality. Think about patterns, textures, and colors. These elements can elevate your drawing.
Let’s explore how to enhance your lamp with decorative details.
Add Patterns To The Lampshade
Patterns create visual interest on the lampshade. Simple stripes or polka dots work well. You can also try floral or geometric designs.
Use a pencil for light sketching first. This way, you can adjust as needed. Once satisfied, outline with a pen or darker pencil.
Remember, balance is key. Don’t overcrowd the shade. Leave some space for the light to shine through.
Include Textures On The Base
Textures give depth to your lamp’s base. Try wood grain or smooth surfaces. You can even add a metallic look.
Use different shading techniques. Cross-hatching creates a rough texture. Smooth shading gives a polished appearance.
Experiment with colors too. A dark base with a light shade looks stunning. Play with contrasts to make your lamp pop.
Refine The Drawing
Drawing a lamp can be simple and fun. Start with basic shapes to form the base and shade. Add details like patterns or light effects to bring your lamp to life. Enjoy creating your unique design!
Refining your drawing is a crucial step that can elevate your lamp sketch from basic to breathtaking. This phase allows you to enhance details and ensure your artwork looks polished. Let’s dive into two important aspects of refining your lamp drawing: cleaning up rough lines and ensuring proportional balance.
Clean Up Rough Lines
Start by examining your drawing closely. Do you see any shaky or uneven lines? Grab an eraser and gently lighten these areas. Use a fine-tipped pencil or pen to retrace and smooth out the outlines.
This is your chance to breathe life into the lamp. Focus on the curves of the lamp’s shade and the straightness of the base.
Consider adding subtle details, like the texture of the lampshade or the shine of the bulb. These elements can make your drawing pop.
Ask yourself: Are the lines conveying the character of the lamp?
Ensure Proportional Balance
Next, take a step back and look at the overall proportions of your lamp. Does the base look too large compared to the shade?
Measuring can help. Use a pencil to gauge the height and width of each part. Adjust where necessary to achieve harmony in your design.
Think about how a well-balanced lamp not only looks appealing but also serves its purpose.
A disproportionate lamp may look odd and uninviting.
As you refine, keep asking: Does this lamp feel right?
With practice, you’ll develop an eye for balance that will enhance all your future drawings.
Add Shadows And Highlights
Adding shadows and highlights brings life to your lamp drawing. Use darker shades to show where light doesn’t reach. Bright areas can highlight curves and edges, creating depth and realism. Experiment with different tones for a more dynamic look.
Adding shadows and highlights is a crucial step in bringing your lamp drawing to life. It adds depth and realism, transforming a simple outline into a three-dimensional object. This technique can make your artwork pop and capture the viewer’s attention.
Identify Light Source
Start by determining where the light is coming from. Is it a sunny window, a lamp beside your drawing, or perhaps an overhead light?
Knowing the light source is vital for accurate shading. It will help you understand where the brightest highlights and the darkest shadows should be placed.
Take a moment to visualize how the light interacts with your lamp. Notice how the light creates bright spots and where it leaves shadows. This observation will guide your shading process.
Apply Shading Techniques
Once you’ve identified your light source, it’s time to add shadows. Use a pencil to create darker areas where the light doesn’t reach. You can apply different techniques like hatching or cross-hatching to achieve various effects.
Start with light pressure and gradually increase it to build depth. This approach allows you to control the darkness and create a smooth transition between light and shadow.
Add highlights next. For these, you can use an eraser to lift some graphite off the paper, creating bright spots that suggest where light hits the lamp.
Experiment with layering your shadows and highlights. Each layer can add richness to your drawing.
As you work, ask yourself: Does the light look natural? Are the shadows convincing? Adjust as needed until it feels just right.
This process not only enhances your drawing but also sharpens your observation skills. Every time you practice, you’ll see improvement in your ability to capture light and shadow in your artwork.

Credit: dragoart.com
Final Touches
Final touches bring your lamp drawing to life. This stage is where details matter. You can refine shapes and add depth. It enhances the overall look of your artwork. Take your time to make it shine.
Review The Drawing
Start by looking closely at your drawing. Check the proportions and shapes. Ensure the base, shade, and light are balanced. Look for any lines that seem off. A fresh pair of eyes can help.
Step back and view your drawing from a distance. This helps spot any mistakes. Make notes on what needs fixing. Consider the overall feel of the lamp. Does it match your vision?
Make Necessary Adjustments
Now, make the changes you noted. Erase any lines that look incorrect. Redraw sections to improve their shape. Add shading to create depth. Shadows can make your lamp look realistic.
Use a fine-tipped pen for details. Outline the edges to give definition. This adds a polished look to your work. Small touches can change everything.
Finally, step back again. Make sure it looks complete. Your lamp drawing should reflect your style. Enjoy the process of making it your own.

Credit: www.youtube.com
Frequently Asked Questions
How To Make A Lamp Easy Drawing?
To draw a lamp easily, start with a simple base shape like a rectangle. Add a curved line for the lampshade. Sketch a straight line for the lamp’s neck. Finally, include details like light rays or patterns on the shade.
Keep it simple and fun!
How To Draw A 3d Table Lamp?
To draw a 3D table lamp, start with a simple base shape. Add the lampshade above the base, ensuring it appears wider. Use shading to create depth and dimension. Include a light bulb inside the shade. Finish with details like a cord and texture for realism.
How To Draw An Easy Lantern?
To draw an easy lantern, start with a rectangle for the body. Add a curved top and a small handle. Draw vertical lines for details and a flame shape inside. Color it bright to make it stand out. Enjoy your creative process!
What Is The Best Lamp For Drawing?
The best lamp for drawing is a bright, adjustable LED lamp. Look for options with color temperature control and a flexible arm. A lamp with a dimmer feature enhances versatility for various drawing tasks. Brands like OttLite and BenQ offer excellent choices for artists.
Conclusion
Drawing a lamp is a fun and creative activity. It allows you to express your style. With simple steps, anyone can do it. Remember to practice often. Each attempt improves your skills. Use different colors and shapes to make it unique.
Share your drawings with friends and family. They will love to see your work. Keep exploring your creativity. Drawing can be relaxing and rewarding. Enjoy the process and have fun. Your lamp drawing journey has just begun.