Ropes are simple objects in real life, yet they can be surprisingly complex to draw convincingly. Their twisted textures, curves, and shadows require attention to detail, making them a valuable exercise for improving your drawing skills. Whether you’re creating realistic sketches, cartoon-style illustrations, or fantasy artworks, mastering how to draw a rope can add depth and realism to your compositions.
This guide explores different techniques for drawing ropes. From basic outlines to intricate braided patterns, you’ll learn how to create ropes that look natural and three-dimensional. By the end of this tutorial, you’ll have the confidence to draw ropes in various styles, positions, and contexts.
Contents
- Why Learn to Draw a Rope?
- Tools and Materials for Drawing Ropes
- Understanding Rope Structure
- Step-by-Step Guide: How to Draw a Basic Rope
- Drawing Different Types of Ropes
- How to Draw Ropes in Different Positions
- Adding Realism Through Texture and Shading
- Drawing Ropes in Context
- Artistic Styles for Rope Drawing
- Advanced Techniques for Dynamic Ropes
- Practicing Rope Drawing Skills
- Common Mistakes to Avoid
- Creative Ideas for Rope Illustrations
- Final Words
Why Learn to Draw a Rope?
Enhancing realism
Ropes appear in many artworks — nautical scenes, adventure illustrations, decorative borders, or everyday objects. Learning to draw them well makes your work more believable.
Practicing texture and shading
Ropes are excellent for improving skills in capturing texture, as their twisted strands and shadows provide a natural challenge.
Expanding artistic versatility
Being able to draw ropes allows you to incorporate them into more complex pieces, such as tied bundles, climbing gear, or character props.
Tools and Materials for Drawing Ropes
Traditional drawing tools
- Pencils: Use H-grade pencils for fine outlines and B-grade for darker shading.
- Erasers: Kneaded erasers help lift highlights.
- Paper: Smooth paper works for detailed lines; textured paper enhances shading effects.
- Rulers: Helpful for maintaining symmetry in braided patterns.
Digital drawing tools
- Drawing tablets: Allow control for curved lines and intricate details.
- Software: Programs with textured brushes help simulate rope fibers.
- Layers: Useful for experimenting with shading and highlights separately.
Understanding Rope Structure
Twisted ropes
Made of two or three strands twisted together. These are the most common and easiest to draw.
Braided ropes
Feature multiple strands woven into complex patterns, ideal for decorative or fantasy artworks.
Coiled ropes
Ropes often appear coiled or looped, requiring an understanding of perspective and overlapping forms.
Step-by-Step Guide: How to Draw a Basic Rope
Step 1: Sketch the outline
Draw two parallel curved lines to represent the path of the rope. Adjust curves to suggest movement or tension.
Step 2: Divide into segments
Mark small diagonal lines along the rope’s length. These will guide the twisted strands.
Step 3: Add twisted details
Using the diagonal guides, draw interlocking curves that alternate direction. This creates the illusion of strands wrapping around each other.
Step 4: Refine the edges
Smooth out the outline to give the rope a consistent thickness. Ensure twists taper naturally at curves.
Step 5: Add shading
- Darken one side of each twist to suggest depth.
- Add highlights where light hits the rope.
- Use small strokes to mimic the fiber texture.
Drawing Different Types of Ropes
Twisted three-strand rope
The most traditional rope style, perfect for nautical or industrial scenes.
- Draw three evenly spaced curves twisting along the rope’s length.
- Keep strands consistent in size and direction.
- Shade each strand separately for dimensionality.
Braided rope
More complex and decorative.
- Start with multiple thin strands.
- Weave them over and under each other in a repeating pattern.
- Use high contrast shading to make the braid pop.
Thick industrial rope
Emphasize bulk by exaggerating strand thickness. Add rough textures to suggest wear.
How to Draw Ropes in Different Positions
Straight ropes
Ideal for practicing twists and textures without dealing with perspective.
Curved ropes
Use overlapping strands to maintain the twisted effect around bends.
Hanging ropes
Add tension by narrowing the rope slightly at the top and thickening near the bottom for weight.
Coiled ropes
- Start with concentric circles for the coil base.
- Add twists to each layer.
- Use shading to distinguish overlapping sections.
Adding Realism Through Texture and Shading
Fiber texture
Use short, fine strokes along the rope’s length to suggest individual fibers.
Shadows and highlights
- Soft shadows make ropes appear smooth.
- Sharp contrasts suggest rougher textures.
Worn ropes
Add frayed edges, broken fibers, or uneven thickness for a weathered effect.
Drawing Ropes in Context
Nautical scenes
Include ropes tied to anchors, wrapped around cleats, or hanging from masts.
Adventure illustrations
Show ropes as climbing gear, tied to rocks, or swinging from trees.
Decorative borders
Create stylized rope patterns framing a composition, either twisted or braided.
Artistic Styles for Rope Drawing
Realistic rendering
Focus on accurate texture and subtle shading to make the rope look tangible.
Cartoon or comic style
Simplify twists and use bold lines with minimal shading for clarity.
Fantasy ropes
Experiment with unusual textures, glowing effects, or magical patterns woven into the strands.
Advanced Techniques for Dynamic Ropes
Foreshortening ropes
Draw ropes that appear to recede into the background by tapering width and compressing twists.
Ropes in motion
Show slight blur or exaggerated curves to suggest swinging or snapping movement.
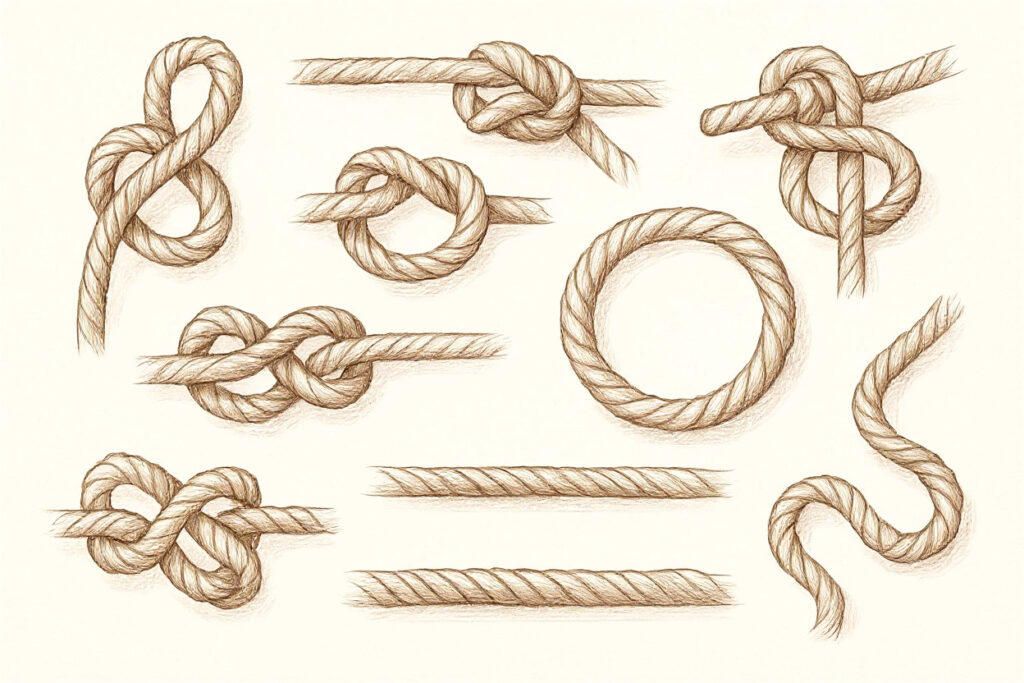
Ropes with knots
- Begin with the basic rope.
- Wrap and overlap strands to form the knot.
- Use shadows to make overlaps stand out.
Practicing Rope Drawing Skills
Quick sketches
Draw 10 ropes in 10 minutes to improve speed and observation.
Light studies
Render ropes under different lighting conditions — harsh sunlight, soft indoor light, or dramatic shadows.
Texture experiments
Focus solely on fibers and fraying effects to enhance realism.
Style variations
Redraw the same rope in realistic, abstract, and stylized formats to broaden versatility.
Common Mistakes to Avoid
Inconsistent twists
Keep strand thickness and spacing uniform for realism.
Overly flat shading
Add highlights and shadows to prevent ropes from appearing like flat ribbons.
Ignoring perspective
Adjust twists and thickness as ropes curve or move into the distance.
Creative Ideas for Rope Illustrations
Storytelling ropes
Depict ropes holding something important, like a treasure chest or suspended bridge.
Thematic designs
Use ropes to form letters or shapes, perfect for posters or graphic art.
Surreal ropes
Create ropes that transform into vines, snakes, or glowing energy strands.
Final Words
Mastering how to draw a rope opens up countless possibilities for your artwork. From basic twisted designs to complex braided patterns, ropes can be both functional and decorative in your illustrations. By practicing perspective, texture, and shading, you can create ropes that look dynamic and believable, no matter the style or context.
Every rope you draw builds your confidence and creativity. Start with simple exercises, experiment with advanced techniques, and soon you’ll be able to integrate ropes seamlessly into any composition — from realistic sketches to imaginative fantasy scenes.