Are you ready to turn a blank canvas into a stunning surfboard sketch? Drawing a surfboard might seem challenging at first, but with a little guidance, anyone can do it.
Imagine capturing the sleek lines and vibrant colors of a surfboard with just a pencil and paper. You can do it, and I’m here to show you how. In this step-by-step guide, you’ll discover simple techniques that will have you drawing like a pro in no time.
Whether you’re a beginner or just looking to refine your skills, this guide will keep you engaged and excited every step of the way. So, grab your drawing tools, and let’s dive into the world of surfboard art together.
Contents
Materials Needed
Creating art requires the right tools. Drawing a surfboard is no exception. Choosing the correct materials makes your process smoother. The right supplies help you bring your vision to life. Let’s explore what you need to draw a surfboard.
1. Paper Or Canvas
Start with a good surface. You can choose paper or canvas. Paper is easy to use and cost-effective. For a more durable option, canvas works well. It provides a textured feel and professional look.
2. Pencils
Pencils are essential for sketching. Use different grades for varied effects. A hard pencil makes fine lines. A softer pencil creates shading and depth. Mechanical pencils offer precision without sharpening.
3. Erasers
Errors are part of the process. Keep an eraser handy. Choose a soft eraser for clean corrections. A kneaded eraser helps with light adjustments. It allows more control over your artwork.
4. Rulers
Surfboards have straight edges. Use a ruler for accuracy. A flexible ruler helps with curves. For finer details, a small ruler works best. It ensures your design is balanced.
5. Colored Pencils
Bring your surfboard to life with color. Colored pencils add vibrancy. They offer a wide range of hues. Layer colors for a rich effect. Blend them for seamless transitions.
6. Markers
Markers add boldness to your artwork. Use them for outlines and details. They provide sharp contrasts. Choose waterproof markers for lasting results. Experiment with different tip sizes.
7. Reference Images
Visual guides aid your creativity. Reference images spark ideas. Study real surfboards for inspiration. Notice the shapes and patterns. They help you understand proportions.
Choosing The Right Surfboard Shape
Choosing the ideal surfboard shape begins with understanding how to draw a surfboard. Sketch basic outlines using smooth curves, considering length and width for stability and maneuverability. Tail shapes influence performance; experiment with different designs to find what suits your style.
Choosing the right surfboard shape can make a significant difference in your drawing. Each surfboard shape has its own unique features and characteristics that cater to different styles and preferences. Whether you’re aiming for a classic longboard look or a sleek shortboard, understanding the differences will help you depict them accurately in your artwork.
Understanding Different Surfboard Shapes
Surfboards come in various shapes, each designed for specific surfing conditions and styles. Shortboards are typically around 5 to 7 feet long, ideal for fast and powerful waves. They feature a pointed nose and a narrow tail, which can be a fun challenge to draw due to their sleek lines.
On the other hand, longboards are generally over 9 feet and have a rounded nose. Their wide, smooth curves make them easier to draw, especially for beginners who are just getting the hang of capturing the right proportions.
Considering The Surfboard’s Purpose
Think about what kind of surfing you want to represent in your drawing. Are you capturing the thrill of cutting through a wave, or the relaxed vibe of cruising along the shore? Shortboards are great for dynamic action scenes, while longboards suit more laid-back, serene settings.
For instance, if you’re drawing a surf scene with a surfer doing tricks, a shortboard with its defined edges and sharp angles would be appropriate. If your scene is about a calm day at the beach, a longboard with gentle, flowing lines would convey that feeling.
Personalizing Your Surfboard Design
Once you’ve decided on the shape, think about adding personalized elements to your surfboard design. You could include unique patterns, logos, or even a distinctive color scheme.
Consider the personality of your surfer character. Do they have a bold, adventurous style, or are they more about elegance and grace? Reflecting this in the surfboard design not only adds depth to your drawing but also makes it more engaging.
Practice And Experiment
Don’t be afraid to experiment with different shapes and designs. Use sketch paper to try out various surfboard shapes and see which ones resonate with your artistic style. Practice is key in honing your ability to capture the essence of each surfboard shape.
Try drawing from different angles to understand how the shape looks in three dimensions. This will help you when you decide to create more complex scenes or when you’re ready to add other elements like waves and surfers to your drawing.
Remember, the right shape is not just about the physical design—it’s about the story you’re telling. How will the surfboard shape contribute to the overall mood and narrative of your artwork?
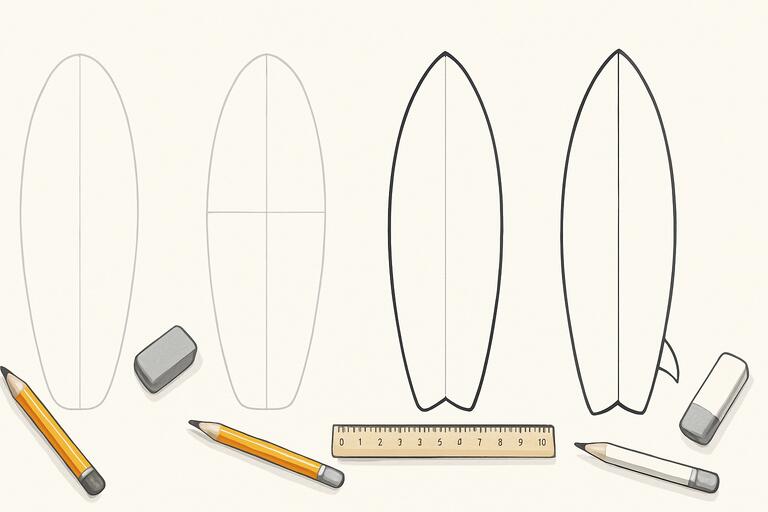
Sketching The Outline
Sketching the outline of a surfboard is a rewarding task. It is the first step to creating your own surfboard art. With a few simple techniques, you can achieve an accurate outline. This guide will help you through the process with easy steps.
Drawing The Board’s Length
Start with a straight line for the board’s length. This line is the center of your surfboard. It will guide you in shaping the board. Use a ruler for precision. Keep this line light, so it’s easy to adjust later.
Curving The Nose And Tail
Next, focus on the surfboard’s nose and tail. The nose is the front, and the tail is the back. To draw the nose, make a gentle curve at the top of the center line. It should resemble a soft point. For the tail, draw a similar curve at the bottom. The tail might be wider, depending on your design.
These curves give the surfboard its unique shape. Adjust them until you’re satisfied. Remember, practice makes perfect. Repeat these steps to refine your surfboard sketch.
Adding Details
Once you’ve sketched the basic shape of your surfboard, it’s time to add details that bring your drawing to life. Adding details is like putting the final touches on a masterpiece, where every line and curve matters. It’s not just about aesthetics; these elements define the board’s functionality and personality. As you dive into the details, think about how each component impacts the surfboard’s performance. Let’s break it down into two essential parts: designing the fins and outlining the rails.
Designing The Fins
The fins are crucial for stability and maneuverability in the water. As you draw them, consider how their size and placement can change the surfing experience. Start by sketching three fins—two smaller ones at the sides and a larger one in the center. This configuration offers balanced control.
Think about what kind of surfer you are. If you love riding big waves, opt for larger, more angled fins for greater control. Remember, the fins’ curve should be smooth and aerodynamic, mimicking how they slice through the water.
Imagine the sensation of gliding over a wave with perfect precision. That’s what the right fin design offers. Are you ready to make your surfboard unique with personalized fin designs?
Outlining The Rails
Rails define the board’s edges and affect how it cuts through water. Begin by drawing a smooth, continuous line along the board’s perimeter. This line should mirror the surfboard’s curves, creating a fluid and cohesive look.
Consider how the rails contribute to the board’s performance. Thicker rails offer more stability, while thinner rails enhance speed and agility. Your choice reflects your style—whether you prefer cruising or quick turns.
Picture yourself carving a sharp turn on a wave, with the rails gripping the water perfectly. That’s the magic of well-designed rails. How will your rail outline influence your next surfing adventure?
By focusing on these details, you transform a simple sketch into a surfboard that’s ready to hit the waves. What’s your vision for your perfect surfboard design?
Creating The Deck
Creating the deck of a surfboard is an exciting part of drawing. This section focuses on giving your surfboard character and style. The deck is the top surface where surfers stand. So, it’s important to get it right.
Adding Texture
Texture adds depth and realism to your surfboard drawing. Start by sketching light lines across the deck. These lines mimic the grain of the wood. Use gentle strokes to keep it looking natural. Vary the pressure on your pencil to create different shades. This makes the texture appear more realistic. Shading is key here. It helps give the deck a sense of dimension.
Highlighting The Stringer
The stringer is the surfboard’s backbone. It’s a thin strip running down the center. Draw a straight line from top to bottom of the deck. Make sure it’s centered. This line should be bold to stand out. The stringer often contrasts with the deck’s texture. You can use a darker pencil or pen for this. Highlighting the stringer adds structure to the surfboard. It gives the drawing a more complete look.

Credit: www.pinterest.com
Shading And Coloring
Shading and coloring bring a surfboard drawing to life. They add depth and dimension, transforming a simple sketch into a vibrant artwork. Understanding how to shade and color effectively can make all the difference.
Applying Base Colors
Start with selecting your base colors. Choose hues that match the surfboard design. Use light strokes for an even coat. Begin with the largest areas first. This helps maintain a clean look. Blend different shades for a natural effect. Mixing colors can create unique patterns.
Enhancing With Shadows
Shadows add realism to your drawing. Identify where light hits the surfboard. Shadows fall opposite the light source. Use darker shades to create shadows. This gives the board a three-dimensional feel. Apply gradually to avoid harsh lines. Soft transitions look more natural. Use a blending tool for smoother edges. Shadows can highlight curves and contours.
Final Touches
Once you’ve sketched the basic outline of your surfboard, it’s time to focus on the final touches. These details can make your drawing stand out and look more realistic. Think of this as the icing on the cake—small tweaks that enhance the overall look.
Refining Edges
Refining the edges of your surfboard is crucial for a polished look. Use a sharp pencil or fine-line pen to trace over the outline. This will help define the shape and make it pop.
Take your time with this step. Rushed lines can look messy. A steady hand can add that professional touch you’re aiming for.
Consider how a real surfboard looks. The edges are smooth and even, not jagged or rough. Pay attention to the curves, especially around the nose and tail of the board.
Adding Artistic Elements
Now that your edges are refined, it’s time to add some artistic flair. This is where your creativity can shine. Adding designs or colors can make your surfboard drawing unique.
You might want to draw a logo or pattern on the board. Think of what you’d like to see if you were hitting the waves yourself. This personal touch can add a lot of character to your drawing.
Consider shading to create depth. Lightly shade areas to give the impression of a curved surface. This can make your drawing feel more three-dimensional.
What elements will make your surfboard drawing stand out? Are there any favorite colors or patterns you want to try? These are the kinds of questions that can guide your creative process.
Remember, the final touches are what make your drawing uniquely yours. Take the time to refine and add elements that resonate with you. Your surfboard will reflect your personal style, ready to ride the imaginary waves of your canvas.

Credit: www.youtube.com

Credit: helloartsy.com
Frequently Asked Questions
How Do You Start Drawing A Surfboard?
Begin by sketching an elongated oval shape. This forms the surfboard’s basic outline. Add a pointed tip for the nose and a rounded tail. Ensure symmetry for a realistic look. Use light pencil strokes for easy adjustments. This foundational shape is crucial for detailing later.
What Tools Do You Need To Draw A Surfboard?
To draw a surfboard, use pencils, erasers, and a ruler. Start with a light pencil for sketching. A ruler helps maintain symmetry. For detailing, fine-tipped pens or markers are ideal. An eraser is essential for refining your outline and correcting mistakes.
How Can You Add Details To A Surfboard Drawing?
After sketching the outline, add fins, logos, and deck patterns. Use reference images for accuracy. Fins are typically triangular. Logos can be custom designs. Deck patterns vary, so be creative. Detailing adds personality and realism to your surfboard drawing.
What Are Common Mistakes When Drawing Surfboards?
Common mistakes include uneven symmetry, incorrect proportions, and lack of detail. Ensure both sides of the surfboard are symmetrical. Check proportions by comparing with reference images. Details like fins and logos add realism. Avoid rushing; take time to refine your drawing.
Conclusion
Drawing a surfboard is fun and rewarding. You’ve learned the basics today. Remember to practice each step slowly. Focus on shapes and details. Your skills will improve over time. Use different colors for creativity. Share your surfboard drawings with friends.
Get feedback and grow your talent. Drawing is a journey, not a race. Enjoy every moment of it. Keep your enthusiasm alive. Explore new styles and ideas. Happy drawing, and keep the waves in your art!