Drawing anime curly hair may seem overwhelming at first, but once you understand the core concepts of flow, volume, and texture, it becomes much easier to create captivating styles for your characters. Whether you’re sketching soft waves, loose spirals, or tight ringlets, anime curly hair can give your character personality, charm, and movement.
This step-by-step guide will walk you through everything from the basic head structure to building realistic curls, stylized anime shading, and variations for different curl types. You’ll also learn tips for drawing from different angles and how to make your curly-haired anime characters stand out with clean, expressive design.
Contents
- Why Learn to Draw Anime Curly Hair
- Understanding the Basics of Hair in Anime
- Tools You Can Use
- Step-by-Step: How to Draw Anime Curly Hair
- Step 1: Sketch the Head and Hairline
- Step 2: Define the Hair Volume and Shape
- Step 3: Break Hair Into Sections
- Step 4: Sketch Curls Within Each Section
- Step 5: Refine the Line Work
- Step 6: Add Texture and Details
- Step 7: Shade the Hair
- Step 8: Color Your Curls
- Drawing Curly Hair at Different Angles
- Anime Curly Hairstyles to Try
- Common Mistakes and How to Avoid Them
- Practice Tips for Drawing Better Curly Hair
- Inspiration and References
- Frequently Asked Questions
- Final Thoughts
Why Learn to Draw Anime Curly Hair
Hair is one of the most expressive features in anime art. It conveys personality, energy, and even mood. Straight or spiky hair is common, but curly hair adds complexity and flair. Mastering curly hairstyles gives you more options when designing original characters.
How Curly Hair Enhances Character Design
- Gives volume and energy to the character
- Helps indicate personality (quirky, elegant, wild, romantic)
- Adds a sense of motion and life to still drawings
- Breaks the monotony of typical anime hair styles
Learning how to draw curls properly adds a professional touch to your illustrations.
Understanding the Basics of Hair in Anime
Before diving into curls, it’s essential to grasp the basics of anime hair structure. Anime artists stylize hair in a simplified yet dynamic way, often breaking it into clumps rather than drawing individual strands.
How Anime Hair Works
- Hair is drawn in sections or “locks” that suggest the overall shape
- Direction, flow, and weight help communicate realism and emotion
- Exaggeration (volume, spikes, bounce) is often used for style
Curly hair can be translated into this stylized system by thinking of it as flowing, twisted shapes grouped into consistent forms.
Tools You Can Use
Drawing curly anime hair can be done with traditional materials or digitally, depending on your style preference.
For Traditional Drawing
- Mechanical or standard pencils (HB–2B)
- Erasers (kneaded and precision types)
- Fine liners for inking
- Colored pencils or markers for shading
For Digital Drawing
- Drawing tablet or iPad with stylus
- Software like Clip Studio Paint, Procreate, or Photoshop
- Pressure-sensitive brush tools for line variation
- Layers for sketching, inking, and coloring separately
Both methods allow for layering your drawing and making clean corrections, which is helpful when creating curly shapes.
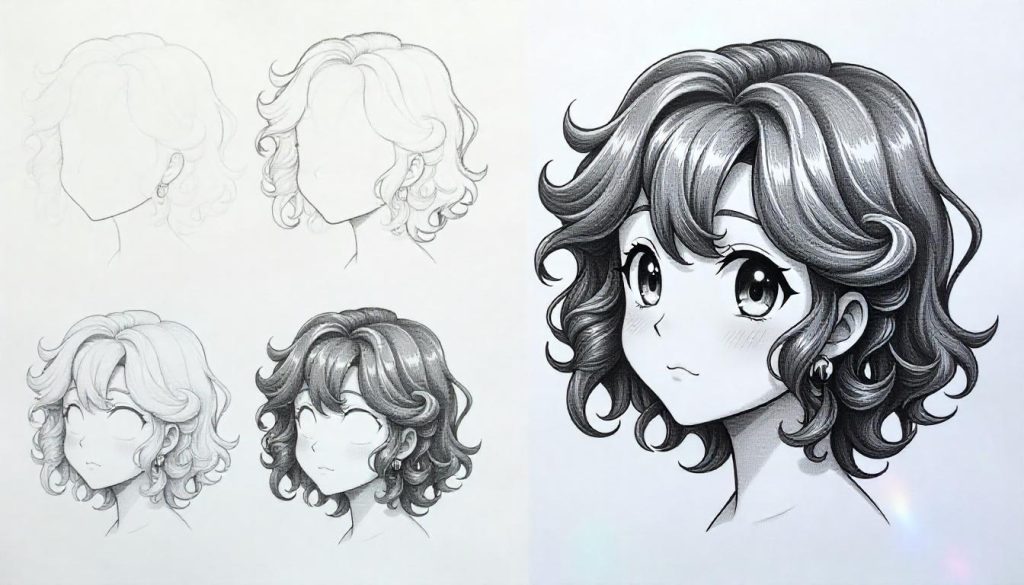
Step-by-Step: How to Draw Anime Curly Hair
This section covers the core process from start to finish. Whether your character has long ringlets or short bouncy curls, this method works for all types of curls.
Step 1: Sketch the Head and Hairline
Always begin with the base structure of your character’s head. This foundation helps you build hair that wraps naturally around the scalp.
Drawing the Head Shape
- Start with a circle for the skull
- Extend the chin downward for the jaw shape
- Add vertical and horizontal guidelines to center facial features
Add the Hairline
- Mark a soft curve where the forehead ends
- This guideline helps ensure your curls emerge naturally from the scalp
The hairline can vary depending on your character’s age, gender, and style.
Step 2: Define the Hair Volume and Shape
Curls need space. Curly hair tends to expand outward and upward depending on the curl type.
Draw a Loose Outline
- Use light lines to sketch the outer shape of the hair
- Avoid flattening it against the skull—give it bounce and lift
- Let curls spread wide or droop depending on length and gravity
Think about how your character would style their curls: messy and loose or sleek and defined.
Step 3: Break Hair Into Sections
Rather than drawing curls randomly, group the hair into logical chunks or clumps. Each chunk will have its own flow and curl pattern.
Divide the Head into Regions
- Top (crown area)
- Sides (temples)
- Back (nape of the neck)
- Bangs or fringe (optional)
Work with these sections to build up the full hairstyle piece by piece.
Step 4: Sketch Curls Within Each Section
Now it’s time to start forming the curls. Begin with a rough layout and refine as you go.
Drawing Loose Curls
- Use long, flowing S-curves
- Let each section overlap slightly for a natural look
- Emphasize softness and motion
Drawing Tight Spirals
- Use coils that taper as they twist
- Show depth by overlapping loops
- Use more defined spiral curves for volume
Drawing Wavy Hair
- Create elongated curves that suggest bends rather than full curls
- Great for more subtle or romantic styles
Match curl type to character personality and hairstyle preference.
Step 5: Refine the Line Work
Once you’ve roughed out the full hairstyle, clean up your drawing by going over it with more confident lines.
Ink or Darken the Final Lines
- Use varied line weight for depth (thicker near scalp, thinner at ends)
- Erase sketchy construction lines
- Emphasize curl edges and overlapping shapes
A clean outline helps prepare your drawing for shading or coloring.
Step 6: Add Texture and Details
Curly hair benefits from subtle internal details like strand lines, inner curves, and texture marks.
Detail Tips
- Add a few fine lines inside each curl group to show twist
- Don’t overdo it—anime hair thrives on simplicity
- Include some “flyaway” strands for realism and movement
Details add depth and interest to your curls without overwhelming the design.
Step 7: Shade the Hair
Shading gives curls dimension and weight. It also helps show light source and volume.
Anime Hair Shading Techniques
- Use solid cell shading for stylized anime effect
- Block in shadows under layers and within dense curls
- Highlight the top of curls and curved edges
For digital work, you can use a multiply layer for shadows and a screen or overlay layer for highlights.
Step 8: Color Your Curls
If you’re working in color, it’s time to apply your base tones and gradients.
Tips for Coloring Curly Hair
- Pick a base color that suits your character’s personality
- Use deeper versions of the base color in shadowed areas
- Add soft gradients or light streaks for shine
- Layer multiple hues for realism: dark roots, sun-kissed tips
Experiment with soft blush tones, rich browns, or even bright fantasy colors like pink or teal.
Drawing Curly Hair at Different Angles
Mastering different angles is crucial for consistency in comics, character sheets, and animations.
Front View
- Hair should frame the face symmetrically or asymmetrically
- Let curls fall around shoulders or bounce outward
Side View
- Emphasize curls near the ear and nape
- Show the shape of the skull under the hair volume
Back View
- Show mass and grouping without individual strands
- Use overlapping waves or spirals
Practicing rotations helps you build full character profiles.
Anime Curly Hairstyles to Try
There are endless possibilities when designing anime characters with curly hair.
Short Curly Hair
- Fluffy curls that frame the cheeks
- Great for energetic or childlike characters
Medium-Length Curls
- Balanced curls around the neck and shoulders
- Good for romantic or scholarly characters
Long Ringlets
- Elegant, fantasy-inspired curls
- Great for magical or aristocratic designs
Afro-Textured Styles
- Voluminous shapes with tight curls or coils
- Strong visual identity and movement
Try mixing these styles to create truly unique characters.
Common Mistakes and How to Avoid Them
It’s easy to fall into a few common traps when drawing curly anime hair.
Mistakes to Watch For
- Making curls too uniform and stiff
- Not following the hair’s natural direction from the scalp
- Ignoring volume—curls need space
- Adding too many lines and losing clarity
Keep your lines loose and energetic. Focus on shape over strand count.
Practice Tips for Drawing Better Curly Hair
Like any skill, drawing curly hair improves with repetition and study.
How to Practice
- Copy real-life curly hair photos using anime styling
- Create multiple variations of the same head with different curl types
- Fill sketch pages with mini studies of curls from various angles
- Trace curls to learn shape flow, then draw freehand versions
A regular sketch routine accelerates improvement.
Inspiration and References
Look to your favorite anime series or character designers to see how they stylize curly hair.
Anime Characters with Curly Hair
- Mami Tomoe (Puella Magi Madoka Magica) – soft curls
- Sōsuke Aizen (Bleach) – loose waves
- Rika Shinozaki (Sword Art Online) – defined curly layers
- Meruem (Hunter x Hunter) – short textured curls
Study how different artists simplify and exaggerate curl textures.
Frequently Asked Questions
How can I draw curls quickly?
Practice using S-shaped strokes in quick succession. Limit each curl section to 2–3 strokes for speed without losing detail.
What brush should I use digitally?
A soft round brush or hair-textured brush with pressure sensitivity helps create clean lines and tapered curls.
How do I make curls look shiny?
Leave white space on the outer curve of the hair or use a highlight stroke shaped like a curved comma for anime-style shine.
Can I combine straight and curly hair?
Absolutely. You can design hybrid hairstyles with straight bangs and curly ends or half-straight, half-wavy layers for interest.
Final Thoughts
Anime curly hair may look intricate, but once you break it down into basic sections, flowing curls, and confident shading, it becomes a fun and dynamic feature to master. Use this step-by-step approach to build better character designs, enrich your art portfolio, and express personality through hair.
Drawing curly hair isn’t about perfection—it’s about understanding rhythm, shape, and volume. With practice and creativity, you’ll be sketching stunning anime curls in no time.