Ballet shoes, with their delicate curves, elegant ribbons, and graceful form, have long been a symbol of artistry, beauty, and discipline. Drawing ballet shoes can be a rewarding exercise for beginners and experienced artists alike because they combine simple structures with intricate details. Whether you want to capture them as part of a still-life sketch, include them in a dancer illustration, or practice fabric textures and shading, ballet shoes are an excellent subject.
This step-by-step guide will show you how to draw ballet shoes in multiple ways, helping you explore both realistic and stylized approaches. Along the way, you will learn how to sketch proportions, define structure, add ribbons, and use shading techniques to bring depth and softness. By the end, you will have a clear roadmap for creating beautiful ballet shoe drawings, no matter your artistic level.
Let’s get started and unlock the secrets to sketching ballet shoes with grace and creativity.
Contents
Understanding Ballet Shoes
The anatomy of ballet shoes
Before diving into drawing, it helps to understand the structure of ballet shoes. They typically consist of:
- Toe box: The hardened front section dancers use to balance on pointe.
- Sole: A thin, flexible bottom that allows the foot to bend.
- Heel: A soft, low-cut section that hugs the back of the foot.
- Ribbons: Long satin ties that wrap around the ankle for support and style.
By recognizing these features, you’ll know what to emphasize in your sketches.
Types of ballet shoes
There are two common styles of ballet shoes you might want to draw:
- Pointe shoes: Structured with a box for toe balancing, often used in professional ballet.
- Soft ballet slippers: Lightweight and flexible, commonly worn in practice.
Both make excellent subjects, but pointe shoes offer more visual drama with their angular tips and tied ribbons.
Materials You Need
To draw ballet shoes effectively, gather the following supplies:
- Pencils (HB for sketching, 2B–6B for shading)
- Eraser (regular and kneaded)
- Sharpener
- Ruler (for guideline accuracy)
- Sketchbook or drawing paper
- Optional: Colored pencils, watercolors, or markers for adding color
Step-by-Step Guide to Drawing Ballet Shoes
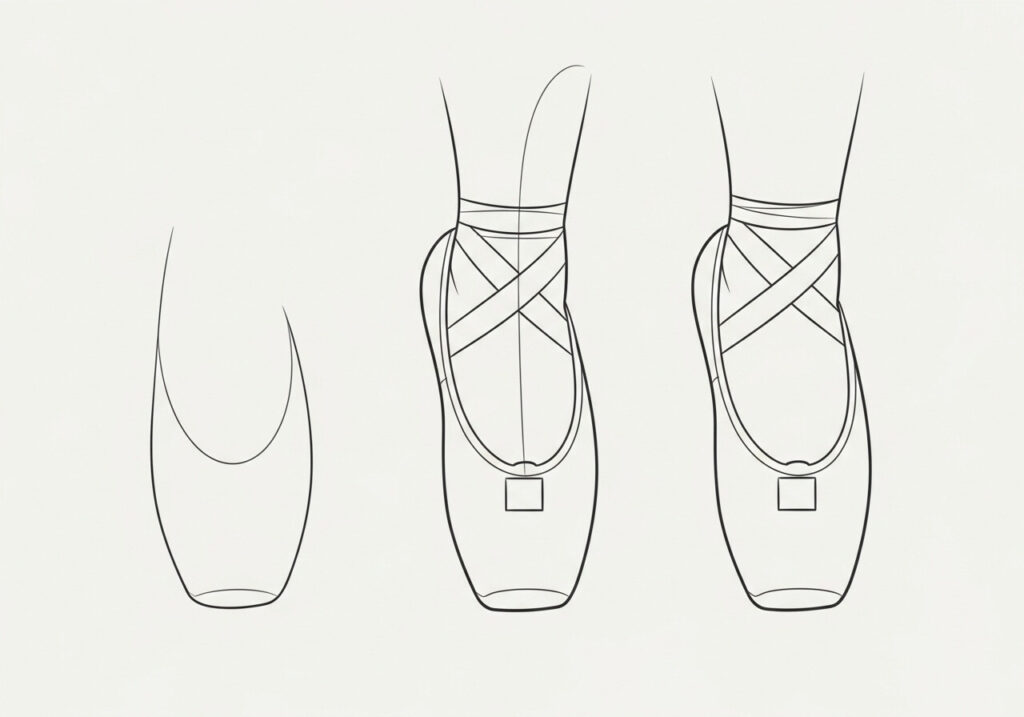
Step 1: Sketching the basic outline
Start by lightly sketching the outline of the shoe. Use simple shapes like rectangles, ovals, and triangles to block the general structure.
- Draw an elongated oval for the shoe base.
- Add a triangular tip for the toe box.
- Mark the back heel with a slightly curved line.
At this stage, don’t worry about perfection—focus on proportions.
Step 2: Defining the shoe shape
Refine your sketch by shaping the outline into a ballet shoe form.
- Smooth out the toe box into a soft curve or a squared edge (depending on pointe or slipper).
- Add a slightly curved line to indicate the arch of the shoe.
- Outline the heel with a rounded dip to show where the foot enters.
Step 3: Adding ribbons
Ribbons are a signature feature of ballet shoes. To add them:
- Draw two thin strips extending from the shoe’s sides.
- Wrap them diagonally around the ankle, creating overlapping curves.
- Add gentle folds or twists for realism.
Step 4: Detailing the toe box
Emphasize the toe box with shading and defined edges. Pointe shoes typically have a squared-off front, while ballet slippers taper more softly. Draw a seam line where the fabric folds over the toes.
Step 5: Shaping the sole and heel
Add a thin sole line along the bottom of the shoe. Indicate stitching or padding with short dashed lines. For the heel, lightly curve the back and add creases to show fabric folds.
Step 6: Adding texture and depth
Use shading to create volume:
- Shade darker under the ribbons for depth.
- Add soft shadows inside the heel opening.
- Blend pencil strokes smoothly to imitate satin texture.
Step 7: Refining details
Erase extra guidelines and sharpen details. Adjust proportions if necessary. Focus on neat, clean lines, especially along the ribbons and seams.
Step 8: Adding color (optional)
If you want to enhance your drawing, add colors like soft pinks, creams, or whites. Use colored pencils or watercolors to highlight the satin shine of ballet shoes. Add shadows in gray or mauve for depth.
Different Ways to Draw Ballet Shoes
Realistic style
Capture every fold, crease, and shadow, paying attention to lighting. This style works well for lifelike sketches.
Cartoon style
Exaggerate proportions, simplify shapes, and add playful details like oversized ribbons. Perfect for beginner artists or children’s illustrations.
Minimalist line art
Use clean, simple lines without shading. This style highlights form rather than texture and works beautifully for fashion sketches.
Stylized fashion drawing
Emphasize elegance and flow, with elongated shapes and exaggerated ribbons. Often seen in design portfolios or creative art projects.
Tips for Drawing Ballet Shoes
- Observe real ballet shoes or reference images for accuracy.
- Use light pencil strokes for initial sketches so mistakes can be easily erased.
- Practice ribbons separately to perfect their wrapping effect.
- Experiment with shading styles—cross-hatching, blending, or stippling.
- Try drawing ballet shoes from different angles: front, side, or tied and resting together.
Common Mistakes to Avoid
- Drawing ribbons too stiff—keep them soft and flowing.
- Ignoring proportions—too big or small toe boxes look unrealistic.
- Over-shading—ballet shoes are delicate; avoid making them look heavy.
- Forgetting the arch—ballet shoes should have a natural curve, not appear flat.
Practice Exercises
- Draw a pair of ballet shoes side by side, untied.
- Sketch a dancer wearing ballet shoes, focusing on how the fabric molds to the foot.
- Try a quick 5-minute sketch of ribbons from different angles.
- Practice drawing shadows under ballet shoes placed on the ground.
Frequently Asked Questions
Are ballet shoes hard to draw?
Not at all. Once you break them down into simple shapes, they become approachable. Ribbons and shading may take practice, but they’re manageable with patience.
What’s the best way to shade ballet shoes?
Blend pencil strokes in layers, using lighter tones for satin highlights and darker tones for folds or under ribbons.
Can I draw ballet shoes without ribbons?
Yes, especially if you’re drawing practice slippers. However, ribbons add charm and make the drawing more recognizable.
Do I need to add color to my ballet shoe drawings?
No, pencil-only sketches can be just as beautiful. Adding color is optional and depends on your artistic style.
Should I draw ballet shoes from memory or references?
Always start with references, then practice freehand drawing once you’re comfortable.
Final Words
Drawing ballet shoes is a delightful way to improve your artistic skills while exploring elegance and detail. From the soft satin fabric to the delicate ribbons, ballet shoes allow you to experiment with texture, proportion, and shading techniques. Whether you prefer realism, line art, or stylized sketches, these shoes provide endless creative possibilities.
By practicing step by step and trying different drawing methods, you’ll soon find yourself comfortable sketching ballet shoes with ease. Remember to be patient, keep observing, and enjoy the process. Each drawing brings you closer to mastering the art of capturing their timeless grace.