Pointe shoes are an elegant and iconic symbol of ballet. Their delicate yet structured design makes them a favorite subject for artists looking to capture beauty, movement, and grace. Learning how to draw pointe shoes requires attention to their unique shape, the folds of the satin ribbons, and the way they contour around a dancer’s foot. Whether you are creating a realistic illustration, a fashion sketch, or a simple pencil drawing, mastering pointe shoes adds sophistication to your artwork.
This detailed guide will take you step by step through the process of drawing pointe shoes, from understanding their structure to shading and adding final details. It’s designed for beginners and experienced artists alike, with tips and creative techniques to help you create stunning drawings that stand out.
Contents
- Why Draw Pointe Shoes
- Materials You Will Need
- Understanding Pointe Shoe Anatomy
- Step-by-Step Guide to Drawing Pointe Shoes
- Drawing Different Angles of Pointe Shoes
- Adding Realistic Details
- Coloring Pointe Shoes
- Tips for Beginners
- Advanced Drawing Techniques
- Creative Ways to Draw Pointe Shoes
- Common Mistakes to Avoid
- Practice Exercises
- Inspiration for Pointe Shoe Drawings
- Final Words
Why Draw Pointe Shoes
Pointe shoes combine both structure and fluidity. They have defined shapes but also soft curves, which allow artists to practice precision and flow. By learning to draw pointe shoes, you improve your ability to sketch footwear, fabric textures, and ribbon folds. They are also an inspiring subject for creating dance-themed artworks or capturing the essence of movement and elegance.
Materials You Will Need
Before you start drawing, prepare the following materials:
- Sketching pencils (HB for outlines, 2B or 4B for shading)
- Erasers (kneaded and standard)
- Drawing paper or a sketchpad
- Ruler for accurate proportions
- Fine-tip pens for outlining
- Colored pencils or watercolors (optional)
- Blending stumps or soft tissues for shading
Optional: Digital drawing tools like tablets for creating modern pointe shoe illustrations.
Understanding Pointe Shoe Anatomy
Pointe shoes have specific parts that define their look and function.
Key Features
- Toe Box: The front, stiffened section that supports the dancer’s toes.
- Vamp: The upper front area of the shoe, often slightly V-shaped.
- Shank: The stiff sole that provides support, usually hidden underneath.
- Ribbons and Elastic: Satin ribbons and bands wrap around the ankle for a secure fit.
- Heel and Sides: Smooth and slightly curved, hugging the shape of the foot.
Understanding these components will help you draw pointe shoes more accurately.
Step-by-Step Guide to Drawing Pointe Shoes
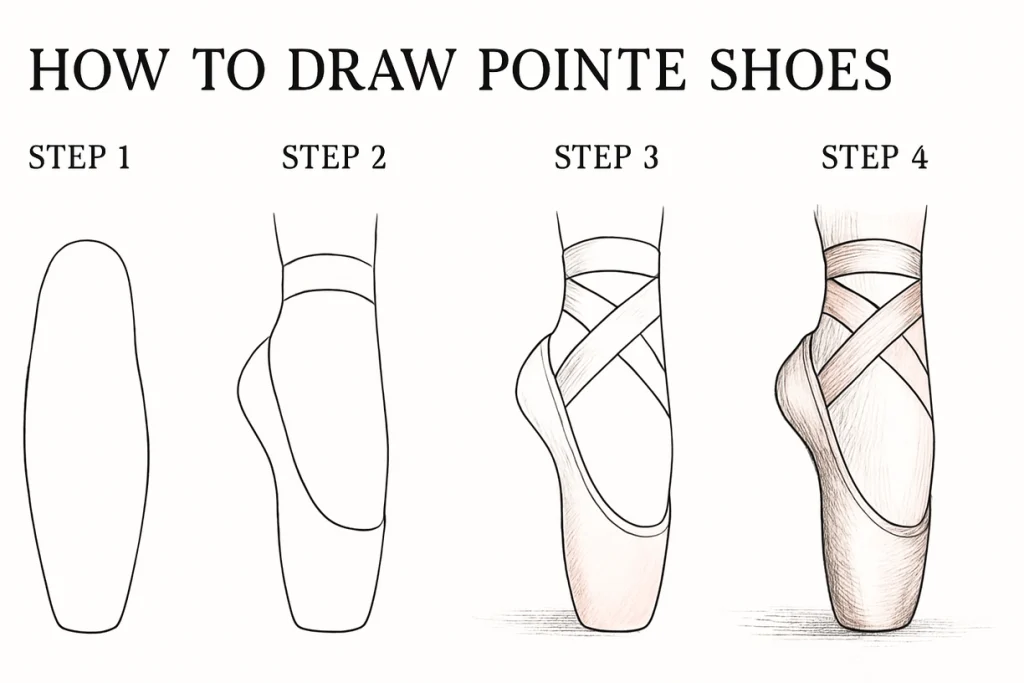
Step 1: Outline the Basic Shape
Begin with a light sketch of the shoe’s overall shape. Pointe shoes often have a tapered oval shape for the toe box, with a slightly narrower middle and a rounded heel. Draw two elongated shapes if you are sketching a pair of shoes.
Step 2: Sketch the Foot Position
If you are drawing pointe shoes on a dancer’s foot, sketch the outline of the foot or leg first. This helps you align the shoes properly with the natural form.
Step 3: Define the Toe Box and Vamp
Add a straight or slightly curved line across the front to indicate the top of the toe box. Draw a smooth line for the vamp, curving it slightly upward to show the shape of the shoe.
Step 4: Draw the Ribbons
Pointe shoe ribbons cross over the front of the ankle and tie around the leg. Sketch two or three bands crossing diagonally. Add loops or bow details if the ribbons are tied.
Step 5: Add the Heel and Sole Details
Refine the heel and sole, making sure the sides of the shoe look smooth and slightly curved. Sketch the stitching or small seams for added realism.
Step 6: Add Wrinkles and Folds
Pointe shoes are often creased where the foot bends. Add gentle curved lines or folds on the vamp and around the ankle to indicate fabric texture.
Step 7: Refine the Outline
Go over your initial sketch with a darker pencil or pen. Clean up unnecessary lines and sharpen the contours of the shoe.
Step 8: Add Shading
Shade the sides of the toe box and the ribbons for depth. Darken areas where the ribbons overlap and where the shoe curves inward. Use blending tools to soften transitions.
Step 9: Add Highlights
Use an eraser to lift highlights on the satin ribbons or smooth parts of the shoe. This gives the shoe a polished and realistic appearance.
Drawing Different Angles of Pointe Shoes
Side View
In side-view sketches, focus on the curve of the arch and the vertical line of the ribbons wrapping around the ankle.
Front View
Emphasize the symmetry of the toe box and the crisscross pattern of the ribbons.
Hanging Shoes
Pointe shoes tied together by their ribbons and hanging create a dramatic composition. Sketch the bows and loose ribbons for a soft, relaxed look.
Adding Realistic Details
- Include stitching details along the sole or edges.
- Show the slightly worn or wrinkled look of a used pointe shoe.
- Add a hint of shine on satin areas to mimic the fabric texture.
Coloring Pointe Shoes
Choosing Colors
Traditional pointe shoes are pale pink or nude, but you can experiment with bold colors for artistic expression.
Coloring Techniques
- Start with a light base layer of color.
- Use shading with darker pinks or browns to create depth.
- Add white highlights on the ribbons for shine.
Tips for Beginners
- Use light, soft strokes in the beginning to make corrections easy.
- Break down the shoe into simple shapes (rectangles and ovals) before adding details.
- Study real pointe shoe references to understand folds and proportions.
Advanced Drawing Techniques
Capturing Movement
To show a dancer en pointe, emphasize the arch of the foot and the tension in the ribbons. Slightly blur the shoe edges for a dynamic feel.
Layering Shading
Use multiple layers of pencil shading to capture the soft yet structured look of the shoes. Blend shadows under the ribbons and along the sides.
Mixed Media
Combine pencil sketching with watercolor washes for soft satin textures. Add fine pen lines for details like stitching.
Creative Ways to Draw Pointe Shoes
- Draw pointe shoes hanging on a ballet barre.
- Create a flat-lay drawing of shoes, flowers, and music sheets.
- Illustrate a pair of pointe shoes tied together with flowing ribbons.
- Add artistic backgrounds like a stage, studio, or spotlight.
Common Mistakes to Avoid
- Over-simplifying the ribbons, which can make the shoes look flat.
- Ignoring the curve of the sole, resulting in a stiff appearance.
- Over-shading or using dark lines that overpower delicate details.
Practice Exercises
- Draw a single pointe shoe from multiple angles.
- Sketch just the ribbons in different tied positions.
- Practice shading exercises to create smooth satin textures.
- Draw a series of pointe shoes, from new to worn-out, to study texture differences.
Inspiration for Pointe Shoe Drawings
Look for ballet performances, studio setups, or artistic photos of pointe shoes for creative compositions. Experiment with poses that show the dancer’s strength and grace.
Final Words
Pointe shoes represent beauty, discipline, and elegance, making them a captivating subject for artists. Learning to draw them teaches you how to combine structure with fluidity, from the firm shape of the toe box to the delicate satin ribbons. By following this step-by-step guide and practicing regularly, you can create drawings that reflect both technical skill and artistic expression.
Whether you aim for realistic illustrations or creative, stylized sketches, drawing pointe shoes will help you grow as an artist. Keep practicing, experiment with different mediums, and challenge yourself to capture the grace and movement that pointe shoes symbolize.