Windows are more than architectural elements; they symbolize openness, perspective, and the interplay of light and space. Whether you are sketching for architectural designs, drawing realistic scenes, or creating imaginative illustrations, mastering how to draw windows can elevate your artwork. From simple rectangular frames to elaborate decorative designs, understanding the techniques behind window drawing can help you create pieces that are both dynamic and believable.
This guide will take you through everything you need to know about drawing windows. You’ll learn how to capture their structure, explore different styles, and add depth through shading and details. Whether you’re a beginner or an experienced artist seeking refinement, this comprehensive tutorial provides the tools to master windows in your artwork.
Contents
- Understanding the Basics of Drawing Windows
- Tools and Materials for Drawing Windows
- Understanding Perspective in Window Drawing
- Step-by-Step Guide: How to Draw a Simple Window
- Drawing Different Window Styles
- Adding Realism to Window Drawings
- Creating Windows in Context
- Experimenting with Artistic Styles
- Shading Techniques for Windows
- Drawing Decorative Elements
- Practicing Advanced Window Compositions
- Common Mistakes and How to Avoid Them
- Exercises to Improve Window Drawing Skills
- Creative Ideas for Window Illustrations
- Final Words
Understanding the Basics of Drawing Windows
Why learn to draw windows?
- Adds realism to architectural sketches.
- Enhances storytelling in illustrations.
- Improves your understanding of perspective and light.
- Allows creativity with designs, shapes, and textures.
Essential elements of windows
- Frame: The outer boundary that gives structure.
- Panes: Glass sections that divide light and reflections.
- Mullions: Dividers that separate panes within the frame.
- Details: Handles, locks, and decorative features that add realism.
Tools and Materials for Drawing Windows
Traditional tools
- Graphite pencils: Use varying grades (2H to 6B) for line work and shading.
- Erasers: Kneaded erasers for highlights, hard erasers for clean lines.
- Rulers and triangles: Essential for precise architectural lines.
- Drawing paper: Choose smooth surfaces for fine details or textured paper for expressive styles.
Digital tools
- Drawing tablets: Allow precision with layers and digital brushes.
- Software: Programs like Procreate, Photoshop, or Clip Studio Paint provide perspective grids and texture brushes.
Understanding Perspective in Window Drawing
One-point perspective
Ideal for windows viewed straight on. All lines converge to a single vanishing point.
Two-point perspective
Perfect for corner windows or angled views. Lines converge to two vanishing points for added depth.
Three-point perspective
Used for dramatic, towering windows viewed from above or below.
Step-by-Step Guide: How to Draw a Simple Window
Step 1: Outline the basic shape
Draw a rectangle or square to represent the outer frame. Keep lines light for easy adjustments.
Step 2: Add depth to the frame
Create parallel lines around the rectangle to suggest thickness. This gives the frame a three-dimensional look.
Step 3: Divide into panes
Add vertical and horizontal lines to represent mullions and glass divisions. Symmetry enhances realism.
Step 4: Sketch window details
Draw handles, locks, or hinges based on your design. Keep details proportional to the frame.
Step 5: Add shading
Use light hatching for glass reflections and darker shading for the frame. Blend tones to suggest material differences.
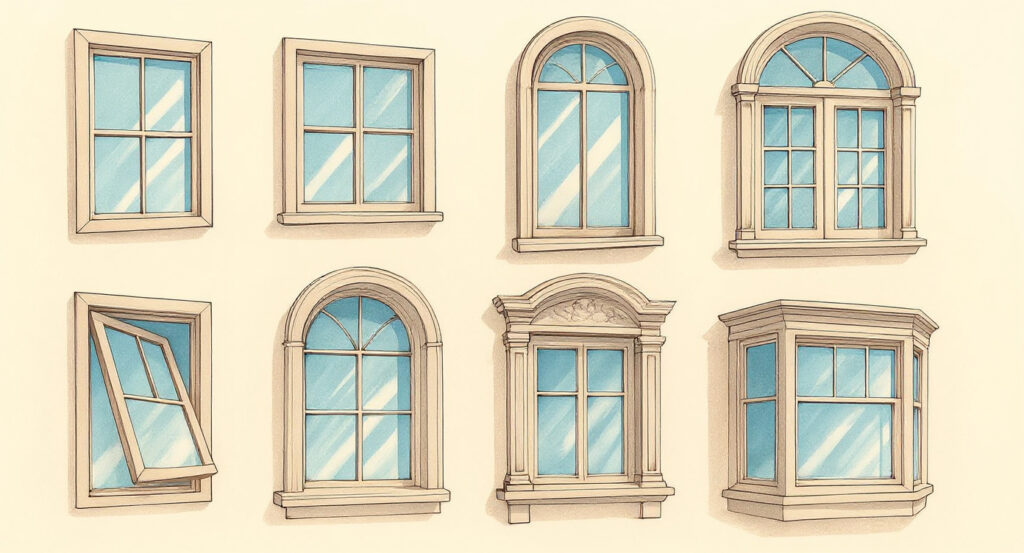
Drawing Different Window Styles
Classic single-hung windows
Focus on clean lines and balanced panes. Perfect for learning symmetry.
Arched windows
Draw a rectangle for the base and add a semicircle on top. Use guidelines to keep curves smooth.
Bay windows
Use two-point perspective to create angled side sections. Add depth by sketching protruding frames.
Stained-glass windows
Divide the window into sections and fill with decorative patterns. Use shading or color layering to mimic transparency.
Modern frameless windows
Simplify lines and emphasize reflections. Minimalistic designs require precise perspective work.
Adding Realism to Window Drawings
Glass reflections
- Use diagonal strokes or curves to suggest light reflection.
- Leave small white highlights to mimic shine.
- Layer shading for depth, making edges darker and centers lighter.
Shadows and light
Observe how shadows fall on walls and sills. Shadows give windows weight and placement in space.
Texture details
- Wooden frames: Use fine parallel lines for grain.
- Metal frames: Keep surfaces smooth with sharp highlights.
- Weathered frames: Add cracks, chips, or uneven lines for character.
Creating Windows in Context
Drawing windows on buildings
Integrate windows into walls using consistent perspective. Align all vanishing points for architectural accuracy.
Interior scenes
Show the window from inside a room, including curtains, blinds, and reflections of interior elements.
Exterior scenes
Add shutters, flower boxes, or reflections of the outdoor environment to bring life to your drawings.
Experimenting with Artistic Styles
Realistic rendering
Focus on accurate perspective, detailed textures, and natural light effects.
Sketchy or expressive styles
Use bold lines, minimal shading, and exaggerated proportions for a more artistic interpretation.
Cartoon or manga windows
Simplify shapes while exaggerating highlights and shadows. Add stylized reflections for dramatic effect.
Fantasy or sci-fi designs
Experiment with unusual shapes like hexagons, glowing panes, or intricate mechanical frames.
Shading Techniques for Windows
Cross-hatching
Ideal for giving glass depth and frames structure.
Gradient shading
Blend tones smoothly for realistic light transitions on glass.
Stippling
Use dots to add texture, especially for frosted or patterned glass.
Layered shading
Combine multiple techniques to differentiate materials like wood, metal, and glass.
Drawing Decorative Elements
Curtains and drapes
Show folds using curved lines and varied shading. Heavy fabrics cast deep shadows, while light fabrics appear airy.
Blinds and shutters
Use parallel lines for blinds and textured panels for shutters. Adjust shadows for open or closed positions.
Ornamental trims
Add carvings, moldings, or engraved details to create sophisticated window designs.
Practicing Advanced Window Compositions
Multiple windows in perspective
Draw building facades with repeating windows, ensuring consistent alignment and spacing.
Reflections in windows
Include reflections of surrounding objects like trees, buildings, or clouds to add realism.
Broken or aged windows
Sketch cracks, chipped paint, or missing panes to create mood and storytelling in your artwork.
Common Mistakes and How to Avoid Them
Misaligned panes
Always use guidelines to ensure symmetry and accurate divisions.
Flat-looking glass
Add subtle reflections and gradients to suggest transparency.
Ignoring perspective
Use vanishing points and horizon lines to maintain realistic proportions.
Overcomplicating details
Start simple. Gradually add complexity as you gain confidence.
Exercises to Improve Window Drawing Skills
Quick sketches
Draw 10 windows in 10 minutes to practice speed and observation.
Texture studies
Focus on rendering just the frame materials — wood, metal, or stone — before adding glass.
Light studies
Experiment with different times of day and weather conditions to see how light interacts with windows.
Style challenges
Redraw the same window in realistic, cartoon, and abstract styles.
Creative Ideas for Window Illustrations
Storytelling through windows
Show scenes through the glass, like a cozy interior or bustling street.
Seasonal windows
Depict snowflakes, raindrops, or blooming flowers reflected in the glass.
Surreal windows
Design windows that open to unexpected worlds or impossible perspectives.
Final Words
Learning how to draw windows isn’t just about sketching frames and glass; it’s about capturing depth, light, and atmosphere. By mastering perspective, experimenting with shading, and exploring different styles, you can create windows that enhance your drawings and invite viewers into your world.
Whether you aim for realism, abstraction, or narrative-driven illustrations, the techniques in this guide provide a foundation for limitless creativity. Pick up your tools, choose a style that inspires you, and start practicing today — each window you draw is another step toward artistic mastery.
This was a helpful guide to drawing it helped me on my assignment for redesigning a book cover I’m glad I found it.