Wings are one of the most captivating subjects in art. From the graceful feathers of a bird to the delicate membranes of a butterfly or the majestic wings of mythical creatures, learning how to draw wings can expand your artistic abilities. Wings symbolize freedom, flight, and imagination, making them a popular theme in illustrations, fantasy art, and design. Whether you’re a beginner exploring simple sketches or an advanced artist aiming for realistic detail, this guide will teach you everything you need to know about drawing wings with precision and creativity.
This comprehensive tutorial covers different wing styles, such as bird wings, angel wings, bat wings, insect wings, and fantasy-inspired designs. We’ll dive into step-by-step instructions, shading techniques, and tips to bring your drawings to life.
Contents
Why Learn to Draw Wings
Drawing wings helps you understand anatomy, symmetry, and texture. Wings require careful attention to proportion and structure, offering a chance to practice observation and patience. Learning to draw wings also improves your overall skill in drawing animals, mythical characters, and fantasy scenes. Whether you want to create angelic illustrations, dynamic birds in flight, or intricate insect patterns, mastering wings opens up countless creative possibilities.
Materials You Will Need
Before you begin, gather these materials:
- Sketchpad or quality drawing paper
- Pencils (HB for outlines, 2B and 4B for shading)
- Erasers (kneaded and standard)
- Ruler or compass for symmetrical guidelines
- Fine-tip pens for detailing feathers or membranes
- Colored pencils, markers, or watercolors (optional for coloring)
- Blending tools like stumps or soft tissues
If you prefer digital drawing, you can use a drawing tablet and software with layers to experiment with line work and shading.
Understanding Wing Anatomy
Bird and Angel Wings
Bird wings are composed of a central arm-like structure and layers of feathers. Angel wings, often inspired by birds, follow a similar structure but may be exaggerated for aesthetic purposes.
- Primary feathers: The longest feathers, located on the outer edges.
- Secondary feathers: Found closer to the body, forming the middle layer.
- Coverts: Smaller feathers that cover the base layers.
Bat Wings
Bat wings are made of thin membranes stretched over elongated fingers. They are smooth, flexible, and slightly transparent.
Insect Wings
Insect wings, like those of butterflies or bees, feature delicate, veined patterns. They are often symmetrical and colorful.
Step-by-Step Guide to Drawing Wings
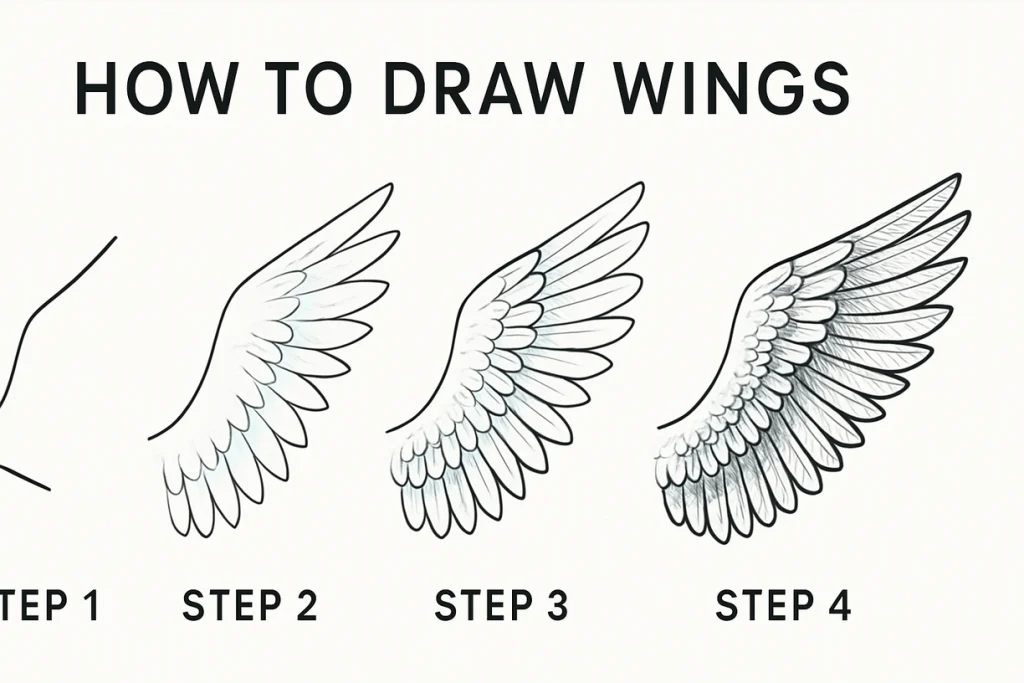
Step 1: Sketch the Basic Outline
Start with a light guideline representing the central “arm” of the wing. For bird or angel wings, draw a slightly curved line extending upward and then bending downward, similar to an arch. For insect or bat wings, begin with a simple triangular or oval shape.
Step 2: Divide the Wing into Sections
For bird wings, divide the wing into three main parts:
- The base closest to the body.
- The mid-section for secondary feathers.
- The outer tip for primary feathers.
For insect wings, outline the forewing and hindwing sections separately.
Step 3: Add Feathers or Membranes
Draw the feathers starting from the base, layering them as you move outward. Each feather should slightly overlap the one next to it. For bat or insect wings, sketch the vein or bone structure before adding the thin membrane.
Step 4: Define the Shape
Refine the wing’s overall shape. Smooth out rough edges, ensuring the feathers or membranes look balanced.
Step 5: Add Details
Add fine details like the texture of feathers or veins in insect wings. Vary the size and shape of feathers to create a natural look.
Step 6: Shading and Depth
Use light shading at the base of feathers or along the membrane to create depth. Apply cross-hatching or soft blending to make the wing appear three-dimensional.
Step 7: Finalize with Highlights
Erase unnecessary guidelines and add highlights to emphasize light reflection. A few white or lighter areas make the wings look more realistic.
Drawing Different Types of Wings
Bird Wings
Bird wings require attention to feather arrangement. Study references of eagles, doves, or songbirds to understand feather layering. Start with a basic arch shape, then layer feathers of varying sizes from large primaries to smaller coverts.
Angel Wings
Angel wings are often larger and more decorative. Exaggerate the size of the feathers for dramatic effect. Use symmetrical outlines and pay attention to flow and curvature.
Butterfly or Insect Wings
Butterfly wings are symmetrical and vibrant. Begin with a light oval or teardrop shape, then sketch veins branching out like a web. Use color patterns with gradients and highlights to bring them to life.
Bat Wings
Bat wings are sleek and darker. Start with elongated finger-like structures, then connect them with curved lines for the membrane. Add shading along the folds for realism.
Fantasy or Dragon Wings
Fantasy wings can combine elements of bat and bird wings. They often feature claws or textured scales. Be creative with shapes, adding spikes or decorative edges for a mythical effect.
Tips for Beginners
- Start with simple outlines and gradually add detail.
- Use references to study wing structure and anatomy.
- Focus on symmetry but allow for slight natural variations.
- Practice drawing each type of wing separately before combining them with full characters or animals.
Advanced Techniques
Creating Texture
For feathers, use short, curved pencil strokes to mimic natural texture. For insect wings, add fine, thin lines to replicate delicate veins.
Adding Motion
To depict wings in flight, draw feathers slightly spread out or blurred at the edges. For insects, sketch multiple faint outlines to suggest movement.
Layering Colors
When coloring, layer multiple shades to create depth and dimension. Use lighter tones for highlights and darker tones for shadows.
Practice Exercises
- Draw a single feather, focusing on detail.
- Sketch a pair of symmetrical wings on a grid.
- Experiment with different wing positions: folded, spread wide, or in mid-flap.
- Create hybrid wings by mixing bird and insect styles.
Adding Background Elements
A pair of wings can look more dynamic with a complementary background. Draw clouds for angel wings, flowers for butterfly wings, or a night sky for bat wings. Use soft shading to keep the wings as the focal point.
Common Mistakes to Avoid
- Drawing feathers that are all the same size and shape.
- Over-darkening the outline, which can make the wings look flat.
- Ignoring how the wing connects to the body.
- Forgetting to maintain symmetry, especially with insect and angel wings.
Inspiration for Creative Wing Art
- Illustrate mythical creatures like phoenixes or dragons.
- Create a nature-inspired scene with butterflies and bees.
- Combine human characters with angel or fairy wings for fantasy artwork.
- Experiment with abstract wing patterns using bright colors.
Final Words
Wings are symbols of elegance, strength, and freedom. Learning to draw them teaches valuable lessons about structure, texture, and movement. Whether you’re sketching the delicate veins of a butterfly, the layered feathers of a bird, or the dramatic span of angel wings, every drawing is an opportunity to refine your skills.
This guide offers the tools, steps, and techniques you need to create wings that look both artistic and realistic. With consistent practice and attention to detail, you’ll soon be able to draw wings confidently in any style or pose.