Bee wings are delicate, translucent, and beautifully intricate, making them a fascinating subject for artists. Capturing their thin, veined structure and subtle shine can elevate a bee illustration from simple to realistic.
Whether you are sketching a bee for a nature journal, creating digital art, or experimenting with watercolor, understanding how to draw bee wings step by step will improve your overall drawing skills. This guide offers a detailed, copy-free approach to drawing bee wings, including structure, shading, and creative styles. It’s designed to help beginners and advanced artists achieve stunning, lifelike results.
Contents
- Why Focus on Drawing Bee Wings
- Materials Needed
- Understanding Bee Wing Anatomy
- Step-by-Step Guide to Drawing Bee Wings
- Tips for Drawing Realistic Bee Wings
- Advanced Techniques for Bee Wings
- Drawing Bee Wings in Different Styles
- Common Mistakes to Avoid
- Practice Exercises
- Adding Bee Wings to a Complete Bee Drawing
- Experimenting with Backgrounds
- Shading and Highlighting Techniques
- Creating Motion Effects
- Exploring Artistic Variations
- Final Words
Why Focus on Drawing Bee Wings
Bee wings, though small, carry a lot of detail and character. The transparent nature of the wings, combined with the complex vein patterns, makes them a challenging yet rewarding subject to master. Learning to draw bee wings not only teaches observation and precision but also improves your ability to depict delicate textures and light. Mastering this skill can enhance any insect drawing and bring your artwork closer to realistic depictions of nature.
Materials Needed
To draw bee wings effectively, you will need:
- Sketching pencils (HB, 2B, 4B for outlines and shading)
- Fine-tip black pen or technical liners for veins
- Erasers (standard and kneaded)
- Drawing paper or sketchpad
- Colored pencils or watercolors for adding color and transparency effects
- Blending tools (stumps or tissues)
- A ruler or compass for symmetrical shapes
Optional: A digital drawing tablet with layers for detailed work.
Understanding Bee Wing Anatomy
Bee wings consist of two pairs: forewings (larger) and hindwings (smaller). The wings have a network of veins that give them strength while maintaining flexibility.
Key Features
- Transparent membrane with slight iridescence.
- Delicate veins running in a pattern, forming small compartments.
- A subtle curve that follows the natural shape of the bee’s body.
- Forewings are longer and slightly oval, while hindwings are shorter and rounder.
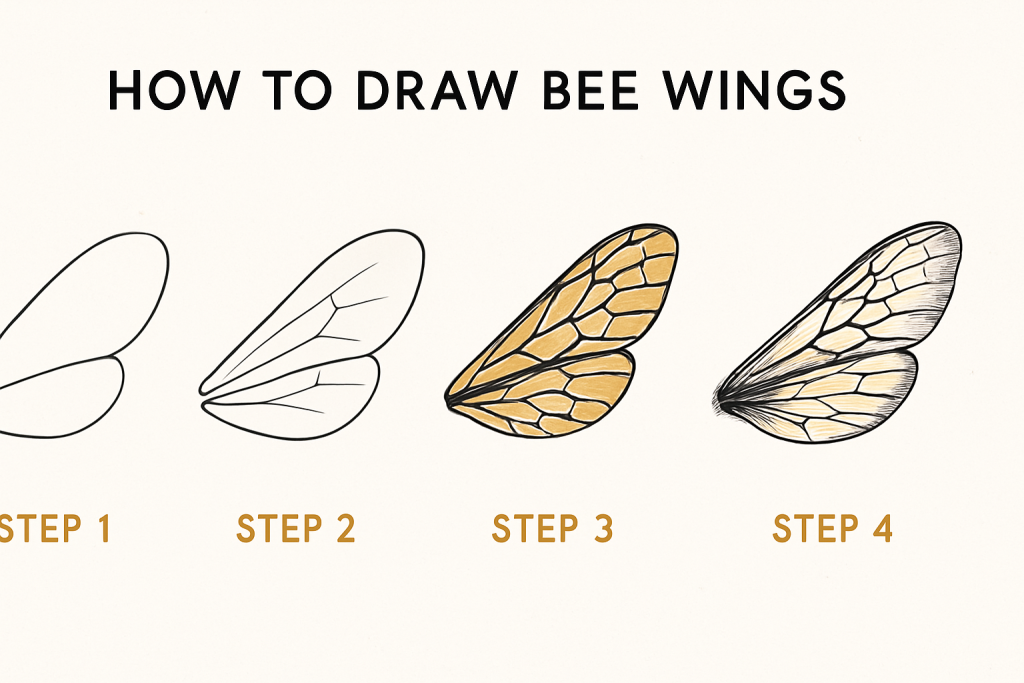
Step-by-Step Guide to Drawing Bee Wings
Step 1: Outline the Basic Shape
Start by sketching a light oval or teardrop shape for the forewing. Place it at a slight angle extending from where the bee’s thorax would be. Add a smaller rounded shape slightly behind for the hindwing.
Step 2: Draw the Wing Base
Wings attach to the bee’s thorax, so lightly sketch a small curved base where the wing meets the body. This creates a natural flow and realistic connection.
Step 3: Add Guiding Lines for Veins
Lightly draw curved lines radiating from the base outward toward the edge of the wing. These will act as guides for the detailed vein patterns.
Step 4: Create the Main Veins
Using a slightly darker pencil, trace over the main veins. Start with the thicker central veins that run from the base to the outer edge of the wing.
Step 5: Add Secondary Veins
Draw thinner veins branching off the main veins, creating small, irregular compartments. These veins should follow the curvature of the wing to keep a natural look.
Step 6: Define the Wing Shape
Clean up the outer edges of the wing, refining its shape and ensuring the tips are slightly rounded.
Step 7: Add Texture
Lightly shade around the base of the wing to show depth. Keep the central part of the wing mostly white or very light to preserve the transparent effect.
Step 8: Outline with Pen
If you want a bold look, use a fine-tip pen to trace the veins and the outer edge of the wing. Keep the lines delicate, as overly dark lines can ruin the realistic appearance.
Step 9: Add Color or Transparency
Use colored pencils or light watercolor washes to give the wings a faint yellow or pale gray tint. Add a hint of light blue or purple for an iridescent effect. Leave portions of the wing nearly white to mimic natural transparency.
Tips for Drawing Realistic Bee Wings
- Keep the lines light and delicate.
- Use minimal shading—most of the wing’s detail comes from the veins.
- Study reference images to understand how light passes through the wings.
- Avoid drawing veins too symmetrically; natural veins have slight variations.
Advanced Techniques for Bee Wings
Layering Colors
Apply multiple layers of colored pencil or watercolor to create subtle gradients. Start with light yellow, then add faint blue or gray tones.
Iridescent Effect
To achieve a shimmering effect, lightly blend shades of lavender, blue, and cream.
Digital Art Techniques
Use multiple transparent layers to recreate the delicate nature of wings. Apply light brush strokes with low opacity to achieve depth.
Drawing Bee Wings in Different Styles
Realistic Style
Focus on vein detail, light shading, and subtle color. Pay close attention to the thin outlines and natural textures.
Cartoon Style
Simplify the wing shape into rounded ovals with minimal veins. Use bright white and simple shading.
Minimalist Style
Use a single continuous outline and just a few key veins for a clean, modern look.
Common Mistakes to Avoid
- Making veins too thick or dark.
- Over-shading, which can make wings look opaque instead of translucent.
- Ignoring the curvature of the wing base, which can make them appear stiff.
Practice Exercises
- Draw the forewing and hindwing separately to master their shapes.
- Practice drawing just the vein patterns on blank ovals.
- Create variations of bee wings in different positions—folded, extended, or in motion.
Adding Bee Wings to a Complete Bee Drawing
When adding wings to a full bee illustration:
- Place the forewing partially overlapping the hindwing.
- Align the wings with the bee’s thorax angle.
- Use lighter lines on the wings compared to the body to create contrast.
Experimenting with Backgrounds
To make your bee wings stand out:
- Add subtle floral backgrounds or honeycomb patterns.
- Use blue or soft pastel backgrounds to emphasize transparency.
Shading and Highlighting Techniques
- Shade lightly around the wing base with a 2B pencil.
- Use an eraser to create highlights by lifting graphite or color.
- Blend gently for smooth transitions without losing clarity.
Creating Motion Effects
To show a bee in flight, sketch multiple faint outlines of the wings to suggest rapid movement. Blur the tips slightly for a dynamic feel.
Exploring Artistic Variations
- Try gold ink for a decorative, stylized wing pattern.
- Use metallic colored pencils for subtle shine.
- Experiment with abstract backgrounds to highlight the intricate wing design.
Final Words
Drawing bee wings is a rewarding challenge that helps you improve precision, shading, and texture skills. By understanding their structure and practicing step-by-step, you can capture the delicate, translucent beauty of these remarkable wings. From realistic renderings to stylized interpretations, there’s endless room for creativity. Whether you’re creating a detailed nature illustration or a simple sketch, bee wings add elegance and interest to your artwork.
Keep practicing, experimenting with different mediums, and exploring the details of natural forms. With time, your drawings will become more refined, and your bee wings will look vibrant and lifelike.