Painting eyes can be one of the most rewarding and challenging parts of portrait or figure painting. The eyes are often called the “windows to the soul,” and capturing their depth, emotion, and realism can elevate your artwork from good to extraordinary. Whether you’re working with oils, acrylics, watercolors, or digital media, understanding the structure, colors, reflections, and shadows of the eye is crucial.
This comprehensive guide will take you step by step through the process of painting realistic eyes. From anatomy basics and materials to color mixing and layering techniques, you’ll develop the skills needed to create lifelike eyes that draw viewers in. We’ll also cover common mistakes and troubleshooting tips so you can avoid frustration and improve your results.
Contents
- Understanding the Anatomy of the Eye
- Choosing Your Materials
- Step 1: Sketching the Eye
- Step 2: Blocking in Base Colors
- Step 3: Painting the Iris
- Step 4: Adding Shadows and Depth
- Step 5: Painting the Pupil and Highlights
- Step 6: Detailing the Sclera
- Step 7: Painting Eyelids and Skin Around the Eye
- Step 8: Adding Eyelashes
- Step 9: Final Highlights and Refinements
- Color Mixing Tips for Realistic Eyes
- Common Mistakes and How to Fix Them
- Practice Exercises to Improve Eye Painting
- Painting Different Eye Expressions
- How to Paint Happy Eyes
- How to Paint Sad Eyes
- How to Paint Surprised or Wide-Eyed Expressions
- How to Paint Aging Eyes
- Using Reference Photos and Models
- Tips for Digital Eye Painting
- Final Thoughts
Understanding the Anatomy of the Eye
Before picking up your brush, it’s important to understand the basic structure of the human eye. This knowledge will guide your painting and help you depict the eye accurately.
Parts of the Eye to Know
- Sclera: The white part of the eye
- Iris: The colored part surrounding the pupil
- Pupil: The black circular opening at the center
- Cornea: Transparent layer covering the iris and pupil
- Eyelid: Upper and lower skin folds protecting the eye
- Eyelashes: Hair on the eyelids
- Tear Duct: The inner corner where tears drain
Understanding how these parts interact with light and shadow helps in painting realistic eyes.
Choosing Your Materials
The materials you choose will impact your painting process and results. Different mediums have unique qualities that influence texture, blending, and detail.
Recommended Materials
- Brushes: Fine-tipped round brushes for detail, flat brushes for larger areas
- Paints: Oils and acrylics are popular for their blendability and vibrancy; watercolors offer softness and transparency
- Palette: A mixing surface for blending colors
- Canvas or Paper: Smooth surfaces for acrylic and oils, watercolor paper for watercolors
- Mediums: Linseed oil or acrylic retarders slow drying times for blending in oils and acrylics
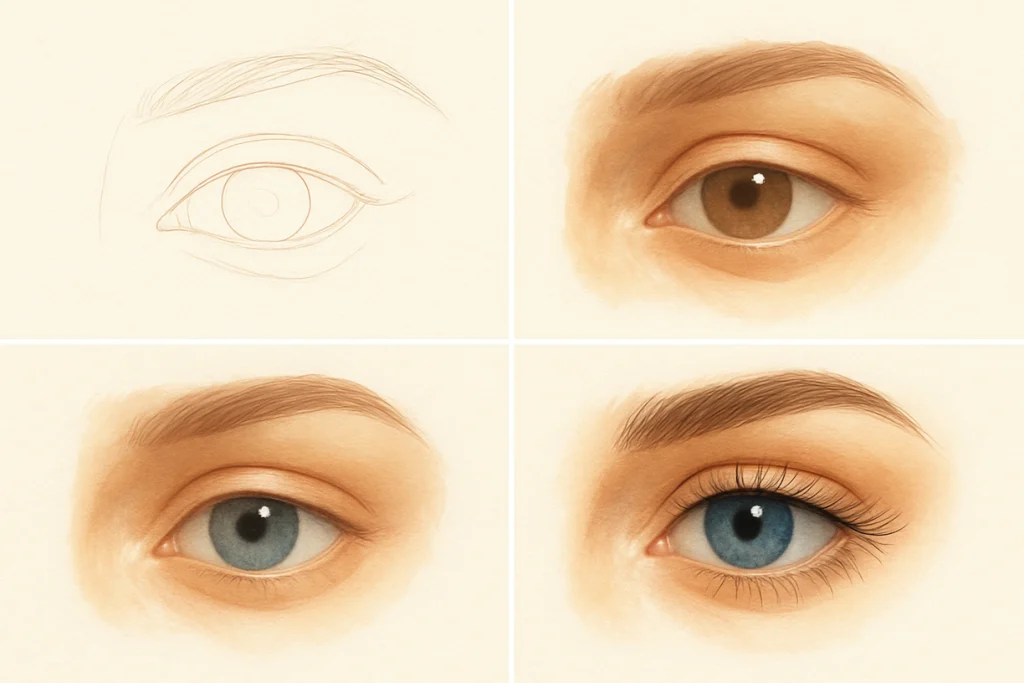
Step 1: Sketching the Eye
Start by lightly sketching the eye outline with pencil or thin paint.
Sketching Tips
- Draw the almond-shaped outline of the eye
- Mark the placement of the iris and pupil
- Include the eyelids and tear duct areas
- Sketch the eyebrow placement as a guide
Keep lines light to avoid hard edges that are difficult to cover later.
Step 2: Blocking in Base Colors
Lay down the base colors for different areas of the eye.
Base Color Suggestions
- Sclera: off-white with hints of blue, gray, or pink
- Iris: base color depending on eye color (blue, brown, green, hazel)
- Pupil: black or very dark brown
- Eyelids: skin tones matching the subject
- Shadows: soft grays or muted browns
Use a flat brush or larger round brush for this stage. Don’t worry about details yet.
Step 3: Painting the Iris
The iris is the most detailed and expressive part of the eye.
How to Paint the Iris
- Mix several shades of the iris color to create depth
- Use radial brush strokes from the pupil outward
- Add darker lines or speckles to mimic texture
- Incorporate light reflections to add life
Layer colors gradually, allowing each layer to dry before adding the next.
Step 4: Adding Shadows and Depth
Shadows give the eye dimension and make it appear three-dimensional.
Where to Add Shadows
- Under the upper eyelid where it casts shade on the eye
- Around the edges of the iris
- Below the lower eyelid
- In the tear duct and corners
Use a soft brush to blend shadows smoothly. Avoid harsh lines.
Step 5: Painting the Pupil and Highlights
The pupil is the darkest area and should be painted with solid, deep color.
Painting Tips
- Use pure black or mix dark browns
- Add reflections or highlights on the pupil to simulate light
- Position highlights consistently with the main light source
Highlights are critical for making the eye look wet and alive.
Step 6: Detailing the Sclera
Though the sclera is white, it contains subtle color variations and shadows.
Painting the Sclera
- Add gentle shadows with muted blues, purples, and pinks
- Include veins very subtly using thin, light red lines
- Blend edges softly to avoid a flat appearance
The sclera should feel rounded, not flat.
Step 7: Painting Eyelids and Skin Around the Eye
The skin surrounding the eye frames it and influences expression.
Tips for Skin Painting
- Use warm and cool skin tones to build realistic texture
- Paint shadows under the eyebrow and at eyelid folds
- Add subtle highlights on the brow bone and cheekbones
- Include eyelashes with fine, curved strokes
Blend carefully to maintain softness without losing form.
Step 8: Adding Eyelashes
Eyelashes add realism and enhance the eye’s expression.
How to Paint Eyelashes
- Use a fine liner or small round brush
- Paint lashes in curved, varied-length strokes
- Make lashes thicker at the base and taper toward the tip
- Layer lashes for volume and natural appearance
Avoid painting them all perfectly straight or evenly spaced.
Step 9: Final Highlights and Refinements
Add final touches to bring the eye to life.
Final Touches Include
- Strengthening light reflections on the cornea and pupil
- Enhancing subtle color variations in the iris and sclera
- Adding a glossy effect using thin white strokes or dots
- Softening or sharpening edges where needed
Step back frequently to assess overall balance and realism.
Color Mixing Tips for Realistic Eyes
Accurate color mixing is key to lifelike eyes.
Basic Skin Tone Mixes
- Mix burnt sienna, titanium white, and yellow ochre for warm skin
- Add ultramarine blue or alizarin crimson for cool shadows
Iris Color Mixes
- Blue eyes: ultramarine blue + white + touches of cerulean
- Brown eyes: burnt umber + burnt sienna + ultramarine blue
- Green eyes: sap green + yellow ochre + blue
Experiment to find natural-looking shades.
Common Mistakes and How to Fix Them
Overly Dark Sclera
Fix by adding soft whites and gentle cool tones to balance
Flat Iris
Add layers of radial texture and light reflections
Stiff Eyelashes
Vary length and curve, use tapered brush strokes
Missing Light Source Consistency
Always place highlights and shadows based on one light direction
Practice Exercises to Improve Eye Painting
- Paint multiple quick studies focusing on iris detail
- Practice blending skin tones around the eye
- Experiment with different light sources and shadow placement
- Create grayscale studies to understand value before color
Painting Different Eye Expressions
Subtle changes in eyelid shape, pupil size, and wrinkles create emotions.
How to Paint Happy Eyes
- Slightly squinted eyelids
- Upturned lower lid
- Bright, crisp highlights
How to Paint Sad Eyes
- Drooping eyelids
- Less intense highlights
- Slight wrinkles or tears
How to Paint Surprised or Wide-Eyed Expressions
- Raised upper eyelids
- Fully visible sclera above and below iris
- Strong highlights and contrast
How to Paint Aging Eyes
- Add fine lines and wrinkles
- Use muted colors with less saturation
- Slight shadows under eyes
Using Reference Photos and Models
Working from life or photos improves accuracy.
- Take photos with good lighting
- Use mirrors for self-study
- Observe the direction and softness of shadows
Tips for Digital Eye Painting
- Use pressure-sensitive brushes for eyelashes and iris texture
- Work in layers for easier corrections
- Zoom in for detail, but view at normal scale often
Final Thoughts
Painting eyes realistically takes practice, patience, and careful observation. By understanding the anatomy, mastering layering techniques, and paying attention to light and color, you can create eyes that captivate and express deep emotion. Use this guide as a foundation and keep experimenting to develop your unique artistic style.
Your journey to painting lifelike eyes begins with one brushstroke—keep practicing and enjoy the process.