Learning how to paint trees can instantly elevate your landscape artwork. Trees add life, depth, and natural beauty—whether you’re painting a peaceful forest or a single branch in bloom.
In this step-by-step guide, you’ll discover simple techniques for painting realistic and creative trees using acrylics, watercolors, or oils. From sketching trunks and branches to blending foliage and seasonal color palettes, this tutorial will walk you through everything you need to know. Perfect for beginners and hobbyists, you’ll gain the skills to bring trees to life on canvas with confidence and style.
Contents
- Why Learn to Paint Trees?
- Tools and Supplies for Painting Trees
- Step-by-Step Guide: How to Paint Trees
- Step 1: Study Tree Structure and Silhouettes
- Step 2: Sketch the Tree Framework
- Step 3: Block in Basic Shapes with Base Colors
- Step 4: Paint the Tree Trunk and Branches
- Step 5: Add Foliage Using Various Brush Techniques
- Step 6: Blend in Details and Highlights
- Step 7: Create Depth and Atmospheric Perspective
- Painting Different Types of Trees
- Painting Pine Trees
- Painting Oak Trees
- Painting Birch Trees
- Painting Palm Trees
- Color Mixing Tips for Tree Painting
- Tips for Painting Trees in Different Seasons
- Painting Trees in Different Lighting
- Common Mistakes When Painting Trees
- Practice Exercises to Improve Tree Painting
- Final Thoughts
Why Learn to Paint Trees?
Painting trees is one of the most essential skills for any landscape artist or hobby painter. Whether you’re using watercolors, acrylics, oils, or gouache, mastering trees allows you to bring natural life, depth, and mood to your compositions. Trees come in endless shapes and textures—from delicate birch trunks to sprawling oaks and dramatic pine forests—offering rich opportunities to express realism or impressionism.
Painting trees also teaches you foundational art techniques: brushwork, blending, color theory, and the balance between detail and suggestion. And the best part? Trees don’t have to be perfect to look beautiful.
Tools and Supplies for Painting Trees
The tools you need will depend on your chosen medium, but there are core items useful across all styles.
General Supplies
- Sketchbook or watercolor pad
- Pencils (HB, 2B) for initial sketching
- Erasers and kneaded erasers
- Palette for mixing colors
- Jars or containers for water or solvents
- Cloth or paper towels for cleanup
Medium-Specific Tools
For Acrylic and Oil Painting:
- Stretched canvas, canvas boards, or wood panels
- Flat brushes (1/2″ to 1″)
- Round brushes (various sizes)
- Fan brushes for foliage
- Palette knives for texture
- Acrylic or oil paints in earth tones and greens
For Watercolors:
- Cold press watercolor paper (140 lb or more)
- Round and liner brushes
- Watercolor paints (pans or tubes)
- Masking tape and masking fluid
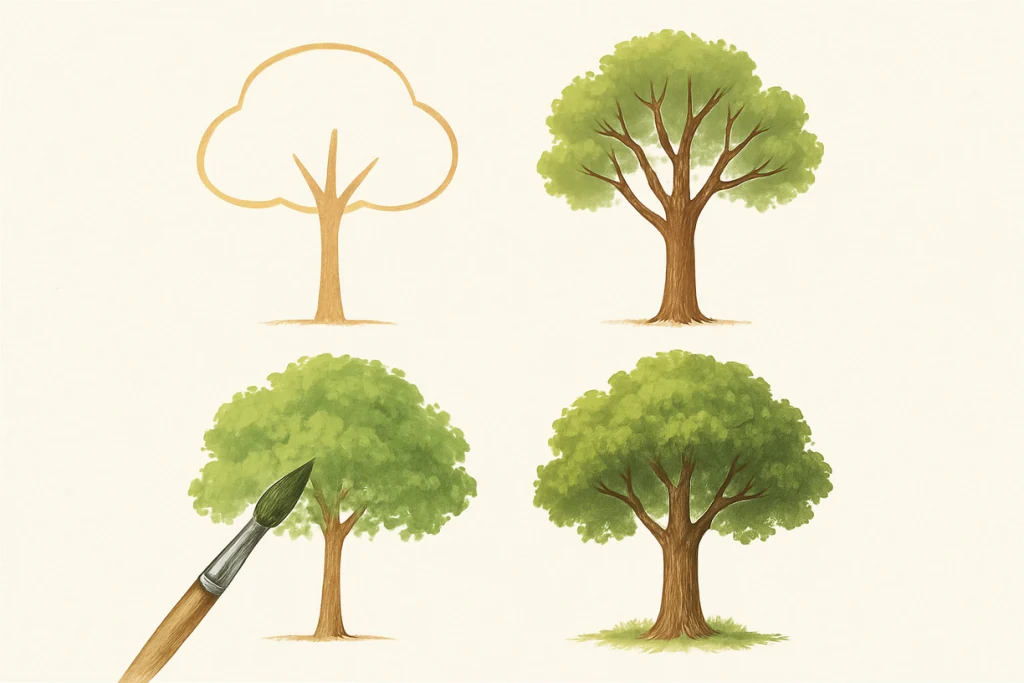
Step-by-Step Guide: How to Paint Trees
There is no single method for painting trees, but understanding the structure and layering process makes a world of difference.
Step 1: Study Tree Structure and Silhouettes
Start by observing trees in real life or reference photos. Each type has a distinct structure.
Key Elements to Observe
- Trunk shape (tapered, curved, straight)
- Branch pattern (forking, spiraling, clustered)
- Foliage type (sparse, dense, airy, needle-like)
- Root base and ground contact
- Seasonal variations
Sketch tree silhouettes to train your eye in identifying proportions and flow. This will guide your composition and form.
Step 2: Sketch the Tree Framework
Begin with a light pencil sketch or paint underdrawing on your surface.
Basic Sketching Tips
- Use long, flowing lines to mark the trunk and major branches
- Avoid symmetry; natural trees are uneven
- Sketch the foliage area as a loose cloud shape
- Add roots if they’re visible above the ground
This step helps place your tree within the composition and sets up space for highlights and shadows.
Step 3: Block in Basic Shapes with Base Colors
Start painting by filling in the large shapes: trunk, branches, and foliage zones.
Suggested Base Colors
- For trunks: burnt sienna, raw umber, or a cool gray
- For foliage: sap green, olive green, or mixtures with yellow ochre
- For sky gaps: use your background color
Use a larger brush to keep the initial layers loose and expressive. Don’t worry about fine details yet—just establish shapes and values.
Step 4: Paint the Tree Trunk and Branches
The trunk is the tree’s backbone, so it needs dimension and texture.
Painting Tree Trunks
- Mix a neutral brown with warm and cool tones for interest
- Use vertical brush strokes to mimic bark texture
- Add highlights with a touch of white or yellow
- Shade one side of the trunk to suggest sunlight direction
- Use a liner brush or round tip for fine branches
For realism, layer colors—start dark and build up lighter tones with a dry brush technique or palette knife.
Step 5: Add Foliage Using Various Brush Techniques
Foliage gives life to your tree, and brushwork can create natural, varied textures.
Acrylic and Oil Foliage Techniques
- Stippling: Dab a round or fan brush to simulate leaves
- Dry Brushing: Drag a nearly dry brush across the canvas for wispy textures
- Sponge or Rag: Press irregular shapes for a looser style
- Fan Brush: Sweep in multiple directions to suggest layered foliage
Watercolor Foliage Tips
- Use wet-on-wet for soft leaf clusters
- Use wet-on-dry for defined leaf shapes
- Layer warm and cool greens for dimension
- Lift paint with a paper towel for highlights
Add shadows under thick foliage with darker greens or blue-green mixtures.
Step 6: Blend in Details and Highlights
Once the structure and foliage are in place, refine the piece with smaller brushes.
What to Focus on
- Tiny twigs and branches poking through the canopy
- Bark texture and cracks using thin lines
- Sunlit leaf tips using a touch of white or light yellow
- Reflected light on the shaded trunk side
Keep details controlled. Too many can overwhelm your tree, while a few well-placed ones will elevate realism.
Step 7: Create Depth and Atmospheric Perspective
If you’re painting multiple trees or a full forest, depth is key.
Depth Techniques
- Use cooler, lighter colors for background trees
- Reduce detail and contrast in the distance
- Overlap trees and fade their edges into the sky or fog
- Use darker, warmer tones in the foreground
These tricks help create a three-dimensional, immersive scene.
Painting Different Types of Trees
Each tree species has its own personality. Practicing various kinds will make your paintings more dynamic.
Painting Pine Trees
- Use a flat brush to layer needle-like strokes downward
- Start narrow at the top and build outward toward the base
- Mix dark green and black for shaded areas
- Add a light snow effect with dry white highlights
Painting Oak Trees
- Paint a thick, gnarled trunk with deep grooves
- Use a sponge or fan brush for dense, rounded foliage
- Add moss or light gray bark tones for realism
Painting Birch Trees
- Use vertical streaks of black on a white base for bark texture
- Paint thin branches that shoot up and out
- Add hints of green or gold depending on the season
Painting Palm Trees
- Paint a tall, curved trunk with ringed textures
- Add long, curved fronds with a fan brush or detailed liner
- Use bright greens mixed with yellow or teal
Color Mixing Tips for Tree Painting
Earthy Browns and Trunks
- Burnt umber + ultramarine = deep bark brown
- Burnt sienna + white = sunlit bark
- Raw umber + black = shadowed trunk
Lush Greens for Foliage
- Sap green + lemon yellow = spring green
- Hooker’s green + ultramarine = cool forest green
- Olive green + burnt sienna = autumn tones
Mix your greens for variety—avoid using one flat shade across your painting.
Tips for Painting Trees in Different Seasons
Trees change dramatically across seasons, offering diverse painting inspiration.
Spring
- Soft, bright greens with small pink or white blossoms
- Use light brushwork for fresh, new leaves
Summer
- Rich, dark greens with thick foliage
- Emphasize sunlight with strong shadows and highlights
Autumn
- Warm tones like ochre, crimson, rust, and gold
- Use dry brush for falling leaves and textured grass
Winter
- Bare branches and neutral grays or blues
- Use a fine liner brush for branch complexity
- Add snow with thick white paint or soft washes
Painting Trees in Different Lighting
Lighting sets the mood of your artwork.
Morning Light
- Warm highlights with yellow or peach tones
- Cool shadows in the foliage
Midday
- Strong contrast and saturated colors
- Clear definition between sunlit and shaded areas
Sunset
- Use warm oranges and purples for dramatic skies
- Add golden edges to the tree tops and branches
Fog or Rain
- Desaturated tones and soft edges
- Fade branches into the background for atmosphere
Common Mistakes When Painting Trees
Using Flat Color
Nature is full of color variation. Mix tones even within the same trunk or leaf cluster.
Overloading Detail
Suggest leaves and branches; don’t outline every one.
Forgetting Light Source
Determine where the light comes from before you paint shadows and highlights.
Making Trees Too Symmetrical
Natural trees have irregularities—embrace their unpredictability.
Practice Exercises to Improve Tree Painting
Quick Sketch Sessions
Set a timer and sketch 10 different tree shapes from reference or imagination.
Brush Technique Drills
Practice using each brush (fan, round, flat) to create various leaf patterns.
Color Mixing Challenge
Try to mix 10 unique greens without using green paint directly.
Seasonal Study
Paint the same tree in all four seasons on one canvas or in a sketchbook.
Final Thoughts
Learning how to paint trees opens the door to more expressive and natural-looking landscape art. Trees are forgiving subjects, rich in detail yet flexible enough for stylistic interpretation. Whether you’re going for realism or whimsical abstraction, the skills you gain from tree painting—layering, brush control, understanding form—will benefit every painting you create.
Keep observing trees around you. Sketch in parks, photograph unusual bark patterns, and explore how different artists portray trees. With time and patience, you’ll not only learn how to paint trees—you’ll learn how to breathe life into them.
Let your brush explore every branch, every leaf, and every season.