Have you ever wanted to capture the beauty of the human heart on paper? Whether you’re an aspiring artist or just looking for a fun way to express yourself, learning how to draw a human heart can be both rewarding and enjoyable.
In this guide, you’ll discover simple steps that make the process easy, even if you’re a beginner. You’ll gain confidence with each stroke, and soon, you’ll create a stunning heart illustration that you can be proud of. Ready to unleash your creativity?
Let’s dive in and get started!
Contents
Materials Needed
Gathering the right materials makes drawing a human heart easier. You don’t need many items. A few basic supplies will help you create a great drawing.
Drawing Paper
Start with good drawing paper. It should be thick enough to hold pencil marks well. Choose a size that feels comfortable for you. Regular printer paper works too.
Pencils
You need a set of pencils. A range from HB to 6B is best. HB is good for outlines. Use softer pencils for shading.
Eraser
An eraser is essential. Choose a soft, white eraser for clean corrections. It helps fix mistakes without tearing the paper.
Sharpener
A pencil sharpener keeps your pencils sharp. A good point helps with details. Choose a hand-held sharpener for easy use.
Reference Image
Use a clear reference image. It helps you see the heart’s shape and details. Find one that shows the heart from different angles.
Color Pencils Or Markers
Color pencils or markers add life to your drawing. Use red for arteries and blue for veins. Choose colors that represent the heart well.
Ruler
A ruler can help with measurements. Use it to draw straight lines if needed. It helps keep your work neat and organized.
Optional: Blending Stump
A blending stump is useful for shading. It smooths out pencil marks. This tool creates depth in your drawing.

Credit: www.youtube.com
Basic Heart Anatomy
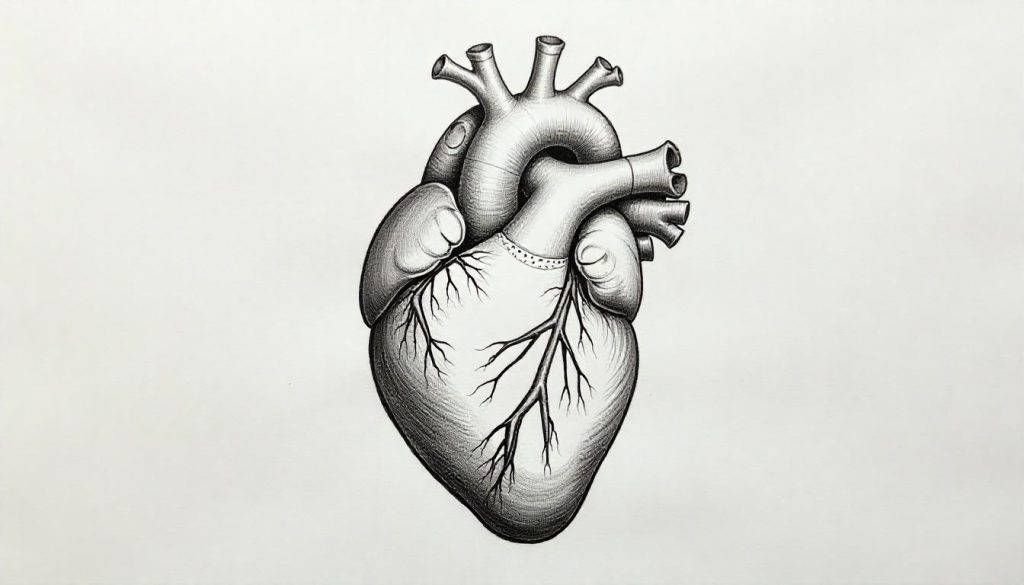
Understanding basic heart anatomy is essential for anyone looking to draw a realistic human heart. The heart is not just a simple shape; it has unique features that make it complex and fascinating. Knowing these details can significantly enhance your drawing skills and bring your artwork to life.
Heart Chambers
The human heart consists of four chambers: two atria and two ventricles. The right atrium receives deoxygenated blood from the body, while the right ventricle pumps it to the lungs for oxygenation. In contrast, the left atrium receives oxygenated blood from the lungs, and the left ventricle pumps it out to the rest of the body.
- Right Atrium: Collects deoxygenated blood.
- Right Ventricle: Sends blood to the lungs.
- Left Atrium: Receives oxygen-rich blood.
- Left Ventricle: Distributes blood throughout the body.
Heart Valves
Valves play a critical role in controlling blood flow through the heart. They ensure that blood moves in the right direction and prevents backflow. You’ll find four main valves: the tricuspid valve, pulmonary valve, mitral valve, and aortic valve.
- Tricuspid Valve: Between the right atrium and ventricle.
- Pulmonary Valve: Leads to the lungs.
- Mitral Valve: Between the left atrium and ventricle.
- Aortic Valve: Leads to the aorta.
Major Blood Vessels
The heart connects to several major blood vessels that transport blood throughout the body. The aorta is the largest artery and carries oxygen-rich blood to the body. The vena cavae bring deoxygenated blood back to the heart.
- Aorta: Distributes oxygenated blood.
- Pulmonary Arteries: Carry blood to the lungs.
- Pulmonary Veins: Bring blood back from the lungs.
- Vena Cavae: Return deoxygenated blood to the heart.
Have you ever tried to capture the heart’s intricate details in a drawing? The more you understand its anatomy, the easier it becomes to illustrate its unique structure. Dive into your drawing with a clear vision of these components, and you’ll see how your skills improve.
Sketching The Heart Outline
Sketching the outline of a human heart is a fun task. It helps you understand its shape and structure. Start with simple shapes to build your drawing. This makes it easier to add details later.
Drawing The Outer Shape
Begin with a basic outline. Draw a large oval shape. This oval represents the heart’s main body. Next, add a small notch at the top. This notch shows where the arteries connect.
Make the bottom of the heart pointy. This gives the heart its unique shape. Ensure the left side is slightly larger than the right. This difference shows the heart’s chambers.
Marking Key Sections
Now, it’s time to mark key sections. Divide the heart into four parts. Draw two horizontal lines inside the oval. These lines represent the chambers: the atria and ventricles.
Label each section. The upper chambers are the left and right atria. The lower chambers are the left and right ventricles. This helps you remember their positions.
These steps create a solid foundation. Your heart outline is now ready for details. Keep practicing to improve your skills.

Credit: easydrawingguides.com
Adding Main Structures
Start by sketching the basic outline of the heart. Focus on the major structures like the atria, ventricles, and major blood vessels. This will create a solid foundation for your drawing.
Adding the main structures of the human heart is an exciting part of your drawing journey. This step brings your artwork to life, showcasing the complexity and beauty of this vital organ. You’ll focus on the atria, ventricles, and the major arteries and veins. Let’s dive into how to accurately represent these essential components.
Drawing The Atria And Ventricles
Start by sketching the two upper chambers, known as the atria. They are relatively smaller compared to the larger lower chambers, the ventricles.
1. Draw two oval shapes at the top of your heart.
2. Ensure they are slightly overlapping, as they sit atop the ventricles.
3. Next, create the ventricles below them. These should be larger and more muscular in appearance.
Take your time to capture the distinct shapes. You might find it helpful to look at reference images to understand the proportions better. Pay attention to the subtle curves; they add realism.
After establishing the atria and ventricles, consider the placement of the septum. This wall divides the left and right sides of the heart. Adding this detail will enhance your drawing’s accuracy.
Adding Major Arteries And Veins
Once the chambers are in place, it’s time to add the major arteries and veins. The aorta and pulmonary arteries are crucial to include.
1. Start with the aorta, which curves upward and then arches down.
2. Add the pulmonary arteries branching off towards the lungs.
Next, don’t forget the veins. The superior and inferior vena cava should be drawn entering the right atrium. These vessels are essential for returning blood to the heart.
Keep your lines clean and confident. If you feel uncertain, practice drawing each artery and vein separately before integrating them into the heart.
Using a reference can help you understand where each vessel connects. Your drawing will become more lifelike with each detail added.
What challenges are you facing as you draw? Engaging with these structures can be intricate, but the payoff is worth it. Each line you add brings you closer to a stunning representation of the human heart.
Detailing The Heart
Detailing the heart brings your drawing to life. It adds depth and realism. Focus on refining the shape and adding texture. These steps make your heart look more authentic.
Refining The Shape
Start by refining the outline of the heart. Adjust the curves and angles. Make the top lobes round and smooth. The bottom should taper gently to a point.
Look at reference images. Notice the slight variations in shape. Each heart is unique. Capture these details in your drawing.
Adding Texture And Layers
Texture gives the heart depth. Use short, light strokes to create veins. Add darker lines for shadows. This adds dimension and realism.
Layer different shades of red and purple. Blend these colors softly. This technique adds life to your drawing. Don’t be afraid to experiment.

Credit: es.pinterest.com
Shading And Depth
Shading and depth are key to drawing a human heart. Use light and dark tones to create dimension. This technique adds realism and makes the heart look three-dimensional. Focus on shadows and highlights for a more lifelike appearance.
Shading and depth are crucial for bringing your drawing of a human heart to life. They add realism and dimension, transforming a flat image into something vibrant and engaging. By focusing on light and shadow, you can create a heart that feels almost three-dimensional.
Creating Light And Shadow
Start by identifying the light source in your drawing. This will guide where you place shadows and highlights.
Use a soft pencil or charcoal to create a gradient effect. Begin with light pressure for highlights and gradually increase pressure for darker areas.
Pay attention to the natural curves of the heart. Shadows will appear in the crevices and areas that are further away from the light source.
Look closely at reference images. Notice how light interacts with the heart’s shape. Mimicking this will enhance the realism in your drawing.
Enhancing 3d Appearance
To make your heart pop off the page, use contrasting shades. Darker areas will push the heart back, while lighter areas will bring it forward.
Consider using blending tools like a tortillon or your finger. This can smooth transitions between light and dark, creating a more polished look.
Add fine details, such as veins and textures, with a sharp pencil. These will catch the light differently and add to the overall depth.
Experiment with layering your shades. Start light and build up to darker tones. This technique can create a striking visual effect that draws the viewer in.
How do you feel when you see a beautifully shaded drawing? It captures your attention, doesn’t it? Aim to evoke that same reaction with your artwork.
Adding Final Touches
Adding final touches to your human heart drawing can elevate it from good to great. This stage is where you highlight the intricate details that make your heart realistic and vibrant. Let’s dive into how to refine your artwork and give it that professional finish.
Highlighting Key Features
To bring your heart to life, focus on the key features. Use a white gel pen or lighter colored pencil to add highlights to the chambers and valves. This technique creates a sense of depth and dimension.
Consider the blood vessels. Adding subtle shadows can emphasize their curves and connections. A slightly darker shade around the edges will enhance the overall look, making it pop off the page.
- Emphasize the aorta by outlining it with a darker pencil.
- Add tiny details like the small arteries branching out.
- Use gentle strokes for the veins to create a realistic texture.
As you work on these details, think about how they contribute to the heart’s function. Each feature plays a role in how blood circulates. This understanding can inspire you to capture them with more precision.
Cleaning Up The Drawing
Once you’re satisfied with the highlights, it’s time to tidy up your drawing. Erase any stray lines or smudges that distract from your artwork. A clean drawing looks more professional and polished.
Use a soft eraser for delicate areas. Avoid pressing too hard, as this might damage your paper. Pay attention to the edges of your heart; they should be crisp and well-defined.
Finally, consider giving your drawing a protective layer. A fixative spray can help preserve your artwork, preventing smudging and fading. It’s a small step that makes a big difference in the longevity of your piece.
Reflect on your artistic journey as you finalize your drawing. What did you learn about your technique? The final touches are not just about aesthetics; they are about celebrating your growth as an artist.
Frequently Asked Questions
How To Draw A Heart Step By Step?
To draw a heart, start with two small circles at the top. Connect them with a curved line. Then, draw a pointed bottom by creating two diagonal lines that meet. Erase any unnecessary lines. Fill in or outline the heart as desired.
Enjoy your simple heart drawing!
How To Draw A Heart In Biology For Kids?
To draw a heart in biology, start with two curved lines at the top. Connect them with a pointed bottom. Use red or pink colors to fill in the heart. Label parts like the atria and ventricles for educational purposes.
Practice makes perfect!
How Do You Draw A Rainbow 🌈?
To draw a rainbow, start with a semicircle. Use red for the top arc, followed by orange, yellow, green, blue, and violet. Space each color evenly. Add clouds at both ends for a finishing touch. Use colored pencils or markers for vibrant results.
Enjoy your colorful creation!
What Is The Cutest Thing To Draw?
The cutest thing to draw is a baby animal, like a puppy or kitten. Cartoon characters, such as adorable teddy bears or cheerful pandas, also make great choices. These subjects evoke warmth and joy, making them perfect for any artist seeking to create something endearing.
Conclusion
Drawing a human heart can be fun and rewarding. With practice, anyone can improve their skills. Focus on shapes and details as you draw. Remember to take your time and enjoy the process. Use resources like tutorials and videos for guidance.
Share your work with friends to get feedback. Keep drawing regularly to see progress. Embrace mistakes; they help you learn. Your journey in art is unique. Keep exploring and have fun creating!