
Have you ever looked at a polar bear and wondered how to capture its beauty on paper? Drawing a polar bear might seem challenging at first, but it doesn’t have to be.
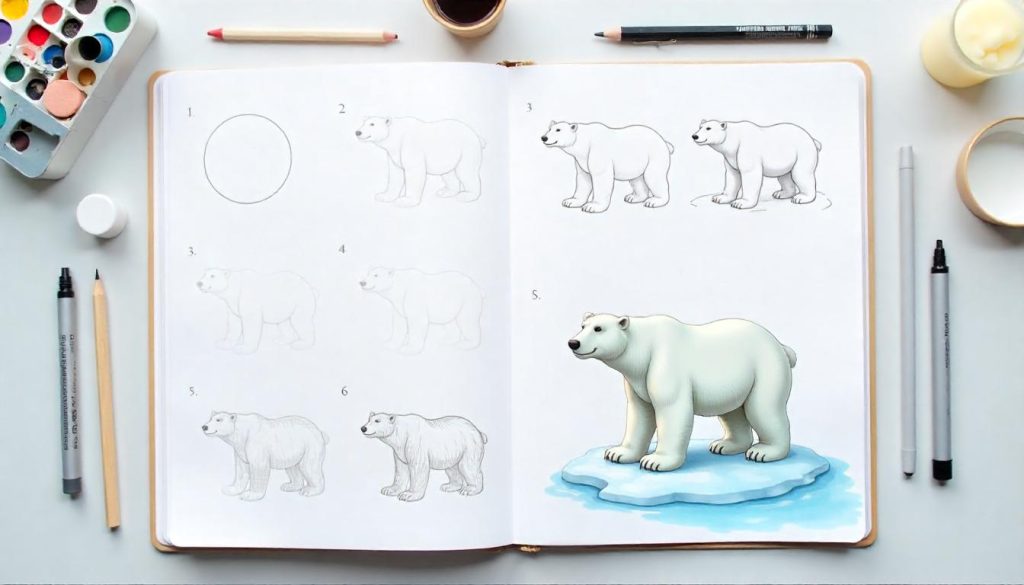
Imagine the satisfaction of creating your own artwork that showcases the grace and majesty of these magnificent creatures. In this guide, you’ll discover simple steps to bring a polar bear to life on your canvas. Whether you’re a budding artist or just looking for a fun activity, this article will provide you with the tips and techniques you need.
Ready to unlock your artistic potential and impress your friends with your drawing skills? Keep reading to learn how!
Contents
Materials Needed
Drawing a polar bear is a fun and rewarding activity. To start, gather the right materials. This helps create a clear and beautiful drawing. Each item plays a role in bringing your polar bear to life. Below are the essential materials needed.
1. Drawing Paper
Choose a good quality drawing paper. It should be thick and smooth. This helps in making clean lines. It also supports erasing without tearing.
2. Pencils
Use different pencils for sketching and details. A 2B pencil is great for sketching. An HB pencil works well for fine details. Keep them sharp for precise lines.
3. Eraser
A soft eraser is essential. It helps correct mistakes easily. Use it gently to avoid smudging your work.
4. Sharpener
A good sharpener keeps your pencils ready. Sharp tips make it easier to draw clean lines. This is important for details in your polar bear drawing.
5. Ruler
A small ruler is useful. It helps in drawing straight lines. This can be handy for framing your drawing.
6. Blending Stump
A blending stump is great for shading. It softens lines and creates depth. It adds a realistic touch to your polar bear.
7. Reference Image
Find a clear reference image. This guides your drawing. It helps in capturing the polar bear’s features accurately.

Credit: helloartsy.com
Basic Shapes
Drawing a polar bear begins with understanding its basic shapes. These shapes provide a foundation, making the process easier. By breaking down the bear into simple forms, you can capture its essence. This approach allows even beginners to sketch confidently.
Sketching The Head
Start with a circle for the head. This circle represents the bear’s round skull. Add a smaller oval at the bottom for the snout. Connect the two shapes with gentle curves. These lines form the bear’s jaw and cheeks. Don’t worry about details now. Focus on getting the shapes right.
Draw two small circles for the eyes. Place them symmetrically above the snout. Add small triangles for ears on the top of the head. These triangles should tilt slightly. They give the bear a gentle look. Keep the sketch light. You will refine these shapes later.
Forming The Body
Begin with an oval larger than the head’s circle. This oval forms the main body. Position it slightly below the head. Ensure the body is wider than it is tall. This gives the bear a sturdy look. Draw a smaller oval at the back for the hindquarters. Connect this to the main body.
For the legs, use simple lines. Draw two vertical lines for the front legs. These lines extend from the body’s bottom. For the back legs, draw lines angled slightly. The back legs should appear thicker and stronger. These lines give the bear a solid stance.
Add small circles at the end of each leg. These circles represent the bear’s paws. Ensure they’re proportionate to the bear’s size. With these basic shapes, you have a solid foundation. Your polar bear is starting to take form.
Adding Details
Enhancing your polar bear drawing involves adding intricate details. Focus on the fur’s texture and the bear’s expressive eyes. Pay attention to shadows and highlights for a realistic look.
Adding details to your polar bear drawing is where the magic truly happens. You’ve got the basic shape down, now it’s time to bring your bear to life. These details will transform a simple sketch into a captivating image. Dive into each section and discover how small tweaks can make a big difference.
Drawing The Eyes And Nose
The eyes are the windows to your bear’s soul. Make them expressive yet simple. Start by drawing two oval shapes for the eyes. Position them symmetrically on either side of the bear’s face. Add a small circle within each oval to represent the pupil, leaving a tiny white spot for a glimmer effect.
For the nose, think of a broad triangle with rounded edges. Place it centrally and slightly below the eyes. Color it in with a dark shade, but leave a small spot uncolored to suggest shine. This small detail can make your bear appear more lifelike.
Shaping The Ears
Polar bear ears are small and rounded. They sit gently on top of the head, not too far apart. Imagine two half circles peeking from behind the head. Draw them with light, curved lines to mimic their soft texture.
Experiment with their placement. Move them slightly closer or further apart to see how it changes the bear’s expression. This subtle detail can convey different emotions or attitudes in your drawing. Have you ever noticed how ear positioning can make animals look curious or alert?
Refining The Mouth
The mouth of your polar bear adds character. Draw a small line extending from the bottom of the nose, curving gently downwards. This creates a simple smile or a neutral expression.
Consider adding a slight curve at the ends for a friendlier look. A straight line can make your bear seem more serious. Play around with different angles until you find the expression that suits your bear’s personality best.
Each detail you add enhances the story your drawing tells. Which feature do you think transforms your polar bear the most?
Creating Texture
Crafting a polar bear’s texture involves observing its fur’s softness and density. Use gentle strokes to mimic the bear’s fluffy coat. Blend shades of white and gray for depth, adding realistic features to your drawing.
Creating texture is key when drawing a polar bear. It brings your art to life by mimicking the bear’s natural appearance. This section will guide you on how to make your polar bear drawing look realistic through texture. You’ll learn techniques for fur and shadows, essential elements in capturing the essence of this majestic animal.
Fur Techniques
Start by observing real polar bears. Notice how their fur looks fluffy yet dense. To replicate this, use quick, light pencil strokes. These strokes should vary in length and direction. This mimics the randomness of fur growth.
Try using a blending tool like a stump or your finger. Blend certain areas to create softer fur patches. This helps add depth and realism to your drawing.
Consider the fur’s direction. Around the face, fur tends to be shorter and more uniform. On the body, it flows in the direction of movement. Paying attention to this can transform your sketch into a lifelike image.
Adding Shadows
Shadows add dimension and contrast to your polar bear drawing. They emphasize the contours of the body and facial features. But, where should you add these shadows?
Think about where the light source is coming from in your drawing. Shadows will be cast on the opposite side. Use a darker pencil or more pressure to shade these areas.
Consider subtlety. Shadows don’t need to be overwhelming. A light touch can often be more effective than heavy shading. This keeps your drawing balanced and natural.
Have you ever noticed how shadows can change the mood of a picture? Play around with different intensities. See how it affects the overall feel of your artwork.
Final Touches
You’ve sketched a polar bear’s basic form. It’s time for the final touches. These make your drawing come alive. Add depth and personality. Let’s explore the essential steps.
Highlighting Details
Details bring realism to your polar bear. Focus on the fur. Use short strokes to mimic fluffiness. Darken the eyes to show emotion. Add shadows under the belly. This gives a sense of weight and dimension. Pay attention to the claws. They should appear sharp and strong. These small touches enhance your drawing significantly.
Correcting Mistakes
Mistakes happen to everyone. Don’t worry if your bear looks off. Check the proportions first. A large head or tiny paws can seem odd. Adjust the lines for balance. If the fur looks too flat, add more texture. Rework any areas that seem unclear. Erasing and redrawing can improve your work. Be patient with your process. It’s part of learning and growing.

Credit: www.youtube.com
Coloring Tips
Coloring a polar bear drawing brings your art to life. The right colors and techniques can make your bear look realistic. Follow these coloring tips to enhance your polar bear drawing.
Choosing The Right Colors
Start with a white or light grey base for the polar bear. These colors reflect their natural fur. Use a soft blue or light purple for shadows. This adds depth and dimension. Highlight areas with a white pencil or crayon. It keeps the bear’s fur looking fluffy and bright. Use reference images of polar bears for accuracy.
Blending Techniques
Blending is key to smooth transitions between colors. Use a blending stump or cotton swab for soft edges. Gently blend the colors in circular motions. This avoids harsh lines and keeps the fur looking natural. Layer colors by starting with light shades. Gradually add darker colors for shadows and depth. Practice blending on scrap paper first. This helps achieve the desired effect.
Frequently Asked Questions
What Materials Are Best For Drawing Polar Bears?
To draw a polar bear, use quality pencils or charcoal for sketching. Consider using watercolor or pastels for shading. A smooth paper surface enhances detail and texture. These materials help capture the bear’s fur and snowy environment effectively.
How Do I Start Drawing A Polar Bear?
Begin by sketching basic shapes like circles and ovals for the head and body. Add guidelines for facial features and limbs. Gradually refine the shapes to resemble a polar bear. This foundational step helps in achieving accurate proportions.
What Techniques Capture Fur Texture In Drawings?
To depict fur texture, use short, overlapping strokes with varying pressure. Layer these strokes to create depth and softness. Experiment with different pencil grades or brushes for realism. This technique enhances the lifelike appearance of the polar bear’s coat.
How Can I Improve My Polar Bear Drawings?
Practice regularly by studying polar bear anatomy and observing reference photos. Experiment with different drawing techniques and materials. Seek feedback from fellow artists or online communities. Continuous learning and adaptation will enhance your drawing skills.
Conclusion
Drawing a polar bear can be easy and fun. Follow the steps above. Practice your skills regularly. This will boost your confidence and creativity. Remember, mistakes are part of learning. They help you improve. Use different shading techniques for depth.
Experiment with various poses and expressions. Share your artwork with friends and family. Get feedback and keep improving. Drawing is a journey, not a race. Enjoy each step along the way. Your polar bear drawings will get better with time.
Keep practicing, and soon you’ll see progress. Happy drawing, and enjoy your art journey!