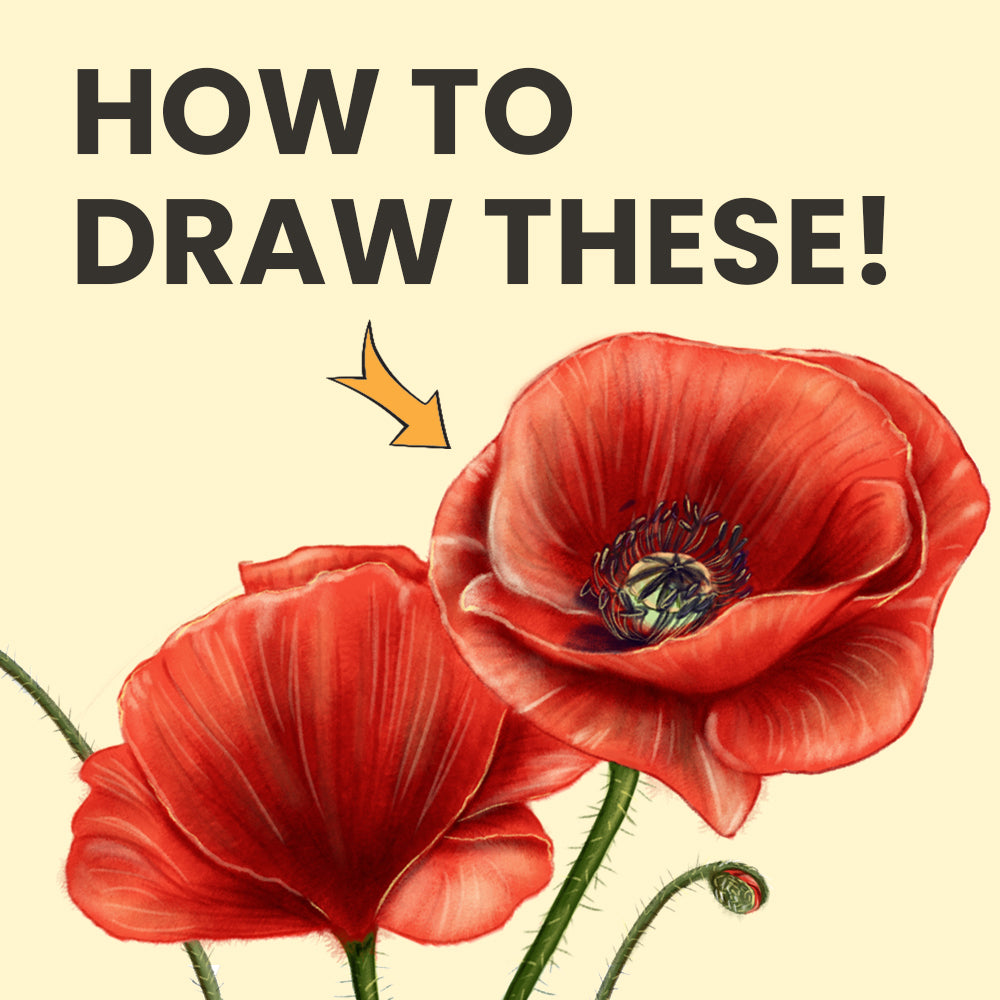
Are you ready to unleash your inner artist? Drawing a poppy is not just about putting pencil to paper; it’s about capturing the vibrant beauty of nature.
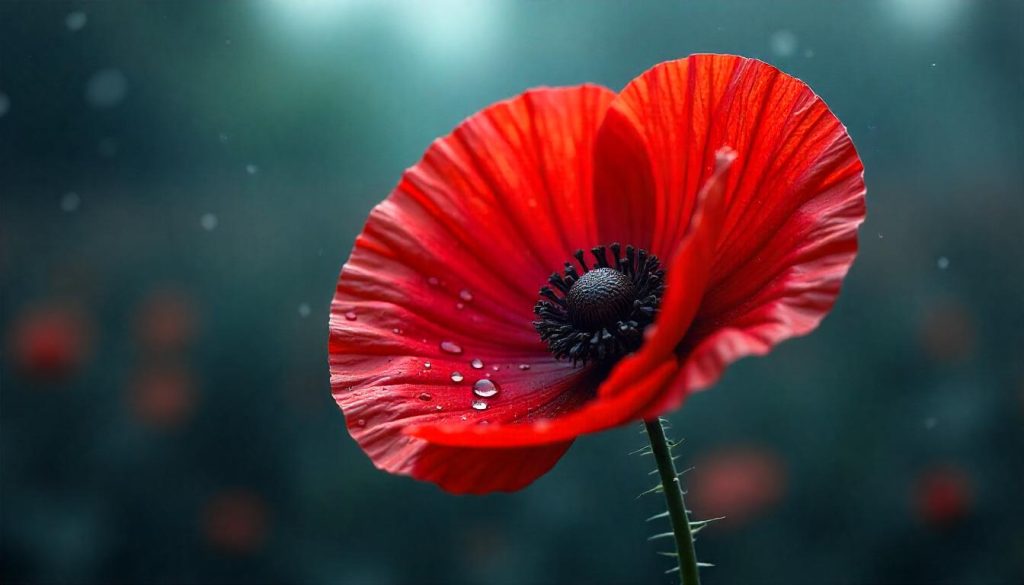
With its striking red petals and delicate black center, the poppy is a perfect subject for both beginners and seasoned artists. Whether you want to create a stunning piece for your home or just enjoy a relaxing hobby, learning how to draw a poppy can be incredibly rewarding.
You’ll discover simple techniques that make it easy to bring this flower to life. Stick around, and let’s dive into the steps that will make your poppy drawing bloom beautifully on the page!
Contents
Materials You’ll Need
To draw a poppy, you need some basic materials. Gathering the right tools makes the process easier. Here’s what you’ll need to get started.
Paper
Choose good quality drawing paper. A thicker paper holds colors better. Use smooth paper for fine details.
Pencils
A set of pencils is essential. Start with a light pencil for sketching. A darker pencil helps with details.
Eraser
An eraser is important for corrections. Use a soft eraser to avoid damaging the paper. It helps keep your work clean.
Colored Pencils Or Markers
Colored pencils add life to your poppy. Choose vibrant colors like red, green, and black. Markers can also work well for bold lines.
Blending Tools
Blending stumps or tissue can smooth colors. They help create depth in your drawing. Use them for softer transitions.
Reference Images
Find clear images of poppies. Use them as a guide for shapes and colors. This helps improve your accuracy.
With these materials, you are ready to create your poppy drawing. Each item plays a role in bringing your vision to life. Gather them and enjoy the process!
Credit: artprojectsforkids.org
Setting Up Your Workspace
Creating a comfortable workspace is key to drawing a poppy. A well-organized area helps you focus. It makes the drawing process enjoyable. Choose a spot with good lighting. Natural light is best, but a lamp can work too.
Gather your materials first. You will need paper, pencils, and erasers. Colored pencils or markers can bring your poppy to life. Keep everything within reach. This saves time and keeps you in the flow.
Choose The Right Surface
Your drawing surface matters. A sturdy table or desk is ideal. Avoid soft surfaces like your bed. They can cause mistakes. A clipboard can help if you’re drawing outside.
Organize Your Materials
Arrange your tools neatly. Place your pencils and erasers in one spot. Keep your colored pencils in another. This way, you can find what you need quickly.
Create A Relaxing Atmosphere
Make your workspace inviting. Play soft music or enjoy silence. Clear away distractions. A calm space helps you concentrate.
Stay Comfortable
Choose a comfortable chair. You may spend hours drawing. Good posture helps prevent fatigue. Take breaks to stretch and relax your hands.
Sketching The Basic Shapes
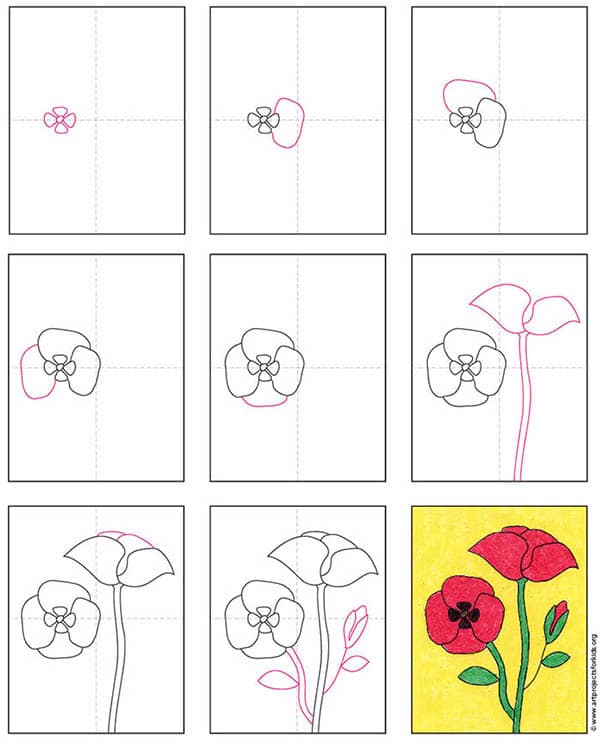
Sketching basic shapes is the first step to drawing a poppy. Start with simple circles and ovals to outline the flower’s petals. This technique makes it easier to create a beautiful and accurate poppy drawing.
Sketching the basic shapes is the foundation of drawing a beautiful poppy. By starting with simple forms, you can build your flower step-by-step. This approach makes it easier to capture the unique features of the poppy without feeling overwhelmed.
Drawing The Flower’s Center
Start with a small circle in the middle of your paper. This will be the center of your poppy.
Add another slightly larger circle around it. This represents the area where the petals will attach.
You can enhance the center by sketching small dots or lines to depict the stamen. These details will give your flower a realistic look.
Outlining The Petals
Next, sketch the petals around the center. Poppy petals are typically broad and slightly wavy.
Draw four to six petal shapes extending from the center. Use soft, curved lines to create a natural flow.
Don’t worry about perfection; each petal is unique. Allow your creativity to shine through as you capture the poppy’s essence.
Adding The Stem And Leaves
Now, it’s time to add the stem. Draw a straight line extending downward from the center of the flower.
Make the stem slightly thicker towards the base for a more realistic appearance.
For the leaves, sketch elongated shapes that are jagged at the edges. Place these leaves on either side of the stem to create balance.
Adding these elements brings your poppy to life.
What surprises you most about the drawing process?
Credit: drawingwithpri.art
Refining The Outline
Refining the outline helps create a clear plan for drawing a poppy. Focus on the flower’s shape and details. Step-by-step guidance makes it easy to follow along and achieve a beautiful result. Enjoy the process and let your creativity shine.
Refining the outline is a crucial step in creating a captivating poppy drawing. It’s not just about getting the basic shapes down; it’s about enhancing the details that bring your artwork to life. As you refine your outline, focus on the subtle nuances of the flower, making it more realistic and visually appealing.
Smoothing The Petal Edges
Begin by examining the outline of your poppy petals. Are the edges too sharp or uneven? Softening those edges can create a more natural look.
Use a gentle hand to round out the shapes of the petals. You want them to appear delicate, as if they are gently swaying in the breeze.
Consider the way light hits the petals. Adding slight curves can help depict how the light interacts with the flower.
Adjust the contours to reflect the petals’ natural flow. Look at reference images to understand how real poppies look. You may find that small tweaks make a significant difference.
Defining The Stem And Leaf Details
Next, shift your focus to the stem and leaves. The stem should be sturdy yet graceful, supporting the beautiful blooms above.
Sketch in the stem with a slight curve to convey movement. A straight line can make your drawing look stiff.
Add details to the leaves by outlining their serrated edges and veins. This not only enhances realism but also adds texture to your drawing.
Think about how the leaves interact with the stem. Are they overlapping? Are they facing different directions? These details can create a more dynamic composition.
What little touches can you add to make your poppy unique? Your personal style will shine through as you refine these elements.
Keep refining until your outline feels complete. This step is essential for making your final drawing more vibrant and lifelike.
Adding Depth And Texture
Creating depth and texture in your poppy drawing brings it to life. Use shading techniques to show light and shadow. Adding fine details to petals and leaves will enhance the overall look, making your artwork more realistic.
Adding depth and texture is the key to transforming a simple drawing of a poppy into a vibrant piece of art. The intricacies of shading, detailing, and color can breathe life into your creation. Let’s dive into how you can achieve this to make your poppy truly stand out.
Shading The Petals
Start by identifying the light source. This will guide where you place your shadows.
Use a soft pencil or charcoal to create subtle gradients on the petals.
Begin with light pressure and gradually build up darker areas. This technique adds a three-dimensional look.
Don’t hesitate to blend with a fingertip or a blending stump. It creates a smooth transition between shades.
Consider how the petals overlap. Shadows between them can enhance the depth.
Think about the natural sheen of the petals. A touch of white pencil or gel pen can mimic sunlight reflecting off them, adding that final pop.
Creating A Realistic Stem
The stem of the poppy deserves attention too. Start with a base color, typically a rich green.
Use a slightly darker green or even brown for shadows.
Apply these darker tones where the stem curves or bends, as this is where light would be less prominent.
Texturing the stem is crucial. Tiny lines or dots can mimic the natural ridges you would find in a real stem.
Don’t shy away from imperfections; they add character.
Have you considered how the thickness of your lines can impact realism? Thicker lines can suggest closer objects, while thinner lines can recede into the background.
Detailing The Leaves
Leaves should complement the beauty of your poppy. Start with a base layer of green, then work in various shades.
Use lighter greens for areas catching light, and deeper shades for the parts in shadow.
Pay attention to the leaf shapes. Poppies often have jagged edges, so make sure to replicate this for authenticity.
Adding veins enhances realism. Lightly draw lines with a sharp pencil, following the natural leaf structure.
Consider the texture; leaves are not smooth. A little stippling or cross-hatching can add depth.
Reflect on how the leaves interact with the stem. Are they resting gently or caught in the wind? This can inform your detailing choices.
By focusing on these elements, you can elevate your poppy drawing. What unique features will you highlight in your artwork?
Coloring Your Poppy
Drawing a poppy is simple and fun. Start with a circle for the center and add petal shapes around it. Use bright colors to bring your poppy to life, making it stand out on the page. Enjoy the process and let your creativity shine.
Coloring your poppy can truly bring your artwork to life. The vibrant reds and deep blacks of the petals create a striking contrast that captures attention. Choosing the right colors and techniques can enhance your drawing, making it not just a representation but a piece of art that resonates.
Choosing The Right Colors
Start with a classic red for the poppy petals. A bright cherry red can be your base color.
You might also consider deeper shades like crimson or scarlet to add depth.
Don’t forget about the black centers. A rich, dark black can provide a stunning focal point.
Think about the background too. A soft green or blue can help your poppy stand out even more.
Experiment with different shades and see what resonates with you.
Blending Techniques For Petals
Blending is key to achieving a natural look in your poppy petals.
Use a soft brush or your fingers to gently mix colors on the petals.
Start from the edges and work your way inward, creating a gradient effect.
If you’re using colored pencils, try layering different shades.
Start with your base color and gradually add darker tones towards the center.
This technique creates a more three-dimensional appearance.
Don’t rush the process; take your time to blend well for a smooth finish.
Adding Highlights And Shadows
Highlights and shadows breathe life into your poppy.
Identify where your light source is coming from.
Add white or a very light pink along the edges of the petals where the light hits.
For shadows, a deep burgundy or purple can enhance the contrast.
Apply these darker shades at the base of the petals and near the center.
This technique can dramatically enhance the depth of your drawing.
Think about how these details change the overall feel of your artwork.
What emotions do they evoke? Are they vibrant and lively or soft and serene?
Engaging with your colors thoughtfully can transform your poppy from ordinary to extraordinary.
Final Touches
Adding final touches to your poppy drawing makes it shine. This step brings out the beauty of your art. It helps create a lively and realistic flower. Focus on small details. They make a big difference.
Erasing Guidelines
Start by gently erasing any unwanted lines. Use a soft eraser for this task. It helps avoid smudging your drawing. Take your time. Make sure the edges are clean and smooth.
Look for any guidelines you used. Remove them carefully. Your poppy should look fresh and clear. This step will enhance its natural beauty.
Enhancing Small Details
Now, it’s time to enhance small details. Add texture to the petals. Use light strokes to create depth. Focus on the center of the flower too. Darkening the middle adds interest.
Consider adding a few shadows. Shadows give your drawing dimension. Use a slightly darker shade for this. Be subtle to keep it realistic.
Finally, check your overall composition. Make any necessary adjustments. Small changes can elevate your artwork significantly.
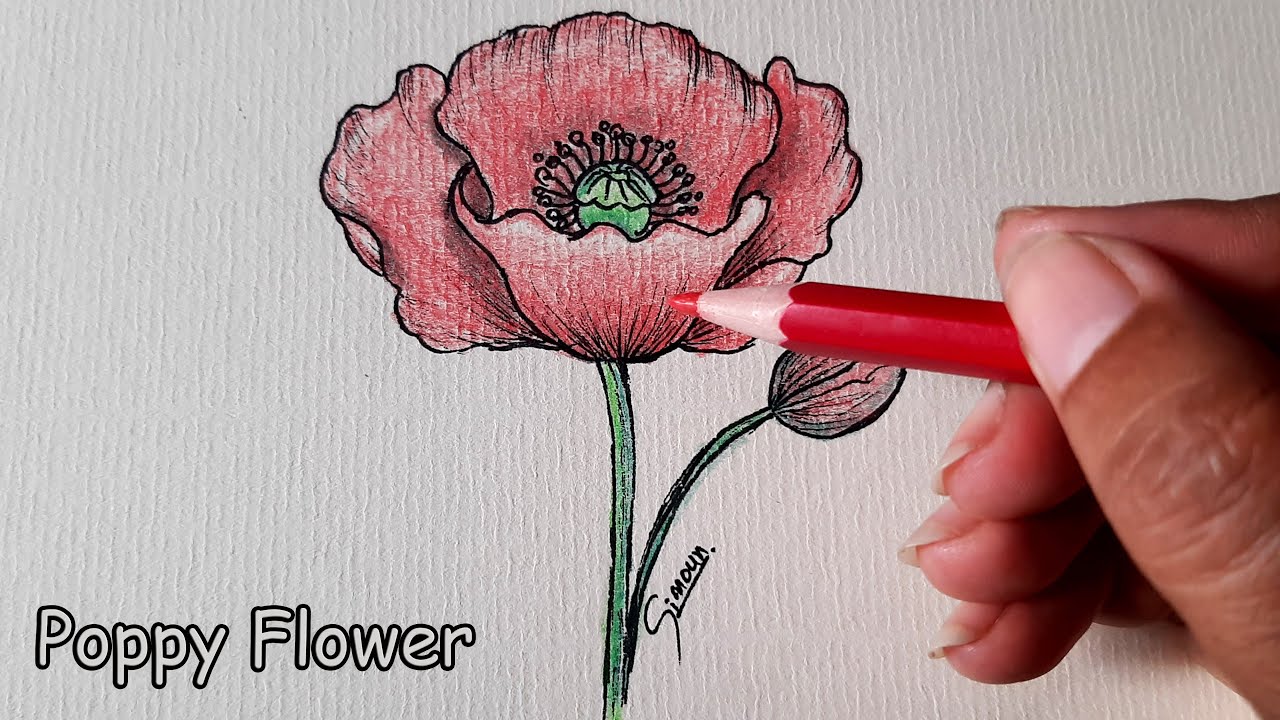
Credit: www.youtube.com
Frequently Asked Questions
How Do You Draw A Poppy For Beginners?
To draw a poppy, start with a simple circle for the flower’s center. Add petal shapes around it, making them wavy. Draw a thin stem and leaves, using curved lines. Keep the petals bright red and the center dark. Practice shading for depth and detail.
Enjoy your drawing!
How To Draw An Anzac Poppy?
To draw an ANZAC poppy, start with a circle for the center. Add four petal shapes around it, slightly overlapping. Draw the petals with wavy edges. Color the petals bright red and the center black. Finish with a green stem and leaves to complete your poppy illustration.
How To Draw A Remembrance Day Poppy For Kids?
To draw a remembrance day poppy, start with a circle for the center. Add four petal shapes around it, making them slightly wavy. Color the petals bright red and the center black. Optionally, draw a green stem and leaves to complete your poppy.
Enjoy your drawing!
What Do Poppy Flowers Symbolize?
Poppy flowers symbolize sleep, peace, and death. They represent remembrance, particularly in relation to fallen soldiers. In some cultures, poppies also signify beauty and fertility. Their vibrant colors can evoke emotions ranging from joy to sorrow. Overall, poppies carry deep and varied meanings across different contexts.
Conclusion
Drawing a poppy can be fun and rewarding. With simple steps, anyone can create beautiful art. Remember to practice the shapes and colors. Enjoy the process and let your creativity flow. Share your drawings with friends or family. They will appreciate your effort.
Keep exploring and trying new techniques. Each drawing helps you improve. Embrace your artistic journey and have fun with it. Happy drawing!