Are you ready to unleash your creativity? Drawing a rabbit is not only fun but also a great way to improve your artistic skills.
Whether you’re a beginner or someone looking to refine your technique, this guide will walk you through each step. Imagine the satisfaction of creating your own cute bunny, complete with fluffy ears and a twitching nose. You’ll discover tips and tricks that make the process easier and more enjoyable.
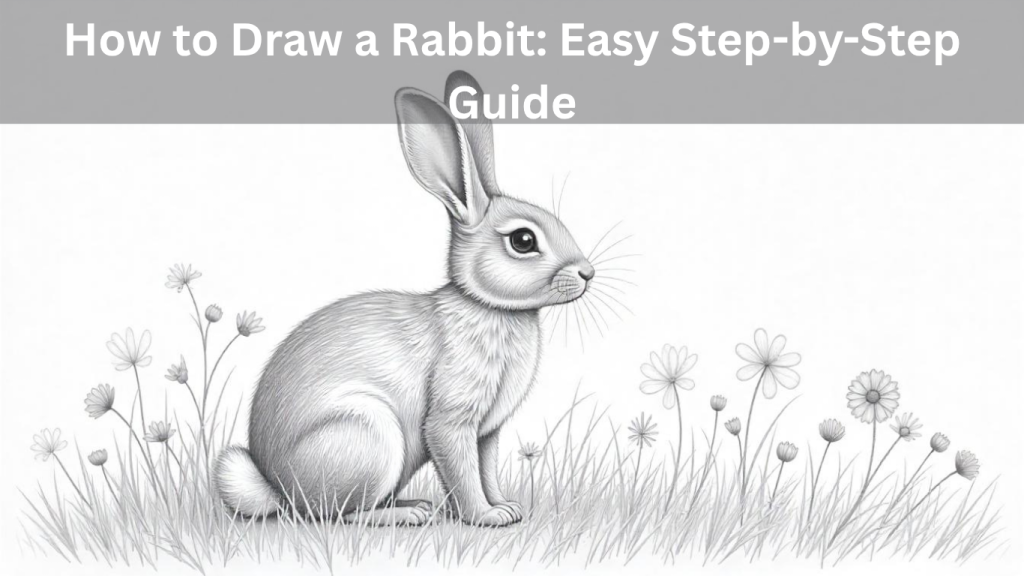
Grab your pencil and paper, and let’s bring your bunny to life! Keep reading to find out how.
Contents
Materials You Need
To draw a rabbit, gather a few basic materials. You will need paper, a pencil, and an eraser. Optional items include colored pencils or markers for adding color. Having these tools will make your drawing experience enjoyable and easy.
Drawing a rabbit can be a delightful experience, especially if you have the right materials at hand. Having the right tools not only makes the process smoother but also adds to your creative fun. Let’s dive into what you need to create a charming rabbit illustration.
Essential Drawing Tools
Start with some basic tools that you likely already have. A simple pencil is perfect for sketching your rabbit’s outline.
– Graphite Pencil: Choose a pencil with a medium hardness, like HB or 2B. They are great for both light lines and darker shading.
– Eraser: A good eraser is crucial. It helps correct mistakes without leaving smudges.
– Blending Stump: This handy tool allows you to create smooth transitions and gradients in your drawing.
Having these tools ready makes the initial sketching phase enjoyable.
Paper Choices
The type of paper you choose can impact your drawing.
– Sketch Paper: This is an excellent option for practice. It’s affordable and comes in various textures.
– Bristol Board: If you plan to add color, consider using Bristol board. It holds ink and markers well without bleeding.
– Watercolor Paper: For a more artistic touch, watercolor paper works beautifully if you want to use paints.
Think about what effects you want to achieve before selecting your paper.
Coloring Supplies
Adding color can bring your rabbit to life. Choose your coloring tools based on your comfort level.
– Colored Pencils: These are great for detailed work and blending colors smoothly.
– Markers: They provide bold colors but can bleed through paper, so choose a thicker paper.
– Watercolors: If you enjoy painting, watercolors can create soft, whimsical effects.
Which method excites you the most?
Additional Tools For Detail
Detailing can elevate your rabbit drawing. Some tools can help enhance your artwork.
– Fine-tipped Pens: Use these for outlining your drawing to add definition.
– White Gel Pen: This is perfect for adding highlights in the eyes or fur.
– Ruler: A ruler helps in creating straight lines if you want to include backgrounds or elements.
Gathering these materials can transform your approach to drawing.
Having the right materials will not only boost your confidence but also enhance your enjoyment as you draw. What will you choose to create first?
Credit: www.tiktok.com
Setting Up Your Workspace
Creating a comfortable workspace is important for drawing a rabbit. A good setup helps you focus. Gather your materials and organize your space. This will make your drawing experience enjoyable.
Choose A Suitable Table
Your drawing table should be sturdy and spacious. A flat surface is best for sketching. Ensure you have enough room for your tools. This will help keep everything organized.
Lighting Matters
Good lighting helps you see details clearly. Natural light is ideal for drawing. If you cannot use natural light, opt for bright lamps. Avoid harsh shadows that can confuse your vision.
Gather Your Materials
Collect all necessary materials before starting. You will need pencils, erasers, and paper. Consider having colored pencils or markers for later. Keep everything within reach to avoid interruptions.
Organize Your Tools
Arrange your tools in an orderly way. Place frequently used items in front. This saves time and keeps you focused. A clutter-free space boosts creativity.
Set Up A Reference Image
Having a reference image helps you draw accurately. Choose a clear picture of a rabbit. Place it where you can see it easily. This will guide you through the drawing process.
Personalize Your Space
Add personal touches to make your space inviting. Use colors or decorations that inspire you. A cozy environment can enhance your creativity. Make it a place where you enjoy spending time.
Sketching The Basic Shapes
Begin by sketching simple shapes to create a rabbit. Use circles for the head and body, and ovals for the ears. This approach makes drawing easier and helps with proportion.
Sketching the Basic Shapes is the foundation of drawing a rabbit. By breaking down the rabbit’s form into simple shapes, you can create a solid structure before adding details. This approach makes the task less daunting and more enjoyable.
Drawing The Head
Start with a circle for the rabbit’s head. This basic shape will help you position the facial features accurately.
Next, draw two small circles on either side of the head for the cheeks.
Think about the placement of the eyes; they should be slightly below the center of the head circle. Sketch two oval shapes for the eyes and add a small triangle for the nose.
With just these shapes, you’re already on your way to capturing the essence of a rabbit!
Adding The Body
Move on to the body by sketching an oval shape beneath the head. This oval should be larger than the head circle.
Connect the head and body with two curved lines to form the neck.
To give your rabbit a more dynamic posture, consider tilting the body slightly. You can create a sense of movement by drawing a line that suggests where the back will curve.
Remember, the body doesn’t have to be perfect. Focus on maintaining proportion relative to the head.
Outlining The Ears
Ears are a defining feature of rabbits, so they deserve attention. Start with two elongated oval shapes extending from the top of the head.
Position them slightly apart to give your rabbit a more natural look.
You can experiment with the ear shape; some rabbits have floppy ears while others have upright ones. Just ensure they align well with the head’s proportions.
As you outline the ears, think about how they might move. Are they perked up in alertness or drooping in calmness?
Each detail you add brings your rabbit closer to life.
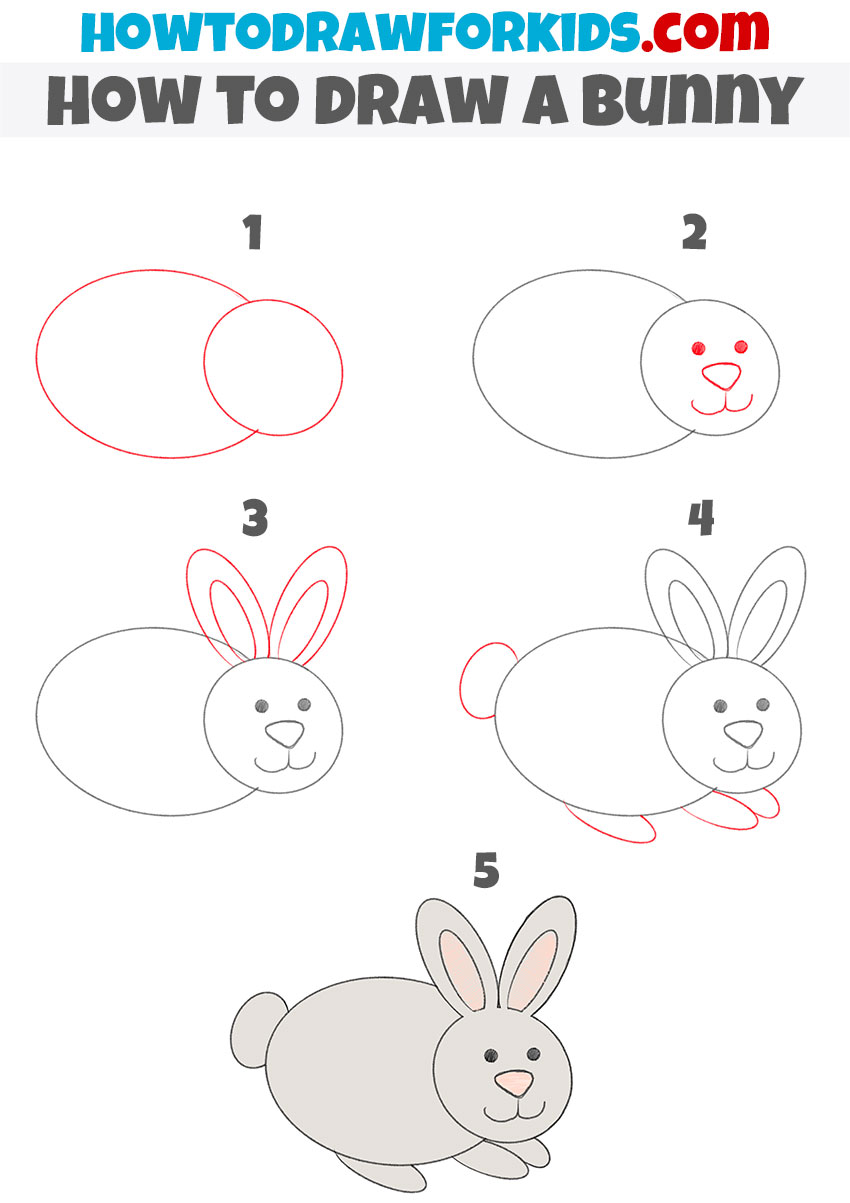
Credit: howtodrawforkids.com
Refining The Outline
Refining the outline is a key step in drawing a rabbit. This stage brings clarity to your initial sketch. Focus on making the shapes more defined. Add details that will make your rabbit look real.
Shaping The Face
Start with the rabbit’s face. Smooth out the rough edges. Make the head rounder and softer. Draw the eyes with gentle curves. Position them slightly higher on the face. This gives a cute look. Outline the nose with a small triangle. Add whisker spots on either side. These small details enhance the character.
Defining The Legs And Paws
Next, focus on the legs. Sketch the front legs first. Make them thin and straight. Draw gentle curves for the back legs. They should be stronger and thicker. Add small ovals at the end for paws. Ensure the paws look soft and rounded. This adds a friendly appearance to your rabbit.
Creating The Tail
The tail is a small but important detail. Draw a fluffy circle at the back. Keep it proportionate to the body. A well-defined tail adds charm. Make sure it looks soft and inviting. This tiny feature completes your rabbit’s look.
Adding Facial Features
Start by sketching the rabbit’s eyes, making them round and expressive. Next, add the nose, a small triangle shape. Don’t forget the ears; they can be long or floppy. These details bring your rabbit to life!
Adding facial features is the final touch that transforms your rabbit sketch from a simple outline into a lively character. These small details convey emotion and personality. Let’s break down how to give your rabbit its unique expression.
Drawing The Eyes
Start by creating the eyes. The shape can vary, but a gentle oval or a more rounded circle often works best.
Place the eyes slightly above the midpoint of the head. This gives your rabbit a more youthful look.
Consider adding a sparkle to the eyes. A small circle or dot can represent light reflecting off the surface. This simple addition adds life to your drawing.
Sketching The Nose
Next, focus on the nose. A rabbit’s nose is typically small and triangular. Position it right in the center of the face, just below the eyes.
Draw a soft curve for the nostrils. This creates a sense of realism.
Don’t hesitate to give your rabbit a twitchy nose by adding a few lines around it. This small detail can enhance the sense of movement and playfulness.
Adding The Mouth
Now, let’s work on the mouth. A simple line can depict a closed mouth, while a slight curve can suggest a smile.
For a more expressive look, you can draw a small “W” shape. This gives your rabbit a more animated and happy appearance.
Consider the emotions you want to convey. Is your rabbit surprised? Curious? Adjust the mouth shape accordingly to match the expression.
By adding these facial features, your rabbit will come alive on the page. What personality do you want your rabbit to have? The choice is yours!
Incorporating Fur Texture
Fur texture adds depth to your rabbit drawing. Use short, quick strokes to create a soft appearance. Focus on the direction of the fur for a more realistic look. This technique brings your rabbit to life on the page.
Incorporating fur texture into your rabbit drawings can elevate your artwork from basic to stunning. The way light interacts with fur can add depth and realism. Whether you’re a beginner or an experienced artist, mastering this technique will make your rabbits come alive on the page.
Understanding Fur Patterns
Fur isn’t just a solid color. Rabbits have a variety of patterns and colors that can vary from breed to breed.
– Solid: One uniform color all over.
– Spotted: Random patches of color.
– Striped: Lines of different colors.
Take a moment to observe real rabbits or photos. Notice how the colors blend and how the patterns differ. This observation will help you replicate those details in your drawing.
Using Different Pencil Techniques
To create the texture of fur, you can use various pencil techniques.
– Short Strokes: Use quick, short strokes to mimic the softness of fur.
– Blending: Gently smudge with your fingers or a blending stump for a smoother look.
– Layering: Build up layers of color gradually for a more realistic effect.
Experiment with these techniques on scrap paper. This practice will help you find the right approach for your rabbit.
Adding Shadows And Highlights
Shadows and highlights can make your fur look three-dimensional. Pay attention to where the light hits your rabbit.
– Shadows: Use darker shades under the belly and behind the ears.
– Highlights: Leave some areas lighter where the light catches.
Consider using an eraser to lift out highlights. This method can make the fur look shinier and more alive.
Practice Makes Perfect
Drawing fur takes practice. Don’t be discouraged by initial attempts.
– Start with simple sketches.
– Gradually add detail.
– Keep refining your techniques.
Remember my first drawing of a rabbit? I struggled with the fur texture. After countless attempts, I finally found my style. Your persistence will pay off too.
Engage with your artwork. What emotions do you want your rabbit to express?
Think about how the fur can enhance that emotion. This will guide your choices as you draw.
Finalizing With Colors
Adding color to your rabbit drawing brings it to life. Colors can express mood and character. Choosing the right colors makes a big difference. Let’s explore how to finalize your artwork.
Choosing The Right Colors
Start by selecting colors that suit your rabbit. Think about realistic shades. Common rabbit colors include brown, gray, and white. You might want to use pastels for a softer look. Bright colors can add fun and creativity.
Consider your background too. A light background may need darker colors on the rabbit. Dark backgrounds can allow lighter shades to pop. Test your colors on scrap paper first. This helps you see how they blend.
Shading For Depth
Shading adds dimension to your rabbit. Use a darker shade for shadows. Apply this under the chin and behind the ears. Light areas can show where light hits. Blend shades to create smooth transitions.
Experiment with different techniques. Stippling gives texture. Cross-hatching adds depth. Use a blending tool for soft effects. The goal is to make your rabbit look three-dimensional.
Common Mistakes To Avoid
Drawing a rabbit can be fun, but some mistakes can make it hard. Skipping basic shapes can lead to odd proportions. Overlooking details like ears and whiskers may leave the drawing flat. Focus on these elements to create a more lively rabbit illustration.
Drawing a rabbit can be a delightful and rewarding experience. However, many beginners make common mistakes that can lead to frustration. Understanding these pitfalls can help you create a more accurate and charming rabbit drawing. Let’s dive into some of the most frequent errors to avoid.
Skipping The Basic Shapes
Many artists rush into adding details without starting with basic shapes.
Your rabbit’s body can be simplified into circles and ovals.
This approach sets a solid foundation for proportions.
A round shape for the body and a smaller circle for the head can make a big difference.
Have you ever noticed how a simple outline can guide your hand?
Neglecting Proportions
Proportions can make or break your drawing.
Rabbits have distinct features like long ears and short tails.
If you make the ears too short or the body too long, it can look off.
Take a moment to observe how a rabbit looks in real life.
What stands out to you about their proportions?
Overcomplicating Details
It’s tempting to add every little detail right away.
However, focusing too much on fur texture or intricate features can overwhelm your drawing.
Start with basic lines and shapes, then gradually add details.
This keeps your drawing clean and manageable.
Have you ever felt stuck trying to make everything perfect?
Ignoring The Flow Of The Fur
A common mistake is drawing fur in straight lines.
Rabbit fur has a natural flow that follows the shape of their body.
Using curved lines can create a more realistic texture.
Practice drawing with a light hand to capture that softness.
How do you think a few gentle curves could enhance your rabbit’s appearance?
Neglecting The Background
A rabbit in a blank space can feel unbalanced.
Consider adding a simple background to create context.
Even a grassy patch or a few flowers can make your drawing pop.
What setting would complement your rabbit best?
Avoiding these common mistakes will lead to a more enjoyable drawing experience. Each step contributes to your overall success. Keep practicing, and soon enough, your rabbit will come to life on paper!
Practice Tips For Improvement
Improving your rabbit drawing skills requires consistent practice and a few effective strategies. Whether you’re a beginner or looking to refine your technique, these tips can help you enhance your abilities and enjoy the process.
Set A Regular Practice Schedule
Consistency is key. Dedicate a specific time each day or week to practice drawing rabbits. Even just 15-30 minutes can make a significant difference over time.
Consider setting a reminder on your phone or using a calendar to keep you accountable. Soon, this routine will become a habit.
Start With Simple Shapes
Break down your rabbit into basic shapes like circles and ovals. This makes it easier to capture the overall form before adding details.
- Draw a large oval for the body.
- Add a smaller circle for the head.
- Use triangles for the ears.
These simple shapes create a solid foundation for your drawing.
Use References
Look at photos or videos of rabbits to understand their anatomy and movement. Observing real-life rabbits will help you draw more accurately.
Try to sketch from various angles. This practice can deepen your understanding of how rabbits look in different positions.
Experiment With Different Styles
Don’t be afraid to try different styles, from realistic to cartoonish. This experimentation can reveal what you enjoy most.
For instance, I once tried a whimsical approach with exaggerated features. It turned out to be a fun exercise that boosted my creativity.
Seek Feedback
Share your drawings with friends or online art communities. Constructive feedback can provide valuable insights into areas for improvement.
Don’t hesitate to ask specific questions, like how to enhance your shading or proportions. Engaging with others can spark new ideas and techniques.
Track Your Progress
Keep a sketchbook to document your drawings over time. This visual record allows you to see your improvement and identify patterns in your work.
Reflect on what worked and what didn’t. This self-assessment can guide your future practice sessions.
What new techniques will you try today to elevate your rabbit drawings? Embrace the journey and watch your skills blossom!

Credit: www.facebook.com
Frequently Asked Questions
How Do I Start Drawing A Rabbit?
To start drawing a rabbit, begin with simple shapes. Sketch an oval for the body and a circle for the head. Then, add guidelines for the ears and legs. Focusing on proportions will help you create a more realistic rabbit.
Gradually refine your sketch with details and textures.
What Materials Do I Need To Draw A Rabbit?
You will need basic drawing materials. A pencil, eraser, and paper are essential for sketching. You can also use colored pencils or markers for adding color. A good quality sketchbook is helpful for practice. Optional tools include charcoal or pastels for different effects and textures.
How Can I Make My Rabbit Drawing Realistic?
To make your rabbit drawing realistic, pay attention to anatomy. Observe real rabbits for accurate proportions and features. Use shading techniques to create depth and texture. Focus on the fur’s direction and length. Lastly, add details like whiskers and the nose for a lifelike appearance.
What Are Common Mistakes When Drawing Rabbits?
Common mistakes include incorrect proportions and lack of detail. Many beginners overlook the size of the ears or legs. Failing to capture the rabbit’s unique posture can also be an issue. Practice is key to overcoming these mistakes and improving your drawing skills over time.
Conclusion
Drawing a rabbit can be fun and easy. Remember to practice often. Use simple shapes to create your bunny. Start with basic lines and add details slowly. Don’t rush. Enjoy the process. Share your drawings with friends or family. Their feedback can help you improve.
Keep exploring different styles and techniques. Drawing is a journey, not a race. With patience, your skills will grow. Have fun and let your creativity shine!