To paint a nutcracker, start by priming the wood and then apply acrylic paint. Use fine brushes for detailed areas and seal with a clear varnish.
Painting a nutcracker can transform a plain wooden figure into a vibrant holiday decoration. This festive project begins with a clean, sanded surface. Artists often choose a white primer to ensure that the bright colors of acrylic paint pop. Selecting the right brushes is key; fine-tipped ones are perfect for intricate designs and facial features.
After painting, a clear varnish is essential to protect the artwork and give the nutcracker a polished finish. This craft not only taps into your creativity but also brings a personal touch to seasonal decor. Whether as a gift or for your own collection, a hand-painted nutcracker stands as a cherished keepsake for years to come.
Contents
- Introduction To Nutcracker Painting
- Selecting The Perfect Nutcracker
- Gathering Your Painting Supplies
- Preparing Your Workspace
- Designing Your Nutcracker
- Painting Techniques And Tips
- Adding The Finishing Touches
- Displaying Your Hand-painted Nutcracker
- Caring For Your Nutcracker
- Expanding Your Nutcracker Collection
- Frequently Asked Questions
- Conclusion
Introduction To Nutcracker Painting
Introduction to Nutcracker Painting unlocks the magic of the holiday season. This art form brings to life charming wooden figures. Families treasure these festive soldiers and kings. Painting nutcrackers is a creative journey. It is perfect for all ages.
The Timeless Appeal Of Nutcrackers
Nutcrackers have a rich history. They symbolize strength and protection. Their classic designs are beloved worldwide. Each painted nutcracker tells a unique story. They shine on mantels and as holiday centerpieces. These figures fill homes with joy and nostalgia.
Benefits Of Painting Your Own Nutcracker
- Unleash Creativity: Choose colors and patterns. Make a one-of-a-kind masterpiece.
- Family Fun: Gather loved ones. Create memories while painting together.
- Personal Touch: Add names or dates. Customize nutcrackers for gifts.
- Relaxation: Enjoy peaceful moments. Focus on brush strokes and details.
Selecting The Perfect Nutcracker
Embarking on a painting project begins with choosing the right canvas. In this case, the canvas is a nutcracker. Selection is key to ensure the final painted piece brings joy and festivity to any room.
Materials And Sizes
Consider the nutcracker’s material before starting. Wood is traditional and holds paint well. Nutcrackers come in various sizes. Small ones fit on shelves, while large ones can stand on the floor. Match the size with the space it will adorn.
Common materials include:
- Wood
- Plastic
- Ceramic
Popular sizes range from:
- 4 inches (miniature)
- 12 to 15 inches (standard)
- Over 2 feet (life-sized)
Pre-made Vs. Diy Kits
Pre-made nutcrackers are ready for paint. They save time but may lack uniqueness. DIY kits offer a personalized touch. They often include primer, which helps paint adhere better.
| Option | Pros | Cons |
|---|---|---|
| Pre-Made | Time-saving, Immediate painting | Less unique, Limited designs |
| DIY Kits | Customizable, Includes supplies | More time required, May need extra supplies |
Choose a pre-made nutcracker for convenience. Opt for a DIY kit for a custom project.
Gathering Your Painting Supplies
Before you embark on the exciting journey of painting a nutcracker, you need the right supplies. Quality materials make the process smoother and the outcome spectacular. Let’s dive into what you’ll need for your nutcracker masterpiece.
Types Of Paints: Pros And Cons
Selecting the right type of paint is crucial for your nutcracker project. Each paint type has its unique qualities, so choosing wisely is key.
| Paint Type | Pros | Cons |
|---|---|---|
| Acrylics |
|
|
| Oil Paints |
|
|
| Watercolors |
|
|
Acrylics are a popular choice for their ease of use and bold colors. Oil paints offer a traditional feel with more working time. Watercolors give a delicate finish but require a gentle touch.
Essential Brushes And Tools
Having the right brushes and tools will give you precision and control. Here’s what you’ll need:
- Flat brushes – Ideal for broad strokes and filling in large areas.
- Round brushes – Perfect for details and fine lines.
- Angled brushes – Great for edges and corners.
- Fine-tip brushes – Necessary for intricate details.
Don’t forget a palette for mixing colors, painter’s tape for clean edges, and a varnish to seal your work. Keep a cup of water and paper towels handy for cleaning brushes between colors.
With these supplies, you’re set to create a nutcracker that will shine with personality and charm. Get ready to paint a festive favorite that will be treasured for years!

Credit: www.pinterest.com
Preparing Your Workspace
Embarking on the journey to paint a Nutcracker requires a well-prepared workspace. A clutter-free and organized area ensures a smoother painting experience. It also keeps your materials within reach and your masterpiece safe.
Setting Up A Painting Area
Choose a spot with ample light and minimal disturbances. A desk or table provides a stable surface for your Nutcracker. Ensure the space is large enough to accommodate all your painting tools. Consider the following:
- Lighting: Bright, natural light works best.
- Chair: A comfortable chair keeps you focused.
- Water: Keep a jar for cleaning brushes nearby.
- Palette: Place it within arm’s reach.
Protecting Surfaces And Clothing
Paint can be messy, so it’s vital to protect your workspace and wear. Cover your table with a plastic sheet or old newspapers. Use painter’s tape to secure the edges. Wear an apron or old clothes you don’t mind getting stained.
| Item | Description |
|---|---|
| Surface Cover | Plastic sheets or newspapers |
| Edge Securing | Painter’s tape |
| Clothing Protection | Apron or old clothes |
Designing Your Nutcracker
Embarking on the journey to paint your very own Nutcracker can be both thrilling and creative. Designing Your Nutcracker is a crucial step before the brush even hits the wood. This stage is where your imagination comes to life, and your Nutcracker begins to develop its unique character.
Color Schemes And Patterns
Choosing the right colors and patterns is essential. It sets the mood and style for your Nutcracker.
- Classic Reds and Greens: Perfect for a traditional look.
- Wintry Blues and Whites: Give a frosty, charming appeal.
- Vibrant Yellows and Purples: Stand out for a bold, modern twist.
Consider using stripes, polka dots, or chevron patterns to add depth and interest.
Inspiration And Themes
Themes can transform your Nutcracker from a wooden figure to a storytelling piece.
| Theme | Description |
|---|---|
| Fairy Tales | Draw from beloved stories for a magical touch. |
| Historical Figures | Pay homage to notable personalities with your design. |
| Seasonal Celebrations | Reflect holidays and seasons through your choice of colors and motifs. |
Find inspiration in everyday life, art, nature, or even your favorite movies.

Credit: effiecarayannis.wordpress.com
Painting Techniques And Tips
Embarking on a Nutcracker painting project brings the holiday spirit to life. Mastering the right painting techniques ensures a vibrant and lasting finish. Let’s dive into methods that will make your Nutcracker stand out!
Base Coating Methods
Base coating is crucial for a uniform color foundation. Use these tips for a flawless start:
- Select the right paint: Acrylics are ideal for their quick drying time and ease of use.
- Prime your Nutcracker: Apply a primer to help paint adhere better and to enhance durability.
- Choose the right brushes: Flat brushes work well for large areas, while round brushes are good for edges.
- Apply thin coats: Use multiple thin layers rather than one thick layer to avoid drips and uneven texture.
- Let it dry: Allow adequate drying time between coats to achieve the best finish.
Detailing For Character
Details bring your Nutcracker to life. Follow these steps for characterful results:
- Plan your design: Sketch out where each color and detail will go before you start.
- Use fine brushes: Opt for smaller, finer brushes to paint intricate details with precision.
- Mix colors: Create custom shades to add depth and uniqueness to your Nutcracker.
- Keep a steady hand: Rest your painting hand on a stable surface to maintain control.
- Seal your work: Once dry, apply a clear sealer to protect the paint and add a professional touch.
Adding The Finishing Touches
Adding the Finishing Touches is a crucial step in the process of painting a nutcracker. This stage transforms your artwork from a simple painted figure to a polished and durable piece. The right finishing touches will ensure your nutcracker stands out and lasts for many holidays to come. Let’s dive into the final steps of this creative journey.
Sealing And Protecting Your Artwork
Once the paint has dried, it’s time to seal your nutcracker. Sealing helps protect the paint from chips and scratches. Choose a clear sealant, either matte or glossy, based on your preference. Apply it evenly with a brush or spray it on for a smooth finish. Allow the sealant to dry completely before handling.
Accessorizing Your Nutcracker
Accessorizing gives personality to your nutcracker. Consider adding:
- Sparkles for a shimmering effect
- Buttons for the coat or eyes
- Trim for the hat or boots
Attach these with strong glue and let them set. Your nutcracker is now ready to display!
Displaying Your Hand-painted Nutcracker
Once you’ve put the final touches on your nutcracker, it’s time to showcase your masterpiece. A hand-painted nutcracker isn’t just a festive decoration; it’s a personal work of art that deserves a special spot in your holiday display. Let’s explore some of the best ways to show off your creation.
Creative Placement Ideas
Think outside the box when it comes to placing your nutcracker. Choose locations where it can be admired from all angles. Here are some creative ideas:
- Bookshelves: Nestle your nutcracker between your favorite holiday reads.
- Mantelpiece: Let it stand guard above your fireplace.
- Window Sill: Greet passersby with your nutcracker’s charming presence.
- Centerpiece: Make it the star of your dining table.
Integrating Into Holiday Decor
Your nutcracker can complement your existing holiday theme. Use colors and elements from your decor to create a cohesive look.
| Decor Style | Integration Tips |
|---|---|
| Traditional | Pair with reds, greens, and golds. |
| Modern | Place alongside sleek silver and white accents. |
| Rustic | Combine with natural wood and pinecones. |
| Whimsical | Add bright colors and fairy lights. |
Caring For Your Nutcracker
Caring for your hand-painted nutcracker ensures its longevity and charm. Proper maintenance goes a long way. Your festive friend will continue to brighten your holidays for years to come. Let’s delve into the best practices for nutcracker care.
Cleaning And Maintenance
Keeping your nutcracker clean is essential. Dust and dirt can dull its vibrant colors. Use the following steps:
- Dust regularly with a soft brush or cloth.
- Avoid harsh chemicals that can strip paint or damage wood.
- Spot clean with a slightly damp cloth when necessary.
- For a deeper clean, use a gentle wood cleaner on unpainted surfaces.
Storage Tips For Off-season
When the holiday season ends, proper storage is key. Follow these tips:
| Tip | Description |
|---|---|
| Climate Control | Store in a cool, dry place to prevent warping and paint damage. |
| Original Packaging | Use the box it came in, if possible, for a snug fit. |
| Wrapping | Wrap in acid-free paper to protect the paint. |
| Avoid Stacking | Place on a shelf to prevent crushing. Do not stack heavy items on top. |
Expanding Your Nutcracker Collection
Expanding Your Nutcracker Collection becomes an exciting journey when you dive into the art of painting your own. Whether you’re a seasoned painter or a beginner, creating a hand-painted nutcracker can add a personal touch to your festive display. Let’s explore how to build themes, share, and gift these charming figures to grow your collection.
Building A Theme
Choosing a theme is the first step to adding cohesion to your nutcracker collection. Think about what excites you during the holidays. Do you love the sparkle of snowflakes or the magic of the Nutcracker ballet? Decide on a motif that speaks to you.
- Classic Christmas: Red, green, and gold paints can create traditional nutcrackers.
- Winter Wonderland: Use blues, whites, and silvers for a chilly, charming theme.
- Fairy Tale: Bright colors and glitter give a whimsical, storybook feel.
Sharing And Gifting Ideas
Painted nutcrackers make heartfelt gifts. Share your creations with loved ones to spread holiday cheer. Here are some ideas:
| Recipient | Gifting Idea |
|---|---|
| Family Members | Personalize nutcrackers with their favorite colors. |
| Friends | Design a nutcracker that matches their home decor. |
| Teachers | Create a nutcracker holding a book or an apple. |
Remember to sign and date your work. It adds a special touch and makes the gift memorable.
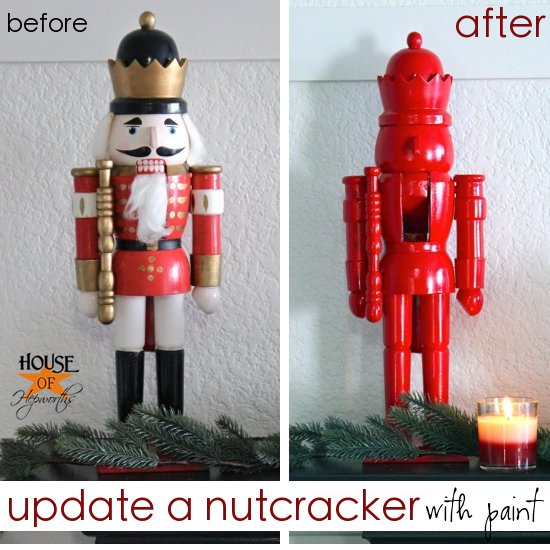
Credit: www.houseofhepworths.com
Frequently Asked Questions
What Paint Do You Use On A Nutcracker?
Use acrylic paint on nutcrackers for its durability and vibrant color options. It’s ideal for both smooth coverage and detailed work.
How To Make A Nutcracker Step By Step?
Gather materials: wood, paint, springs, screws. Carve or assemble the wood into a nutcracker shape. Attach the lever and spring mechanism. Sand any rough edges for a smooth finish. Paint your nutcracker in vibrant colors. Allow it to dry completely before use.
What Does An Original Nutcracker Look Like?
An original nutcracker typically features a wooden soldier figure with a lever on the back to crack nuts between its jaws.
What Can I Use For A Nutcracker Beard?
For a nutcracker beard, use white faux fur, wool roving, or fluffy white yarn. These materials create a realistic and festive look.
Conclusion
Wrapping up, mastering the art of painting a nutcracker can be a delightful endeavor. With the right brushes, colors, and techniques, your holiday decor will boast a personal touch. Embrace the process, let creativity flow, and your festive masterpiece will surely impress.
Happy painting and happy holidays!