To paint motorcycle fairings, you must first remove them from the bike and clean them thoroughly. Then, sand the fairings to create a smooth surface, apply a primer, and finally, apply the paint.
Painting motorcycle fairings can be a great way to personalize your bike and give it a unique look. Whether you want to match the color of your fairings to the rest of your bike or choose a completely different color, painting them yourself can save you money and give you a sense of satisfaction.
However, before you start painting, it’s important to properly prepare the fairings by removing them from the bike and cleaning them thoroughly. This will ensure that the paint adheres properly and lasts for a long time. We’ll go over the steps involved in painting motorcycle fairings, from cleaning and sanding to priming and painting.
Contents
- Introduction To Motorcycle Fairing Painting
- Essential Tools And Materials
- Preparing Your Workspace
- Pre-painting Preparations
- Applying Primer
- Painting Techniques And Tips
- Applying The Clear Coat
- Reassembling And Curing
- Maintenance And Care
- Troubleshooting Common Issues
- Showcasing Your Work
- Frequently Asked Questions
- Conclusion
Introduction To Motorcycle Fairing Painting
When it comes to giving your motorcycle a fresh and stylish look, one of the most effective ways is to paint the fairings. Motorcycle fairings not only protect the bike’s engine and other vital components, but they also contribute to its overall appearance. In this blog post, we will delve into the world of motorcycle fairing painting, starting with an introduction to the process.
Importance Of A Well-painted Fairing
A well-painted fairing is crucial for several reasons. Firstly, it enhances the visual appeal of your motorcycle, allowing you to express your personal style and stand out on the road. Secondly, a properly painted fairing protects the underlying components from rust, corrosion, and other types of damage. Lastly, a high-quality paint job can increase the resale value of your bike, making it an attractive choice for potential buyers.
Benefits Of Diy Painting
Opting for a DIY painting project for your motorcycle fairings offers a range of benefits. Firstly, it allows you to save money compared to hiring a professional painter. With some research and practice, you can achieve professional-looking results at a fraction of the cost. Secondly, DIY painting gives you the freedom to choose the exact color and finish you desire, ensuring that your bike reflects your unique personality. Additionally, the satisfaction and sense of accomplishment that come with completing a DIY project are truly rewarding.
If you’re new to motorcycle fairing painting, don’t worry. With the right tools, materials, and techniques, you can transform your bike into a work of art. In the following sections, we will explore the step-by-step process of preparing, priming, painting, and finishing your motorcycle fairings. So, let’s dive in and unlock the secrets of achieving a flawless paint job for your beloved ride!
Essential Tools And Materials
To paint motorcycle fairings, essential tools and materials include sandpaper, primer, spray paint, clear coat, masking tape, and a well-ventilated workspace. Proper preparation and the right supplies are crucial for achieving a professional and durable finish on your motorcycle fairings.
Choosing The Right Paint
When it comes to painting motorcycle fairings, choosing the right paint is crucial. You’ll want a paint that is specifically designed for automotive use, as it will be durable and resistant to the elements. Look for a paint that is formulated for use on plastic, as motorcycle fairings are typically made of plastic materials. Additionally, consider the color and finish you desire for your fairings, as there are a wide variety of options available. Whether you want a glossy finish or a matte look, make sure to select a paint that matches your preferences and the overall style of your motorcycle.Primer And Clear Coat Selection
Before applying the paint, it’s important to prepare the fairings properly. This involves using a primer to create a smooth and even surface for the paint to adhere to. Choose a primer that is designed specifically for plastic surfaces. This will help the paint bond better and provide a long-lasting finish. After applying the paint, it’s essential to protect it with a clear coat. The clear coat acts as a protective layer, shielding the paint from scratches, UV rays, and other external factors. Opt for a clear coat that is compatible with the paint you’ve chosen to ensure optimal results.Sanding Tools And Materials
Proper preparation of the fairings includes sanding the surface to remove any imperfections and create a smooth base for painting. You’ll need a few essential sanding tools and materials for this task. Start with sandpaper of varying grits, such as 320, 600, and 1200. These different grits will help you achieve different levels of smoothness. Additionally, consider using a sanding block or sanding sponge to ensure even pressure and consistent results. Remember to clean the fairings thoroughly after sanding to remove any dust or debris before proceeding with the painting process. In conclusion, when painting motorcycle fairings, having the essential tools and materials is crucial for achieving a professional and durable finish. From choosing the right paint and primer to selecting the appropriate sanding tools, each step plays a significant role in the overall outcome. By properly preparing the fairings and using high-quality materials, you can transform the appearance of your motorcycle and protect the fairings for years to come.Preparing Your Workspace
Preparing your workspace is crucial when it comes to painting motorcycle fairings. It ensures that you have a clean and safe environment to work in, as well as all the necessary equipment at hand. This step sets the foundation for a successful and professional paint job.
Setting Up A Clean Area
Before you start painting, it’s essential to set up a clean area free from dust, debris, and other contaminants that could ruin the finish of your fairings. Clear a space in your garage or workshop and cover the floor with a drop cloth to catch any drips or spills. Use compressed air or a vacuum to remove any loose particles from the surrounding area.
Safety Precautions And Equipment
When painting motorcycle fairings, it’s important to prioritize safety. Make sure to wear appropriate protective gear, including a respirator, gloves, and safety goggles to shield yourself from fumes and chemicals. Additionally, gather all the necessary equipment such as sandpaper, masking tape, and a well-ventilated paint sprayer to ensure a smooth and safe painting process.
Pre-painting Preparations
When it comes to painting motorcycle fairings, proper preparation is essential to achieve a professional and durable finish. Pre-painting preparations involve several crucial steps to ensure the fairings are ready for painting. Dismantling the fairings, cleaning and degreasing, and sanding the surface are the primary tasks that need to be carried out meticulously. Here’s a closer look at each step:
Dismantling The Fairings
Before beginning the painting process, it’s crucial to dismantle the fairings from the motorcycle. This will allow for easier and more thorough access to the entire surface of the fairings. It’s important to carefully remove all the parts, ensuring that they are labeled or organized for easy reassembly later.
Cleaning And Degreasing
Thorough cleaning and degreasing are vital to ensure that the fairings are free from any dirt, grime, or oil that could affect the adhesion of the paint. Using a mild detergent and water, clean the fairings, and then follow up with a solvent-based cleaner to thoroughly degrease the surface. This step is crucial for the paint to adhere properly and prevent any imperfections in the finish.
Sanding The Surface
Once the fairings are clean and dry, the next step is to sand the surface to create a suitable texture for the paint to adhere to. Using fine-grit sandpaper, gently sand the entire surface of the fairings in a circular motion. This will help to smooth out any imperfections and create a slightly rough texture that will promote paint adhesion. After sanding, it’s important to thoroughly wipe down the fairings to remove any dust and ensure a clean painting surface.
Applying Primer
When it comes to painting motorcycle fairings, applying primer is a crucial step to ensure a smooth and long-lasting finish.
The Priming Process
- Start by cleaning the fairings thoroughly to remove any dirt or grease.
- Choose a high-quality automotive primer suitable for plastic surfaces.
- Apply the primer in thin, even coats to create a smooth base for the paint.
Tips For Even Coating
- Use a spray gun or aerosol can for an even application of primer.
- Hold the gun or can about 6-8 inches away from the fairings for optimal coverage.
- Apply multiple thin coats, allowing each layer to dry before adding the next.
Painting Techniques And Tips
Discover the best painting techniques and tips for achieving a flawless finish on motorcycle fairings. From proper surface preparation to choosing the right paint and applying it with precision, this guide will help you transform your bike’s appearance with professional-looking results.
Painting your motorcycle fairings can be a fun and rewarding project, but it can also be a bit challenging if you don’t know the proper techniques. In this guide, we will cover some tips and tricks to help you achieve a professional-looking paint job that will make your motorcycle stand out. Here are some painting techniques and tips to keep in mind:Layering The Paint
When it comes to painting motorcycle fairings, layering the paint is essential. You need to apply multiple coats of paint to achieve the desired color and finish. However, it’s important to let each layer dry completely before applying the next one. This will prevent the paint from running and dripping, and it will also help you achieve a smooth finish.Avoiding Drips And Runs
One of the most common problems when painting motorcycle fairings is drips and runs. To avoid this, you need to apply the paint in thin, even coats. Start by applying a light coat of primer, and then sand it down with a fine-grit sandpaper. This will help the paint adhere better and prevent drips. When applying the paint, use a steady hand and move the spray can or paintbrush in a back-and-forth motion. Don’t try to cover the entire surface in one go. Instead, apply multiple thin coats until you achieve the desired color and finish.Achieving A Smooth Finish
To achieve a smooth finish when painting motorcycle fairings, you need to sand the surface between coats. Use a fine-grit sandpaper to remove any imperfections and smooth out the surface. This will help the paint adhere better and prevent drips and runs. You can also use a polishing compound to remove any scratches or swirl marks and give your fairings a shiny, polished look. In conclusion, painting motorcycle fairings is a great way to customize your bike and make it stand out from the crowd. By following these painting techniques and tips, you can achieve a professional-looking paint job that will make your motorcycle look like a work of art. So, grab your paintbrushes and spray cans, and let your creativity run wild!Applying The Clear Coat
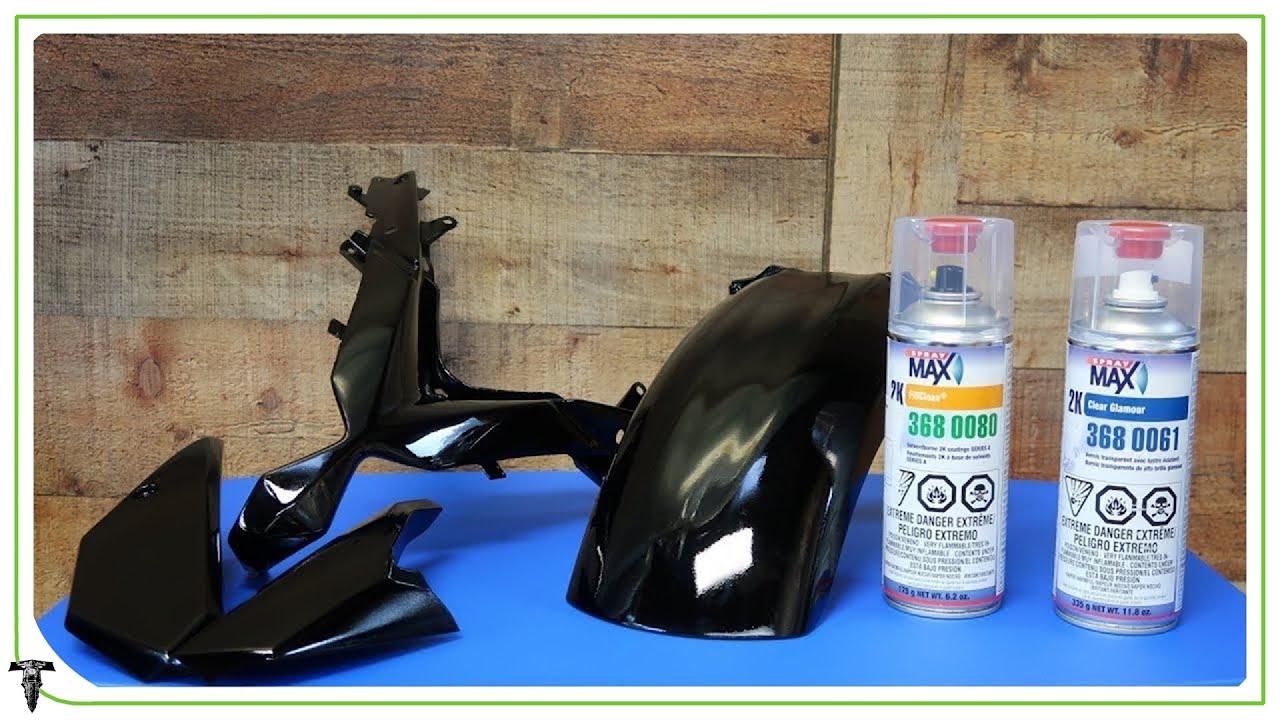
When applying the clear coat to motorcycle fairings, it’s crucial to follow the correct process to ensure a professional and durable finish. The clear coat provides protection and enhances the appearance of the paint job, making it essential to apply it properly. Let’s explore the role of clear coat and valuable application tips for durability.
The Role Of Clear Coat
The clear coat serves as a protective layer, shielding the underlying paint from UV rays, environmental elements, and minor abrasions. It also adds depth and gloss to the finish, contributing to the overall aesthetic appeal of the fairings.
Application Tips For Durability
- Ensure Proper Mixing: Thoroughly mix the clear coat and hardener according to the manufacturer’s instructions to activate its protective properties.
- Appropriate Environment: Apply the clear coat in a well-ventilated area with controlled temperature and humidity to facilitate proper curing.
- Even Application: Use consistent, overlapping strokes to achieve an even layer of clear coat, avoiding buildup or uneven spots.
- Allow Sufficient Drying Time: Follow the recommended drying and curing times to prevent premature handling and ensure long-lasting durability.
- Avoid Contaminants: Protect the freshly applied clear coat from dust, debris, and insects to maintain a smooth and flawless finish.
Credit: m.youtube.com
Reassembling And Curing
After completing the painting process, it’s time to reassemble the motorcycle fairings and allow them to cure properly. Reattaching the fairings and ensuring the curing time and conditions are critical to achieving a professional finish.
Reattaching The Fairings
When reattaching the fairings, ensure that all the necessary parts and screws are organized and ready. Carefully align the fairings with the mounting points on the motorcycle frame, and securely fasten them using the appropriate screws and bolts. Double-check the alignment and fit to guarantee a seamless and professional appearance.
Curing Time And Conditions
Proper curing is essential for the longevity and durability of the paint job. Allow the fairings to cure in a dust-free environment at the recommended temperature and humidity levels. Follow the paint manufacturer’s instructions regarding the specific curing time and conditions, as these may vary based on the type of paint used.
Maintenance And Care
Painting your motorcycle fairings is a great way to give your bike a fresh look and protect it from the elements. However, once you’ve invested time and money in a new paint job, it’s important to take steps to maintain and care for it properly. Here are some tips to help you keep your motorcycle fairings looking their best.
Regular Cleaning
Regular cleaning is essential to keep your motorcycle fairings in good condition. Dirt, dust, and grime can accumulate on the surface of your fairings and cause damage over time. To clean your fairings, start by washing them with a mild soap and water solution. Avoid using harsh chemicals or abrasive cleaners, as these can damage the paint. Rinse the fairings thoroughly with clean water and dry them with a soft cloth or towel. It’s also a good idea to wax your fairings regularly to protect the paint and keep it looking shiny and new.
Protecting The Paint From Damage
One of the most important things you can do to protect your motorcycle fairings is to prevent damage in the first place. Try to avoid parking your bike in direct sunlight for extended periods of time, as this can cause the paint to fade or crack. If you do need to park in the sun, cover your bike with a breathable motorcycle cover to protect it from the elements. You should also be careful when washing or working on your bike, as accidental scratches or dings can cause damage to the paint. Consider using a motorcycle stand or lift to make it easier to access hard-to-reach areas without putting your fairings at risk.
Troubleshooting Common Issues
Painting motorcycle fairings can be a challenging task, but with proper troubleshooting, you can achieve great results. From prepping the surface to selecting the right paint and avoiding common mistakes, this guide will help you navigate through the process and ensure a flawless finish on your motorcycle fairings.
Fixing Paint Bubbles
When bubbles appear in the paint, sand the affected area gently and repaint with proper technique.
Dealing With Peeling
To address peeling paint, strip off the old paint, clean the surface thoroughly, and apply fresh paint.
Touch-up Strategies
For touch-ups, blend the new paint with the existing one, feathering the edges for a seamless finish.
Showcasing Your Work
When it comes to painting motorcycle fairings, showcasing your work is a key part of the process. After putting in the time and effort to create a stunning finish, it’s important to document and share your work with others. From capturing high-quality photographs to sharing on social platforms, displaying your motorcycle paint job allows you to celebrate your accomplishment and inspire others in the motorcycle community.
Photographing Your Motorcycle
Before sharing your motorcycle fairing paint job with the world, it’s essential to capture high-quality photographs. Find a well-lit area that highlights the unique features of your motorcycle, and consider using a professional camera or smartphone with a high-resolution camera. Take shots from different angles to showcase the details and craftsmanship of your paintwork, ensuring that the images accurately represent the true colors and finish of the fairings.
Sharing On Social Platforms
Once you have captivating photographs of your motorcycle fairings, it’s time to share your work on social platforms. Utilize popular platforms such as Instagram, Facebook, and Pinterest to reach a wider audience of motorcycle enthusiasts. Use relevant hashtags to increase the visibility of your posts, and engage with the community by responding to comments and connecting with other motorcycle enthusiasts. Sharing your paint job on social media allows you to receive feedback, connect with like-minded individuals, and potentially inspire others to take on their own painting projects.

Credit: www.wikihow.com

Credit: www.wikihow.com
Frequently Asked Questions
What Kind Of Paint Do You Use On Motorcycle Fairings?
Use acrylic enamel or urethane paint for motorcycle fairings. These types provide durability and a glossy finish.
Can I Spray Paint My Fairings?
Yes, you can spray paint your fairings to customize or repair them. Ensure proper preparation and technique for best results.
How To Prep Motorcycle Plastics For Paint?
To prep motorcycle plastics for paint, start by cleaning them thoroughly with soap and water, then sand them with 400 grit sandpaper. After sanding, use a plastic cleaner to remove any remaining dirt or debris. Then, apply a plastic adhesion promoter to ensure the paint adheres properly.
Lastly, apply a primer and then the desired paint color.
How Many Cans Of Spray Paint To Paint Motorcycle Fairings?
Typically, it takes 2-3 cans of spray paint to paint motorcycle fairings. However, the amount of paint needed can vary depending on the size of the fairings and the type of spray paint being used. It’s recommended to purchase extra cans to ensure complete coverage and a smooth finish.
Conclusion
In wrapping up, painting motorcycle fairings can transform your bike’s look. Remember to prep well, choose quality paint, and apply layers evenly. The final clear coat adds protection and gloss. With patience and attention to detail, your motorcycle can become a stunning, personalized ride.