Giving your bathroom a fresh look doesn’t always require a full renovation. One of the most cost-effective ways to transform the space is by painting your bathroom countertops. Whether your countertops are dated, stained, or simply no longer match your decor, painting them is an affordable DIY project that can bring new life to your bathroom.
From laminate to cultured marble and even granite, painting can dramatically improve the appearance of your bathroom surfaces. This comprehensive guide explores different methods, tools, and materials to help you paint your bathroom countertops the right way, whether you’re going for a natural stone effect or a solid color finish.
Contents
- Why Paint Your Bathroom Countertops
- Can You Really Paint Bathroom Countertops?
- Tools and Materials You’ll Need
- Step-by-Step Guide to Painting Bathroom Countertops
- Step 1: Clean the Countertop Thoroughly
- Step 2: Sand the Countertop Surface
- Step 3: Tape Off Surrounding Areas
- Step 4: Apply Primer
- Step 5: Paint the Countertops
- Step 6: Create a Decorative or Faux Finish (Optional)
- Step 7: Seal the Countertop
- Different Ways to Paint Based on Surface Type
- Painting Laminate Bathroom Countertops
- Painting Tile Bathroom Countertops
- Painting Cultured Marble Countertops
- Painting Granite or Natural Stone
- Using Countertop Painting Kits
- Drying and Curing Time
- Cost of Painting Bathroom Countertops
- Maintenance Tips for Painted Countertops
- Common Mistakes to Avoid
- Frequently Asked Questions
- Final Thoughts
Why Paint Your Bathroom Countertops
Bathroom renovations can be expensive and time-consuming. Painting your countertops gives you a fresh, modern look at a fraction of the cost and with minimal downtime.
Benefits of Painting Countertops
- Saves money compared to replacement
- Offers design flexibility with various finishes and colors
- Refreshes outdated or damaged surfaces
- Increases home value and appeal
- Easy to do as a weekend project
Painting your countertops can be a smart alternative to full replacement, especially if you’re working with a tight budget.
Can You Really Paint Bathroom Countertops?
Yes, and it’s becoming increasingly popular. Many homeowners successfully paint surfaces like laminate, cultured marble, Formica, tile, and even granite using specialized paint kits and sealers.
Surfaces You Can Paint
- Laminate
- Formica
- Cultured marble
- Tile
- Solid surface (Corian)
- Granite and natural stone
The key is choosing the right products and thoroughly preparing the surface.
Tools and Materials You’ll Need
Gather your supplies before starting the project to ensure a smooth workflow.
Basic Tools
- Painter’s tape
- Sandpaper or sanding block
- Degreaser or TSP cleaner
- Lint-free cloths
- Paint roller and tray
- Foam brushes or detail brushes
- Drop cloths or plastic sheeting
- Respirator mask (for oil-based paints or epoxy)
Paint Options
- Countertop paint kits
- Acrylic latex paint (paired with primer and sealer)
- Chalk paint (for decorative looks)
- Epoxy paint (for high durability)
- Stone-look spray paints
Sealing Products
- Polyurethane (water-based or oil-based)
- Clear epoxy topcoat
- Acrylic sealers for countertops
Always check the product label for bathroom-safe and water-resistant properties.
Step-by-Step Guide to Painting Bathroom Countertops
Before you begin, clear the area, remove any hardware, and cover the sink or faucet if they are not being replaced. Open windows for ventilation.
Step 1: Clean the Countertop Thoroughly
Start by removing dirt, oils, and any residues that could prevent paint from adhering.
How to Clean the Surface
- Use a degreasing cleaner or TSP (trisodium phosphate)
- Wipe thoroughly with a lint-free cloth
- Let it dry completely
Cleanliness is crucial for a durable paint job.
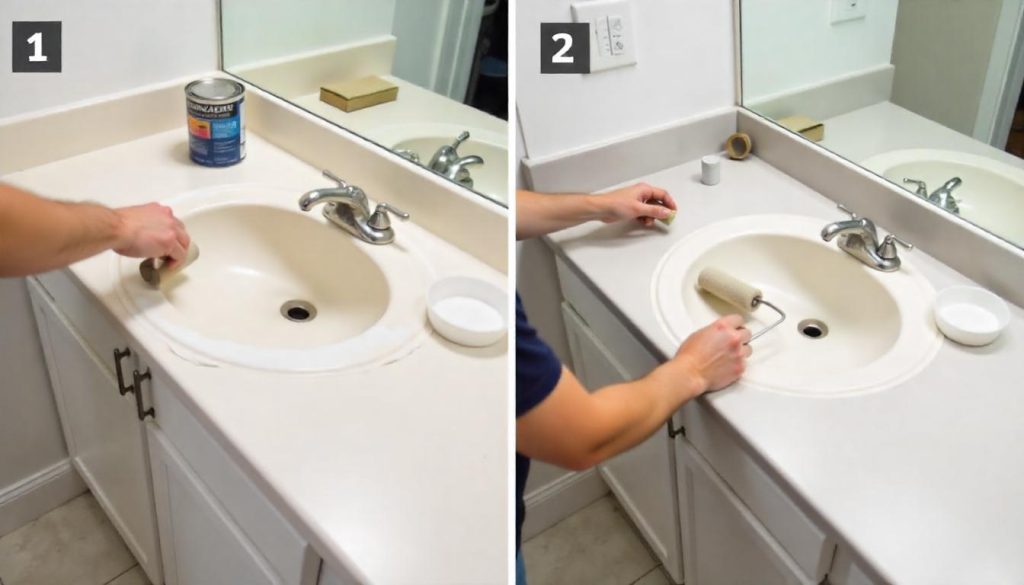
Step 2: Sand the Countertop Surface
Sanding creates a surface that paint and primer can grip.
Sanding Tips
- Use 120–220 grit sandpaper for laminate and other smooth surfaces
- For tile, use a diamond sanding pad or rougher grit
- Wipe off dust with a damp cloth
Be sure the surface feels slightly rough to the touch when you’re done.
Step 3: Tape Off Surrounding Areas
Protect walls, sink basins, cabinets, and fixtures from drips and splatter.
Taping Tips
- Use high-quality painter’s tape for clean lines
- Apply plastic sheeting or drop cloths on floors and nearby surfaces
Proper masking prevents mess and ensures a clean final look.
Step 4: Apply Primer
Primer improves adhesion and helps the paint last longer.
Choosing the Right Primer
- For laminate: Use bonding primer or shellac-based primer
- For tile: Use tile and tub primer or epoxy primer
- For natural stone: Use a high-adhesion masonry primer
Apply 1–2 thin coats and allow proper drying time between coats.
Step 5: Paint the Countertops
Now comes the fun part—applying color and transforming the look.
Best Methods for Painting
- Use a small roller for large, flat areas
- Foam brushes are ideal for corners and edges
- Apply 2–3 thin, even coats for best results
- Allow 4–6 hours of drying between coats
Avoid thick layers to prevent drips, bubbles, or uneven texture.
Step 6: Create a Decorative or Faux Finish (Optional)
You can give your countertops a designer look using faux painting techniques.
Marble Look
- Paint the base coat in white or light gray
- Use a feather or small brush to create veining with darker paint
- Blend with a sponge or rag for a realistic look
Granite Look
- Apply a dark base coat
- Use a sponge to dab on speckles of gray, white, and gold
- Layer until you achieve a stone-like appearance
Stone Texture
- Use a stone-look spray paint
- Follow with a clear sealer for durability
These decorative finishes add depth and elegance to your bathroom.
Step 7: Seal the Countertop
Sealing your painted countertop is essential for moisture resistance and long-term wear.
Types of Sealers
- Polyurethane: Durable, scratch-resistant, available in matte to glossy
- Epoxy topcoat: High-gloss, professional-looking, heat-resistant
- Acrylic sealer: Water-resistant, fast-drying, low odor
Apply at least two coats of sealer, allowing 24 hours between coats. Cure time varies from 3–7 days.
Different Ways to Paint Based on Surface Type
Each surface type requires slight adjustments in preparation and materials.
Painting Laminate Bathroom Countertops
Laminate is a common surface in older homes and takes paint well with the right primer.
Tips for Laminate
- Use bonding primer before paint
- Acrylic latex paint works best
- Seal with multiple coats of polyurethane
Laminate is ideal for DIYers due to its smooth surface and affordability.
Painting Tile Bathroom Countertops
Painting tile requires stronger bonding and heat-resistant materials.
Tips for Tile
- Sand the tile thoroughly
- Use epoxy-based primer and paint
- Seal with a waterproof epoxy topcoat
Grout lines may still show, so consider faux stone finishes to disguise texture.
Painting Cultured Marble Countertops
Cultured marble has a glossy surface but can be painted with proper prep.
Tips for Cultured Marble
- Sand to remove the gloss
- Use bonding primer and epoxy or acrylic paint
- Top with clear urethane or epoxy sealer
Avoid thick paint layers to prevent bubbling or streaks.
Painting Granite or Natural Stone
While more difficult to paint, it’s still possible to refresh granite countertops with the right products.
Tips for Granite
- Use a masonry primer
- Choose oil-based or specialty countertop paint
- Apply multiple sealant coats
Keep in mind that painted granite won’t look exactly like natural stone.
Using Countertop Painting Kits
If you’re new to DIY, countertop paint kits offer a simplified solution.
Popular Kits
- Giani Countertop Paint Kit
- Rust-Oleum Countertop Coating
- Daich SpreadStone
These kits come with all the materials needed and detailed instructions.
Drying and Curing Time
Letting each layer dry thoroughly ensures a lasting finish.
General Timeline
- Primer drying: 2–4 hours
- Paint drying: 4–6 hours between coats
- Sealer drying: 24 hours
- Full cure: 3–7 days
Avoid placing items on the counter or using the sink until the surface is fully cured.
Cost of Painting Bathroom Countertops
Painting is a budget-friendly option compared to replacement.
Estimated Cost Breakdown
- Primer: $15–$30
- Paint: $20–$50
- Sealer: $20–$40
- Tools and tape: $15–$30
- Countertop kit: $70–$150
Expect to spend around $75–$200 total, depending on size and materials.
Maintenance Tips for Painted Countertops
Proper care extends the life of your painted surface.
How to Maintain
- Wipe with a damp cloth and mild soap
- Avoid harsh chemicals or abrasives
- Use cutting boards—don’t cut directly on the surface
- Don’t place hot tools directly on the countertop
- Reapply sealer as needed (every 1–2 years)
Simple habits can keep your paint job looking new longer.
Common Mistakes to Avoid
Even small errors can lead to peeling, bubbling, or poor results.
Mistakes to Watch For
- Skipping primer
- Not sanding properly
- Painting in high humidity
- Applying paint too thickly
- Not waiting between coats
- Forgetting to seal
Take your time and follow each step carefully to avoid do-overs.
Frequently Asked Questions
Can I paint a bathroom countertop without sanding?
Sanding is highly recommended to help the primer and paint adhere better. Some bonding primers claim to work without sanding, but results may vary.
What kind of paint do you use on bathroom countertops?
Use acrylic latex, epoxy, or countertop-specific paint. Always pair it with the appropriate primer and sealer for moisture protection.
How long does painted countertop last?
With proper prep and maintenance, painted countertops can last 3–5 years or longer before needing a touch-up.
Is it safe to paint bathroom countertops?
Yes. Use non-toxic, low-VOC products, and ensure proper ventilation while painting and curing.
Can I paint around the sink?
Yes. Use painter’s tape to mask off the sink edges. If the sink is removable, take it out for easier access.
Final Thoughts
Painting your bathroom countertops is a powerful way to update the look of your space without spending a fortune. With just a few tools, some paint, and a weekend’s worth of effort, you can achieve a high-end look for a fraction of the cost of new countertops.
From simple solid colors to faux granite or marble finishes, the options are limitless. Whether you’re working with laminate, tile, or cultured marble, the techniques in this guide will help you transform your countertops with confidence and style.