
Drawing a burger is a fun and simple way to practice food illustration. With its stacked layers and soft shapes, it’s perfect for beginners who want to improve their drawing skills step by step.
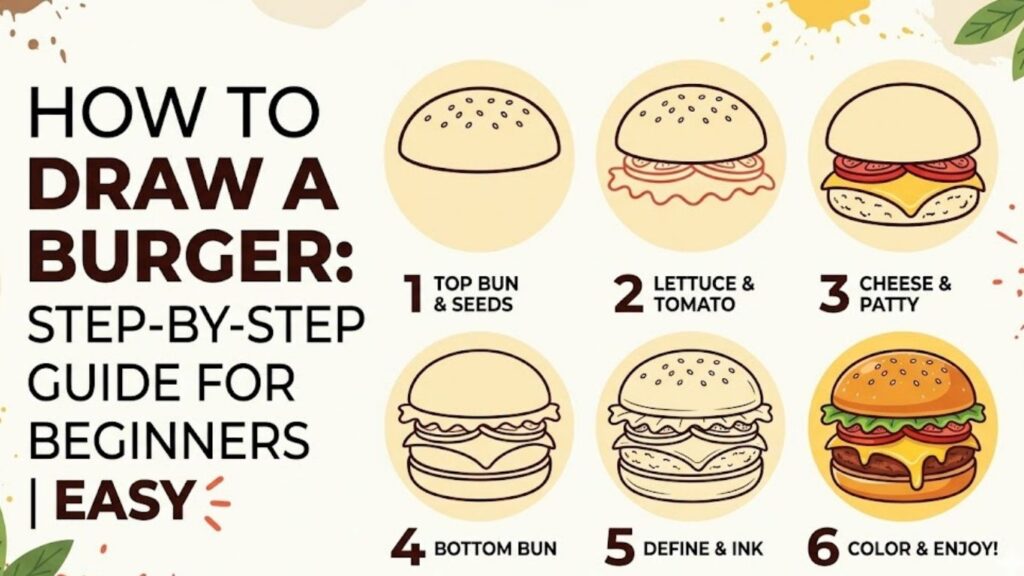
In this guide, you’ll learn how to draw a burger from basic shapes to detailed shading. The process is easy to follow, even if you’ve never drawn before, and it will help you build confidence quickly.
Essential Drawing Supplies You Should Have
Sketchbook
HB and 2B pencils
Eraser
Black fineliner pen
Colored pencils or markers
How to Draw a Burger Step by Step Guide for Beginners
1. Understanding the Structure of a Burger
Learn the Basic Layers
Before starting your drawing, it’s important to understand how a burger is built. A typical burger consists of stacked layers such as the top bun, lettuce, tomato, cheese, patty, and bottom bun.
Think of it like building blocks. Each layer sits on top of the other, creating a balanced structure. Starting with this mindset makes drawing much easier and more organized.
Many beginner tutorials suggest drawing each ingredient one at a time to simplify the process and avoid confusion . This approach helps you focus on one shape at a time rather than feeling overwhelmed.
Visualizing the burger as layers will help you keep proportions correct. It also makes your drawing look realistic and neatly arranged.
2. Sketching the Basic Shapes
Start with Simple Forms
Begin your drawing using light pencil strokes. Start with the top bun by drawing a curved dome shape. Then add a slightly flatter curve underneath for the bottom bun.
These two shapes act as the foundation of your burger. Keep them loose and natural—burgers are not perfectly symmetrical.
Next, sketch a rough oval shape between the buns for the patty. This creates the core structure.
Using simple shapes first is one of the easiest ways to improve your drawing. It allows you to adjust proportions before adding details.
At this stage, don’t worry about perfection. Focus on getting the placement right. This will make the later steps much easier.
3. Drawing the Top Bun in Detail
Add Volume and Texture
The top bun is one of the most noticeable parts of your burger drawing. Refine the dome shape by smoothing out the lines and adding slight curves to give it volume.
Now add sesame seeds on top. Draw small oval shapes scattered across the bun. Keep them uneven for a natural look.
The bun should appear soft and slightly puffy. Avoid sharp edges and use gentle curves instead.
Adding these details early helps bring your drawing to life. It also sets the tone for the rest of your artwork.
Take your time with this step, as a well-drawn bun can make your burger look more appealing and realistic.
4. Adding Lettuce for a Natural Look
Create Wavy Edges
Under the top bun, draw the lettuce layer using wavy, uneven lines. This gives the impression of soft, leafy texture.
Lettuce should not look flat. Let the lines move up and down naturally to create folds and depth.
This layer often sticks out slightly from the sides, so don’t keep it perfectly aligned with the bun.
Wavy lines are essential here because they show how organic shapes behave. Straight lines would make the lettuce look stiff and unrealistic.
Practicing this step helps improve your ability to draw natural textures, which is useful in many types of artwork.
5. Drawing the Tomato Slice
Add Smooth Rounded Shapes
Below the lettuce, draw a thin oval shape for the tomato slice. It should follow the curve of the bun but remain slightly flatter.
You can add small inner details like seeds or lines to show texture. These tiny elements make a big difference in realism.
Tomatoes usually have a glossy surface, so you can leave small blank spots for highlights when coloring.
Keep the lines clean and simple. Overcomplicating this step can make your drawing look messy.
This layer adds color contrast and helps balance the overall composition of your burger.
6. Creating the Burger Patty
Add Thickness and Texture
The patty sits at the center of your burger. Draw it as a slightly uneven oval shape to show its natural texture.
Avoid making it too smooth. Add small bumps and irregular edges to give it a cooked appearance.
You can also draw light horizontal lines to represent texture and grill marks.
The patty should be thicker than the tomato but not as thick as the bun. Keeping proportions realistic is important for a balanced drawing.
This step adds depth and makes your burger look more realistic and appetizing.
7. Drawing Melted Cheese
Show Soft, Flowing Edges
Add a slice of cheese on top of the patty. Draw it with slightly drooping corners to show that it’s melting.
The edges should not be straight. Instead, use soft curves to create a natural flowing effect.
Cheese often extends slightly beyond the patty, so allow it to hang over the sides.
This detail adds a sense of warmth and realism to your drawing. It also makes the burger look more delicious and dynamic.
Simple techniques like this can greatly improve the overall quality of your artwork.
8. Adding the Bottom Bun
Complete the Base
Now draw the bottom bun beneath all the layers. It should be flatter than the top bun but still slightly curved.
Make sure it supports all the layers above it. The width should match the top bun for balance.
Add a slight thickness to show that it’s a separate layer.
The bottom bun completes the structure of your burger. Without it, the drawing would feel incomplete.
Take a moment to check proportions before moving forward.
9. Refining and Cleaning the Sketch
Improve Line Quality
Erase unnecessary guidelines and refine your drawing. Go over the final lines with a darker pencil or pen.
Make your lines smooth and confident. Clean edges make a big difference in presentation.
Check for uneven areas or mistakes and fix them carefully.
This step transforms your rough sketch into a polished drawing.
It may seem simple, but it plays a crucial role in making your artwork look professional.
10. Adding Shading and Depth
Make Your Burger Look Realistic
Shading is what brings your burger to life. Decide where your light source is coming from.
Add shadows under each layer, such as beneath the lettuce and patty. This creates depth and separation.
Use soft pencil strokes and blend gently for a smooth effect.
Highlight areas where light hits the bun or tomato. This contrast adds realism.
Even basic shading can make your drawing look three-dimensional and much more appealing.
11. Coloring Your Burger
Bring It to Life with Color
Use warm tones for the bun, green for lettuce, red for tomato, yellow for cheese, and brown for the patty.
Try layering colors to create depth. For example, use darker shades in shadow areas.
Leave small highlights to show shine, especially on the tomato.
Coloring is where your burger truly comes alive. It adds personality and makes your drawing visually engaging.
Take your time and enjoy this step—it’s one of the most rewarding parts of the process.
12. Experimenting with Styles
Try Different Burger Designs
Once you’ve mastered the basics, experiment with different styles. Draw cartoon burgers, realistic burgers, or even creative designs.
Add extra toppings like onions, pickles, or sauces. Each variation helps improve your skills.
You can also play with perspective, making your burger look bigger or closer.
Exploring different styles keeps drawing fun and helps you grow as an artist.
Don’t be afraid to try new ideas and develop your own unique style.
Frequently Asked Questions
Is drawing a burger good for beginners?
Yes, burgers are great for beginners because they use simple shapes and layered structures, making them easy to follow.
What is the easiest way to draw a burger?
Start with basic shapes like ovals and curves, then build each layer step by step. This method keeps the process simple.
Why does my burger drawing look flat?
It may lack shading or depth. Adding shadows and highlights can make your drawing look more realistic.
How can I improve my food drawings?
Practice regularly and observe real food. Studying textures and shapes helps improve accuracy.
Should I use references?
Yes, using reference images can help you understand proportions and details better.
Final Words
Drawing a burger is a great way to learn shapes, textures, and shading in a fun way. By following simple steps, you can create a realistic and appealing drawing.
Keep practicing, experiment with styles, and enjoy the process. Every drawing you make helps you improve and build confidence in your artistic journey.