
Drawing a clover is one of the easiest and most calming ways to begin your art journey. With its soft curves and repeating shapes, it’s perfect for learning balance and control.
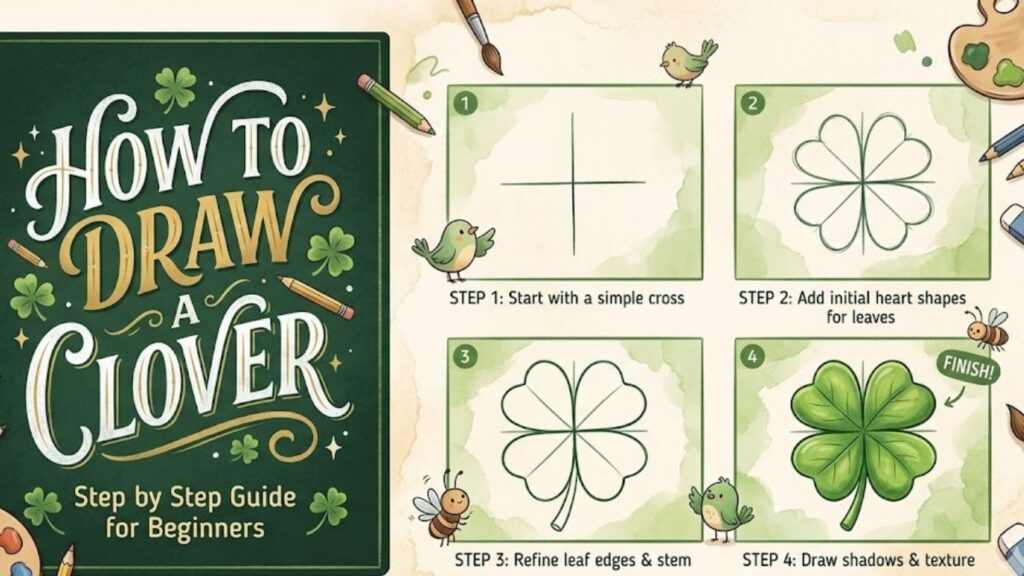
In this complete guide, you’ll learn how to draw a clover step by step, along with helpful tips, ideas, and techniques to improve your skills naturally.
Essential Drawing Supplies You Should Have
Sketchbook
HB and 2B pencils
Eraser
Black fineliner pen
Colored pencils or markers
Simple Tips Before You Start Drawing
Before jumping into the main steps, take a moment to relax your hand and observe simple shapes. A clover is made of repeating curves, so practicing circles and heart shapes can help you draw more smoothly.
Keep your strokes light in the beginning. This allows you to fix mistakes easily and build confidence as you move forward. Drawing is not about perfection—it’s about progress and enjoying the process.
How to Draw a Clover Step by Step Guide for Beginners
1. Understanding the Structure of a Clover
Learn the Basic Form
A clover is made up of small rounded leaves that grow from a central point. Most commonly, you will see three leaves, but sometimes there are four, which are often associated with luck.
Each leaf resembles a heart shape, and all leaves connect at the center. This makes the clover a great subject for practicing symmetry and repetition.
Breaking the clover into simple shapes helps beginners draw it more easily. Tutorials often suggest starting with heart-like forms for each leaf, since they naturally match the clover’s structure .
When you understand this structure, your drawing becomes much easier. You’re no longer guessing—you’re building your drawing step by step with confidence and clarity.
2. Drawing the Center Guide
Create a Balanced Layout
Start by placing a small dot in the middle of your paper. This will act as the center where all leaves connect.
From this point, lightly draw guidelines extending outward. These can be simple lines showing where each leaf will go.
Using a guide helps you maintain symmetry. Many beginners skip this step, which leads to uneven leaves. A small guide can make a big difference in the final result.
Think of this as building a foundation. Once the center is clear, the rest of the drawing becomes much easier to organize.
Keep everything light and simple—you’ll refine it later.
3. Drawing the First Leaf
Use a Heart Shape
Begin by drawing a soft heart shape starting from the center point. This will form your first leaf.
Make sure the curves are smooth and rounded. Avoid sharp edges, as clover leaves are naturally soft in appearance.
Using a heart shape is one of the easiest ways to draw a clover leaf. It provides a clear structure and helps keep proportions consistent.
Take your time with this step. The first leaf sets the standard for the rest.
If it doesn’t look perfect, don’t worry. You can adjust it easily since your lines are still light.
4. Adding the Remaining Leaves
Repeat the Pattern
Now draw additional leaves around the center using the same heart shape.
For a three-leaf clover, create two more leaves. For a four-leaf clover, add one extra leaf evenly spaced.
Each leaf should connect to the center and match in size and shape. Repetition is key here.
Some guides recommend drawing each leaf one at a time to maintain consistency and avoid confusion .
This step completes the main structure of your clover. Once all leaves are in place, your drawing will already look recognizable and balanced.
5. Drawing the Stem
Add a Natural Flow
From the center point, draw a thin line extending downward to create the stem.
Make the stem slightly curved instead of straight. This adds a natural and organic feel to your drawing.
You can make the stem slightly thicker at the top and thinner toward the bottom.
Even though it’s a small detail, the stem plays an important role in completing the plant structure.
Keep it simple and smooth. Overcomplicating the stem can distract from the leaves.
6. Adding Leaf Details
Draw Veins for Realism
Inside each leaf, draw a thin line from the center outward. These lines represent the veins.
You can add smaller branching lines for extra detail if you want.
These details help make your drawing look more realistic and visually interesting.
According to drawing guides, adding simple vein lines enhances the natural look of the clover without making it too complex .
Keep the lines light and subtle. The goal is to enhance, not overwhelm.
7. Refining Your Drawing
Clean and Improve
Now it’s time to clean up your sketch. Erase any extra guidelines or rough lines.
Go over your final lines with a darker pencil or pen. Make them smooth and clear.
Check for uneven shapes and adjust them if needed.
This step is important because it transforms your rough sketch into a polished drawing.
Take your time and focus on clarity. Clean lines make your drawing stand out.
8. Adding Shading and Depth
Make It Look 3D
Shading adds depth to your drawing. Decide where your light source is coming from.
Shade one side of each leaf slightly darker. This creates contrast and dimension.
You can also darken the center where the leaves meet to create depth.
Use soft strokes and blend gently for a smooth effect.
Even simple shading techniques can make your clover look more realistic and visually appealing.
9. Coloring Your Clover
Add Life with Color
Use green shades to color your clover. Start with a base layer and then add darker tones for shadows.
You can also use lighter shades for highlights.
Using multiple shades of green creates depth and makes your drawing more vibrant.
Coloring is where your artwork truly comes alive. It adds personality and energy to your drawing.
Take your time and enjoy this step.
10. Practicing Different Clover Styles
Explore Creative Ideas
Once you’re comfortable with the basics, try different styles.
Draw cartoon clovers with big, rounded leaves or realistic ones with detailed textures.
You can also create patterns using multiple clovers.
Experimenting helps you develop your own style and keeps drawing fun.
The more you practice, the more confident you’ll become.
11. Common Mistakes to Avoid
Learn and Improve
One common mistake is uneven leaves. Always check symmetry.
Another mistake is skipping guidelines, which can lead to imbalance.
Avoid drawing stiff lines—keep them soft and curved.
Adding too many details can also make your drawing messy.
Learning from these mistakes will help you improve faster.
12. Practice Tips for Beginners
Build Your Skills
Practice drawing clovers regularly using simple shapes.
Start with quick sketches to improve control and speed.
Observe real plants to understand natural shapes.
Try different tools like pencils, pens, or markers.
Stay patient and consistent. Improvement comes with time and practice.
Frequently Asked Questions
Is drawing a clover easy for beginners?
Yes, it’s one of the easiest drawings because it uses simple repeating shapes.
What is the best way to draw a clover?
Start with a center point and build heart-shaped leaves around it step by step.
Why do my leaves look uneven?
This usually happens when guidelines are skipped. Using a center guide helps maintain balance.
Can I draw a clover without shading?
Yes, but shading adds depth and makes your drawing look more realistic.
How long does it take to learn?
With regular practice, you can improve within a few days.
Final Words
Drawing a clover is a simple and enjoyable way to build your artistic skills. By following step-by-step techniques, you can create clean and balanced drawings with ease.
Keep practicing, stay creative, and enjoy the process. Every drawing you complete brings you closer to becoming more confident in your art.