Do you want to learn how to draw a carrot that looks so real, you could almost pluck it off the page? You’re in the right place!
Drawing a carrot might seem simple, but there’s an art to getting those curves and colors just right. Whether you’re a beginner or looking to refine your skills, this guide will give you the confidence you need. Imagine impressing your friends with a drawing that leaps off the page! Don’t just imagine it—make it happen.
Dive into this step-by-step guide, and let’s get those creative juices flowing. Your masterpiece awaits!
Contents
Materials Needed
Gather paper, pencils, and an eraser to start drawing a carrot. Coloring tools like crayons or markers add vibrant hues. Optional: use a ruler for straight lines.
When you’re setting out to draw a carrot, having the right materials is crucial. Imagine sitting down, ready to sketch, but realizing you’re missing a key tool. It’s frustrating, right? Let’s avoid that. Whether you’re a seasoned artist or a beginner, having the right materials will make the process smoother and more enjoyable. So, gather your supplies, and let’s make sure you have everything you need.
###
Sketch Paper
A good piece of sketch paper is your canvas. Choose paper that can handle the pressure of your pencil without tearing. If you’re like me, you might have learned the hard way that printer paper doesn’t cut it.
###
Pencils
You’ll need a variety of pencils. A standard HB pencil for the initial outlines and lighter pencils like 2H for fine details. Don’t forget a 2B pencil for shading. Having the right pencils can make all the difference.
###
Eraser
Mistakes happen. But that’s okay! A quality eraser will let you correct errors without leaving smudges. Consider having both a kneaded eraser and a standard one on hand.
###
Sharpener
A sharp pencil gives you control. Keep your pencils sharp to create clean lines. A small, handheld sharpener is perfect for this task.
###
Colored Pencils
Carrots aren’t just orange; they have depth and dimension. Use colored pencils to add life to your drawing. Don’t shy away from experimenting with different shades.
###
Ruler
While you might not think of a carrot as needing precision, a ruler can help with proportions. Especially when you’re focusing on realistic details.
###
Reference Image
Having a picture of a carrot in front of you can be incredibly helpful. It’s your guide to capturing the essence of a real carrot. It’s like having a map when exploring new territory.
###
Optional: Blending Stump
If you’re aiming for a more realistic look, blending stumps can soften lines and create smooth transitions. They’re not essential, but they elevate your shading game.
When you gather all these materials, you set yourself up for a successful drawing session. Have you ever tried drawing without all the right tools? It’s like trying to cook with missing ingredients. So, get your materials ready and enjoy the creative process.

Credit: m.youtube.com
Choosing The Right Paper
Selecting the right paper is crucial for drawing a carrot. A smooth, medium-weight paper provides a good surface. It allows pencils or colors to glide easily. This ensures clear lines and vibrant hues.
Choosing the right paper is a crucial step in learning how to draw a carrot. The paper you select can significantly influence the outcome of your art. Understanding different types of paper and their effects can make your drawing experience more enjoyable and productive.
Understanding Paper Weight
Paper weight plays a big role in how your drawing will turn out. Heavier paper, like 200gsm or more, can handle more pressure and layers of color. If you’re using colored pencils or markers, a thicker paper will prevent bleeding and warping.
Consider your tools. Are you using pencils or ink? Light paper might work for sketches, but detailed drawings need more robust options.
Texture And Tooth
Texture refers to the surface feel of the paper. Some have a smooth surface, while others are more textured.
If you prefer fine lines and detailed work, go for smooth paper. On the other hand, textured paper is excellent for creating depth and highlights in your carrot drawing.
Try different textures to see which complements your drawing style. A simple test sketch can reveal a lot.
Paper Color
The color of your paper can also impact your drawing. White is the standard choice, providing a blank canvas for vibrant colors.
However, experimenting with toned or colored paper can make your drawing pop. A light gray or cream might give your carrot more dimension.
Have you ever tried drawing on a colored surface? It might just surprise you.
Personal Experience And Experimentation
Once, I switched from plain printer paper to a textured sketchpad. The difference was astounding. My carrot drawing had more character and realism.
Experiment with different papers to find what suits you best. Sometimes, the right paper can turn an average drawing into something special.
What paper do you think would enhance your drawing skills? Give it a try, and you might discover a new favorite.
Selecting Drawing Tools
Choosing the right tools is essential for drawing a carrot. Pencils and erasers provide control for sketching. Colored pencils or markers add vibrant orange hues, bringing your carrot to life.
Selecting the right tools can make your drawing experience enjoyable. Choosing suitable materials ensures that your drawing process is smooth and productive. Different tools provide varied effects, enhancing your artwork’s appearance. Let’s explore the essential drawing tools you need for sketching a carrot.
Pencils: The Basics
Pencils come in different grades. Each grade offers a unique texture. Soft pencils like 2B or 4B create darker lines. Hard pencils like HB or 2H are ideal for lighter sketches. Starting with a lighter pencil helps outline the carrot shape.
Erasers: For Clean Lines
Erasers are crucial for refining your drawing. A kneaded eraser is flexible. It can shape into any form. Use it to lighten areas or correct mistakes. A vinyl eraser provides more precision. It helps achieve sharp and clean edges.
Paper: The Canvas
The type of paper impacts your drawing’s outcome. Smooth paper is perfect for detailed work. Textured paper adds depth and character. Choose a medium-weight paper for durability. This ensures your pencil marks stay crisp.
Colored Pencils: Add Vibrancy
Colored pencils bring your drawing to life. Select colors like orange, green, and brown. These colors are essential for a realistic carrot. Layering colors can create a 3D effect. Blending tools can enhance this technique.
Blending Tools: Smooth Transitions
Blending tools help soften harsh lines. A blending stump is a popular choice. It smoothens pencil strokes. Tissue paper can also blend colors effectively. These tools add a polished look to your carrot drawing.
Basic Shapes And Forms
Drawing a carrot starts with understanding its basic shapes. Every carrot has a simple structure. By breaking it down, you can create a realistic drawing. Focus on capturing the essence of the carrot’s form. This will make your drawing more accurate and appealing.
Understanding Basic Shapes
Carrots are primarily made up of two shapes. The first shape is a long, tapered cylinder. This forms the body of the carrot. The second shape is a leafy top. It resembles a bushy crown. Visualize these shapes in your mind. They are simple and easy to draw.
Sketching Simple Forms
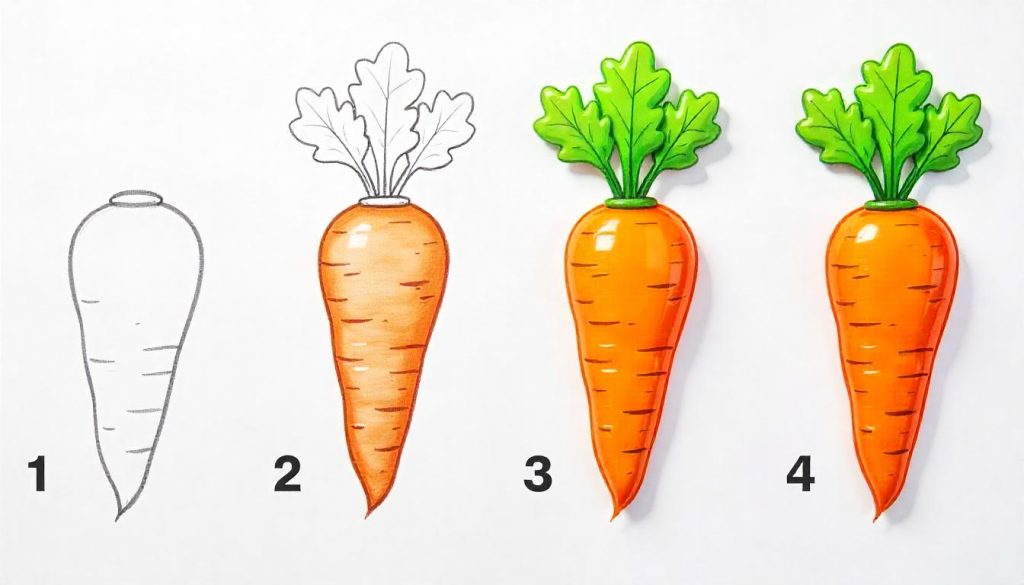
Start by drawing the carrot’s body. Use a pencil for light lines. Draw a long, narrow oval. Taper it towards one end. This represents the carrot’s point. Next, sketch the leafy top. Add a bunch of wavy lines. This creates the appearance of leaves. Adjust the shapes until they look right.
Keep your lines loose and light. This helps in making changes easily. Remember, practice makes progress. The more you draw, the better you get. Enjoy the process of creating art!
Drawing The Carrot Outline
Start by sketching a long, oval shape for the carrot’s body. Add a smaller, curved triangle at the bottom for the tip.
Drawing a carrot might seem simple at first, but capturing its unique shape and texture can be a fun challenge. Whether you’re an aspiring artist or just someone looking to explore your creative side, understanding how to outline a carrot effectively can make your drawing stand out. Let’s dive into the basics of drawing a carrot outline, starting with creating the carrot shape and defining the carrot body.
Creating The Carrot Shape
Start by visualizing the carrot’s unique elongated form. Picture it as a long, tapered cylinder. This shape is crucial for your outline.
Begin with a light pencil sketch. Draw a vertical oval shape, narrowing it slightly towards one end. This represents the carrot’s tapered body.
Think about the carrot’s natural curves. You might recall picking carrots from a garden that aren’t perfectly straight. Slightly bend your outline to give it a realistic touch.
Defining The Carrot Body
Once your shape is set, it’s time to define the carrot’s body. Have you ever noticed the subtle lines running down a carrot’s surface?
Add these lines in a slightly curved manner along your outline. They don’t need to be perfectly symmetrical. This adds character to your drawing.
Consider the carrot’s texture. Use small, dashed lines to mimic the rough skin. This technique can transform your simple sketch into something more lifelike.
As you draw, remember that every carrot has its own personality. Some are stubbier, while others have a longer, leaner look. Adjust your outline to capture these differences.
What kind of carrot will you create today? Whether it’s a quirky, bumpy carrot or a smooth, elegant one, your drawing is a reflection of your artistic flair.
Adding Details
Start by sketching a narrow oval for the carrot body. Add zigzag lines to illustrate the leafy top. Enhance realism by drawing fine lines along the carrot’s length for texture.
Adding details to your carrot drawing can take it from a simple outline to a vibrant piece of art. It’s the details that bring your carrot to life, making it realistic and engaging. Remember the first time you tried drawing something intricate? You discovered that it’s the little things that make a big difference. Let’s dive into how you can add those essential details to your carrot drawing.
Drawing The Carrot Texture
Capturing the texture of a carrot is crucial for realism. Carrots aren’t perfectly smooth; they have subtle lines and grooves. Use short, curved lines along the body of the carrot to mimic these natural patterns.
Consider how light affects your carrot. Shadows can add depth, so lightly shade one side to give it dimension. Play around with your pencil pressure to create variations in texture, making your carrot look more lifelike.
Incorporating The Carrot Top
The carrot top is where you can add a splash of personality. Carrot greens are leafy and can be drawn with quick, jagged strokes. Think about how the leaves overlap and vary their lengths for a natural appearance.
Experiment with different shades of green to add richness. You can even draw a few leaves bending or twisting as if swaying in the breeze. This will add movement to your drawing and capture the viewer’s attention.
Have you ever noticed how a little extra detail can completely change your perspective on something? As you add these details, your carrot will transform before your eyes. What other small tweaks could elevate your drawing?
Shading Techniques
Create a realistic carrot drawing using basic shading techniques. Start with a simple outline. Then add dimension by shading the carrot’s round body and leafy top, using light and dark pencil strokes. This approach brings your carrot to life on paper.
Shading techniques can bring your carrot drawing to life. Adding depth makes the carrot look realistic. Understanding light and shadow can create this effect. Let’s explore some shading techniques to enhance your carrot drawing.
Light And Shadow Basics
Light and shadow are crucial for realism. Identify the light source in your drawing. This determines where shadows fall on your carrot. The side facing the light appears brighter. The opposite side has shadows. Start by lightly sketching the basic shape of your carrot. Then, add a gradient from light to dark. Use gentle pencil strokes for smooth transitions. Shadows should be softer on curved surfaces. This mimics natural lighting.
Enhancing With Shading
Shading adds texture to your carrot drawing. Use a variety of pencil pressures for different shades. Light pressure creates soft shadows. Press harder for darker areas. Observe real carrots for guidance. Notice the texture of the skin. Mimic this with small, detailed strokes. Blend edges with your finger or a blending tool. This smooths the transition between light and dark. Highlights can make your carrot pop. Erase small areas to create bright spots. This technique enhances realism. Practice different shading techniques to find what works best for you.
Coloring The Carrot
Drawing a carrot is fun and easy. Start with an oval shape for the top. Then, add a long, tapered body. Finish with green leaves at the top. Enjoy coloring your carrot with bright orange and green shades. Perfect for beginners and kids!
Coloring the carrot is where the magic happens. You have sketched your carrot, and now it’s time to bring it to life. Adding color can transform your drawing from a simple outline to a vivid piece of art. But how do you choose the right shades? And how do you apply them effectively? Let’s dive into these questions and explore the art of coloring your carrot drawing.
Choosing Colors
When you think of a carrot, you probably imagine its vibrant orange hue. But did you know carrots come in various colors like purple, red, and yellow? Choose colors based on the type of carrot you want to depict.
Consider the setting of your drawing. Is your carrot part of a garden scene, or is it a standalone illustration? The setting can influence your color choices. For a realistic depiction, opt for shades of orange with touches of brown and green for the leaves.
Don’t shy away from experimenting. Try different combinations to see what looks best. You might discover a unique palette that makes your drawing stand out.
Applying Color Gradients
Color gradients can add depth and realism to your carrot drawing. Start with a base color, like a light orange, and gradually blend in darker shades. This technique mimics how light and shadow fall on an object.
Use gentle strokes with colored pencils or brushes. You want to build up the color gradually. Apply darker tones at the edges and lighter tones at the center to give your carrot a rounded appearance.
Consider the direction of your light source. This will guide you on where to apply shadows and highlights. Are you capturing the carrot in natural sunlight, or is it indoors under artificial light?
Try layering different colors to create a richer texture. A touch of red or yellow can make the carrot look more dynamic. Have you ever noticed how a simple change in shading can transform the entire feel of your drawing?
Coloring is not just about filling spaces. It’s about creating a mood and telling a story through your art. How will your carrot story unfold?
Final Touches
Adding final touches to your carrot drawing brings it to life. Carefully shade the body for depth. Highlight the top with light strokes. This adds realism and dimension to your artwork.
After sketching out the basic shape of your carrot, it’s time to add the final touches that bring your drawing to life. These are the details that can make your carrot look more realistic and vibrant. Imagine the pride you’ll feel when you see your creation pop off the page, full of depth and character. Let’s dive into refining those edges and adding those all-important highlights.
Refining Edges
Begin by taking a closer look at the outline of your carrot. Use a sharper pencil to refine the edges, ensuring they are smooth and clean. This step is crucial in giving your carrot a polished look.
Consider the contours of a real carrot. They’re not always perfectly straight. Add slight curves to your lines to mimic the natural, uneven surface of a carrot.
Erase any unnecessary sketch lines. This will help your drawing look neat and professional.
Adding Highlights
Adding highlights can make your carrot look more three-dimensional. Think about where the light would naturally hit the carrot.
Use a white pencil or eraser to create subtle highlights along the top side of the carrot. This will suggest a light source shining on it.
Be gentle with this step; too much pressure can create stark lines. The goal is to keep it subtle yet effective.
Remember when you last held a carrot under sunlight? Notice how the light created soft, shiny patches? Try to replicate this effect on your drawing.
These final touches might seem small, but they make a big difference in the overall look of your drawing. Are you ready to see your carrot come to life with just a few more tweaks? Give it a try and watch how these small details transform your artwork.

Credit: www.pinterest.com
Frequently Asked Questions
How Do I Start Drawing A Carrot?
Begin by sketching an elongated oval shape for the carrot’s body. Add a slightly curved line at the top for the stem. This forms the basic outline. Ensure the proportions are realistic and resemble a carrot. This simple foundation helps in creating a more detailed and refined drawing later.
What Materials Do I Need To Draw A Carrot?
To draw a carrot, you need paper, a pencil, and an eraser. Use colored pencils or markers to add color. Optional tools like a ruler can help maintain proportions. Choose quality paper for better results. These basic materials are enough to create a vibrant and detailed carrot drawing.
How Can I Add Details To My Carrot Drawing?
Add details by sketching lines along the carrot’s body to show texture. Draw small, irregular lines to mimic the carrot’s natural creases. Use shading techniques to enhance depth. Include leafy greens at the top for realism. These elements bring your carrot drawing to life, making it look more realistic.
What Are Common Mistakes In Drawing A Carrot?
Common mistakes include incorrect proportions and lack of texture. Avoid making the carrot too flat or uniform. Ensure the body tapers slightly towards the end. Overlooking the leafy greens can make the drawing incomplete. Pay attention to these details to improve the overall look of your carrot drawing.
Conclusion
Drawing a carrot is fun and simple. Start with basic shapes. Add details like texture and shading. Practice makes perfect. Use light strokes first. Correct mistakes easily. Carrots come in different shapes. Experiment with these. Enjoy the process. Relax and let creativity flow.
Share your art with friends. They might want to try too. Drawing is a great way to relax. It boosts creativity and focus. Keep practicing and discover your style. Soon, drawing carrots will be a breeze. Art is for everyone.
Enjoy the journey!