Drawing a lighter is a great way to practice clean lines, small details, and simple 3D shapes. It may look basic, but it helps build strong drawing fundamentals.
In this guide, you’ll learn how to draw a lighter step by step in an easy and beginner-friendly way. With practice, you’ll be able to draw realistic and creative designs confidently.
Contents
- Essential Drawing Supplies You Should Have
- Simple Tips Before You Start Drawing
- How to Draw a Lighter Step by Step Guide for Beginners
- 1. Understanding the Structure of a Lighter
- 2. Drawing the Basic Outline
- 3. Refining the Body Shape
- 4. Drawing the Metal Top
- 5. Adding the Spark Wheel
- 6. Drawing the Flame Area
- 7. Refining the Outline
- 8. Adding Surface Details
- 9. Shading and Depth
- 10. Coloring Your Lighter
- 11. Drawing Different Lighter Styles
- 12. Common Mistakes to Avoid
- 13. Practice Tips for Beginners
- Frequently Asked Questions
- Final Words
Essential Drawing Supplies You Should Have
Sketchbook
HB and 2B pencils
Eraser
Black fineliner pen
Colored pencils or markers
Simple Tips Before You Start Drawing
Before you begin, practice drawing rectangles, straight lines, and small mechanical details. A lighter is made from simple shapes combined with tiny parts.
Keep your strokes light at first so you can adjust easily. Focus on proportions and structure before adding details or shading.
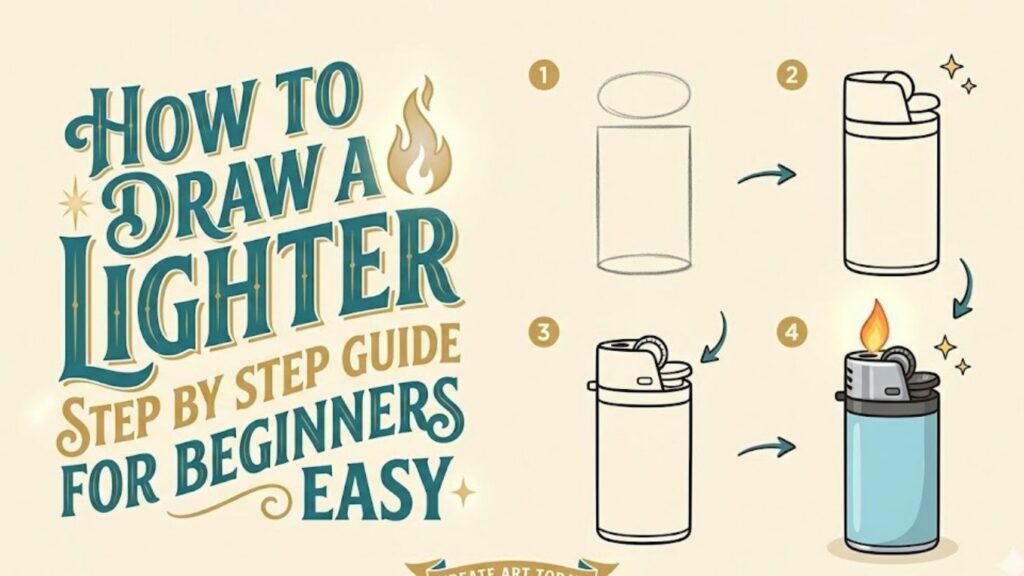
How to Draw a Lighter Step by Step Guide for Beginners
1. Understanding the Structure of a Lighter
Learn the Basic Parts
A typical lighter consists of a rectangular body, a metal top, a spark wheel, and a flame outlet.
The body is usually the largest part and holds the fuel. The top section contains smaller mechanical details.
Breaking the lighter into these simple parts makes it easier to draw step by step.
Instead of seeing it as a complex object, think of it as a combination of basic shapes.
Understanding the structure helps you place each part correctly and maintain proper proportions.
2. Drawing the Basic Outline
Start with Simple Shapes
Begin by drawing a tall rectangle. This will form the main body of the lighter.
Make sure the sides are straight and the corners slightly rounded.
Then add a smaller rectangle on top for the metal section.
Keep your lines light and simple.
This step creates a solid foundation for your drawing and helps you plan the layout.
3. Refining the Body Shape
Add Realistic Edges
Now refine the body by smoothing the edges and adding slight curves.
Most lighters are not perfectly sharp—they have soft edges.
You can also add a small base line at the bottom to show thickness.
This step helps your drawing look more realistic and less flat.
Take your time to make the shape clean and balanced.
4. Drawing the Metal Top
Define the Upper Section
At the top of the lighter, draw a small rectangular or oval-shaped section.
This part is usually slightly narrower than the body.
Add a small curved cap or guard around the top.
Keep the shapes simple and neat.
This step adds structure and prepares you for the smaller details.
5. Adding the Spark Wheel
Draw Small Details
Draw a small circle or cylinder on top of the metal section. This represents the spark wheel.
Add tiny lines or texture to show grip on the wheel.
Even though it’s a small detail, it’s an important feature of the lighter.
Keep your lines light and precise.
This step helps your drawing look more detailed and realistic.
6. Drawing the Flame Area
Create the Top Opening
Above the spark wheel, draw a small opening where the flame comes out.
You can add a tiny flame shape if you want your lighter to look active.
Keep the flame simple, using soft curves.
This step adds life and character to your drawing.
It also helps complete the recognizable structure of the lighter.
7. Refining the Outline
Clean and Improve
Erase any unnecessary guidelines and smooth out your lines.
Go over your final outline with a darker pencil or pen.
Make sure all parts are clear and well-defined.
This step transforms your rough sketch into a polished drawing.
Take your time to ensure everything looks neat.
8. Adding Surface Details
Enhance the Design
You can add small details like logos, patterns, or texture on the lighter body.
Some lighters have a matte finish, while others are glossy or metallic.
Keep the details simple if you’re a beginner.
Adding these elements makes your drawing more interesting and unique.
This step allows you to personalize your artwork.
9. Shading and Depth
Make It Look 3D
Decide where your light source is coming from.
Add shading on one side of the lighter and lighter tones on the opposite side.
Focus on edges and corners to create depth.
Use soft strokes and blend gently.
Shading gives your drawing a realistic and three-dimensional appearance.
10. Coloring Your Lighter
Bring It to Life
Use colors like black, silver, red, or blue depending on the style you want.
Add highlights to show reflections on metallic parts.
Use darker shades for shadows and lighter shades for bright areas.
Coloring enhances your drawing and makes it visually appealing.
Take your time blending colors smoothly.
11. Drawing Different Lighter Styles
Explore Variations
Once you’ve learned the basic lighter, try drawing different types.
You can draw classic pocket lighters, decorative ones, or modern designs.
Experiment with different shapes, sizes, and colors.
Trying different styles helps improve your creativity and skills.
The more you practice, the more confident you’ll become.
12. Common Mistakes to Avoid
Learn and Improve
One common mistake is uneven proportions between the body and top section.
Another mistake is drawing crooked lines. Keep your shapes straight and aligned.
Avoid adding too many details too early.
Skipping shading can make your drawing look flat.
Being aware of these mistakes helps you improve faster.
13. Practice Tips for Beginners
Build Your Skills
Practice drawing lighters regularly using simple shapes.
Start with quick sketches to improve control.
Observe real objects to understand their structure.
Try different tools like pencils, pens, and markers.
Consistency is key to improvement.
Frequently Asked Questions
Is drawing a lighter easy for beginners?
Yes, it’s beginner-friendly because it uses simple shapes like rectangles and small details.
What is the easiest way to draw a lighter?
Start with a rectangle for the body and build the top section step by step.
How can I make my drawing look realistic?
Focus on clean lines, proper proportions, and shading.
Can I draw a flame on the lighter?
Yes, adding a flame can make your drawing more dynamic and interesting.
How long does it take to improve?
With regular practice, you can improve within a few days.
Final Words
Drawing a lighter is a simple and effective way to practice shapes, details, and shading. By following step-by-step techniques, you can create clean and realistic drawings.
Keep practicing, experiment with styles, and enjoy the process. Every drawing you complete helps you grow as an artist.