Drawing dog ears is a great way to improve your ability to capture expressions and personality in animals. Ears come in many shapes, making them fun and versatile to draw.
In this guide, you’ll learn how to draw dog ears step by step in a simple and beginner-friendly way. With practice, you’ll be able to draw different ear styles with confidence.
Contents
- Essential Drawing Supplies You Should Have
- Simple Tips Before You Start Drawing
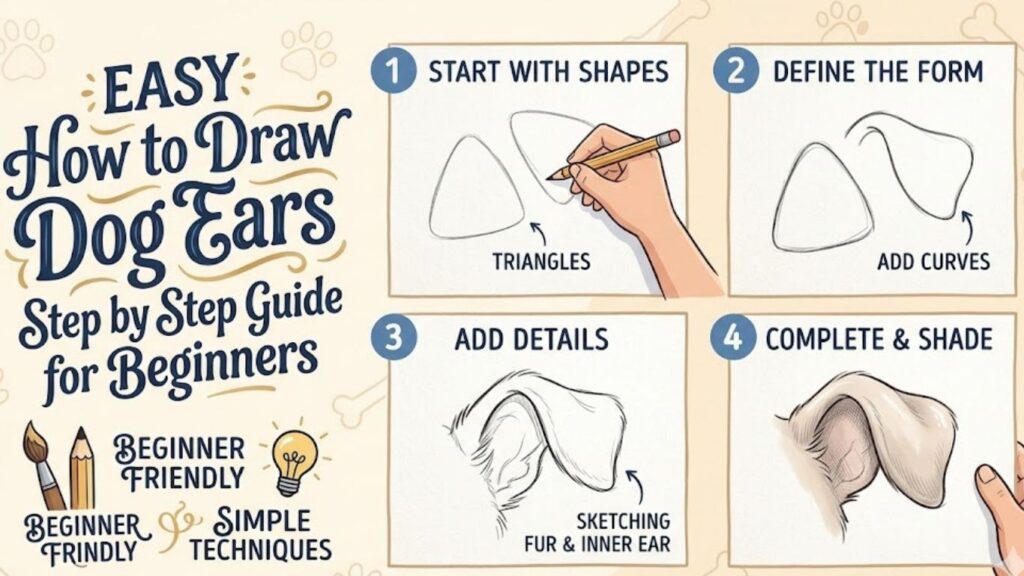
- How to Draw Dog Ears Step by Step Guide for Beginners
- 1. Understanding the Structure of Dog Ears
- 2. Placing the Ears on the Head
- 3. Drawing Basic Ear Shapes
- 4. Adding Thickness and Depth
- 5. Refining the Shape
- 6. Drawing Fur Texture
- 7. Adding Inner Ear Details
- 8. Shading and Depth
- 9. Coloring Your Drawing
- 10. Drawing Different Ear Styles
- 11. Common Mistakes to Avoid
- 12. Practice Tips for Beginners
- Frequently Asked Questions
- Final Words
Essential Drawing Supplies You Should Have
Sketchbook
HB and 2B pencils
Eraser
Black fineliner pen
Colored pencils or markers
Simple Tips Before You Start Drawing
Before you begin, practice drawing curved and soft triangular shapes. Dog ears are rarely straight and often have gentle folds and curves.
Keep your strokes light at first so you can adjust easily. Focus on understanding the shape and flow rather than trying to make everything perfect right away.
How to Draw Dog Ears Step by Step Guide for Beginners
1. Understanding the Structure of Dog Ears
Learn the Basic Shapes
Dog ears vary depending on the breed, but most can be simplified into basic shapes like triangles, ovals, or soft curves.
Some ears stand upright, while others droop or fold. Despite the differences, they all connect to the head in a similar way.
Understanding the base shape helps you draw ears more accurately.
Think of ears as flexible forms rather than stiff objects. This mindset makes it easier to capture their natural look.
Once you understand the structure, drawing different ear styles becomes much simpler.
2. Placing the Ears on the Head
Get the Position Right
Before drawing the ears, lightly sketch the head shape. This helps you position the ears correctly.
Ears are usually placed on the upper sides of the head, slightly above the eyes.
Incorrect placement can make your drawing look unnatural, so take your time with this step.
Use light guidelines to ensure symmetry.
This step builds a strong foundation for the rest of your drawing.
3. Drawing Basic Ear Shapes
Start with Simple Forms
Begin by sketching the basic shape of the ears.
For upright ears, draw soft triangles. For floppy ears, use long curved shapes.
Keep your lines light and simple.
This step focuses on capturing the overall shape rather than details.
Starting simple helps you avoid mistakes and makes the drawing process easier.
4. Adding Thickness and Depth
Make the Ears Look Real
Ears are not flat—they have thickness and structure.
Add a second line inside the ear shape to show depth.
You can also draw the inner ear area, which is usually softer and slightly curved.
This step gives your drawing a more realistic appearance.
Adding depth early helps guide your shading later.
5. Refining the Shape
Smooth and Adjust
Go over your sketch and refine the shape of the ears.
Smooth out rough lines and adjust proportions if needed.
Make sure both ears look balanced, unless you’re drawing a tilted or expressive pose.
Erase unnecessary guidelines.
This step helps turn your rough sketch into a cleaner drawing.
6. Drawing Fur Texture
Add Natural Detail
Use short, light strokes to represent fur.
Follow the direction of hair growth, which usually flows downward or outward.
Avoid drawing every single hair. Instead, suggest texture with simple strokes.
This technique keeps your drawing clean while adding realism.
Fur texture is an important detail that brings your drawing to life.
7. Adding Inner Ear Details
Enhance Realism
Draw subtle lines and shapes inside the ear to show folds and structure.
The inner ear often has softer fur and lighter tones.
Keep the details simple and avoid overcomplicating.
This step adds depth and makes your drawing more interesting.
Small details can make a big difference in the final result.
8. Shading and Depth
Create a 3D Effect
Shading helps your ears look more realistic.
Decide where your light source is coming from.
Add darker shading inside the ear and under folds.
Use soft strokes and blend gently.
Shading adds dimension and makes your drawing stand out.
9. Coloring Your Drawing
Bring It to Life
Use colors that match the type of dog you’re drawing.
Add darker tones for shadows and lighter tones for highlights.
Blend colors smoothly for a natural look.
Coloring enhances your drawing and adds personality.
Take your time and enjoy the process.
10. Drawing Different Ear Styles
Explore Variety
Practice drawing different types of dog ears, such as floppy, upright, or folded ears.
Each style has its own unique shape and flow.
Experimenting with different styles helps improve your skills.
It also allows you to draw a wider range of dog breeds.
The more you practice, the more confident you’ll become.
11. Common Mistakes to Avoid
Learn and Improve
One common mistake is drawing ears too stiff. Always use soft, curved lines.
Another mistake is incorrect placement on the head.
Avoid adding too many details too early.
Skipping shading can make your drawing look flat.
Being aware of these mistakes helps you improve faster.
12. Practice Tips for Beginners
Build Your Skills
Practice drawing ears regularly using simple shapes.
Start with quick sketches to build confidence.
Observe real dogs to understand ear shapes and movement.
Try different tools like pencils, pens, and markers.
Consistency is key to improvement.
Read Next:
Frequently Asked Questions
Is drawing dog ears easy for beginners?
Yes, when you break them into simple shapes, they become much easier to draw.
What is the best way to draw dog ears?
Start with basic shapes, refine them, and then add texture and shading.
Why do my ears look uneven?
This usually happens when guidelines are skipped. Use light sketches to maintain balance.
How can I make my drawing look realistic?
Focus on fur texture, shading, and proper proportions.
Can I draw different ear styles?
Yes, practicing different styles helps improve your skills and creativity.
Final Words
Drawing dog ears is a fun and effective way to improve your skills in shapes, texture, and shading. With step-by-step practice, you can create realistic and expressive drawings.
Keep practicing, stay patient, and enjoy the process. Every drawing helps you grow as an artist.