
Learning how to paint bubbles on white paper is a fun way to practice transparency, highlights, reflections, shading, and color blending. Although bubbles look delicate and almost invisible in real life, they can be surprisingly interesting to paint because their surfaces reflect light and surrounding colors. With a few simple techniques, you can create realistic-looking bubbles using watercolor, acrylic, gouache, or even colored pencils.
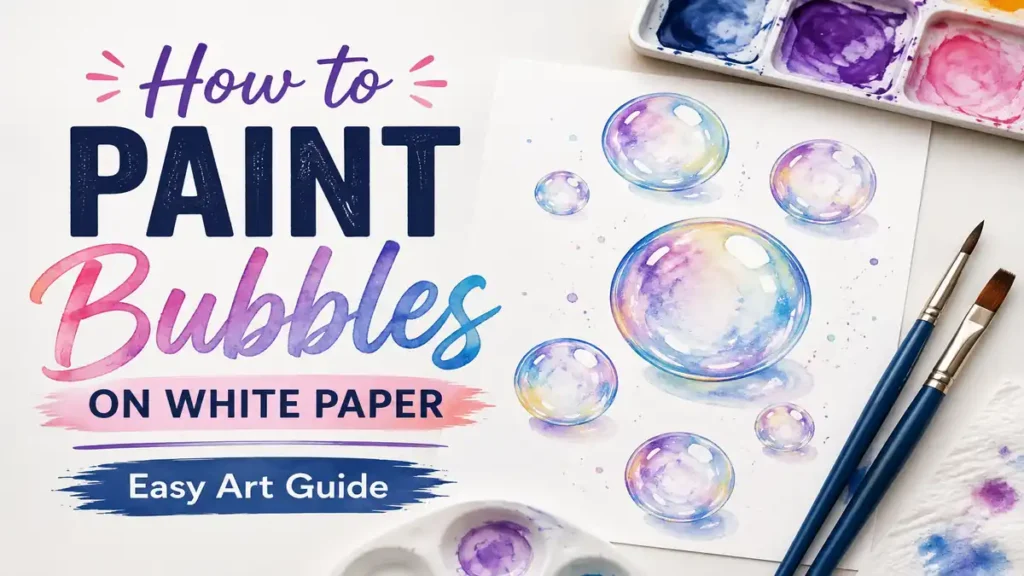
The secret is not to paint a bubble as a solid circle. Instead, think of it as a transparent sphere surrounded by subtle edges, curved reflections, soft shadows, and bright highlights. White paper actually makes the process easier because you can leave parts of the page untouched to represent reflected light. Whether you’re a beginner experimenting with painting or an experienced artist looking for a playful subject, this guide will walk you through the process.
Items to Buy
- White watercolor paper
- Smooth drawing paper
- Graphite pencil
- Kneaded eraser
- Round paintbrushes
- Small detail brush
- Soft blending brush
- Watercolor paints
- Acrylic paints
- Gouache paints
- Palette
- Clean water
- Paper towels
- Masking tape
- White acrylic paint
- White gouache
- White gel pen
- Colored pencils
- Fine liner
- Ruler
- Drawing compass
- Optional metallic paint
Why Paint Bubbles on White Paper?
Bubbles are excellent subjects for practicing several important artistic skills.
Painting them can help you understand:
- Transparency
- Light reflection
- Circular forms
- Color blending
- Shading
- Highlights
- Soft edges
- Negative space
- Reflected light
- Three-dimensional appearance
Because bubbles have such a simple shape, they allow you to concentrate on light and color rather than complicated anatomy or perspective.
What Makes a Bubble Look Realistic?
A realistic bubble usually contains several visual elements rather than one flat color.
Look closely at a soap bubble and you may notice:
- A faint outer rim
- Bright highlights
- Soft color patches
- Darker areas around the edge
- Reflections
- Transparent sections
- Distorted surroundings
The center of a bubble can remain almost completely white because you’re allowing the paper to represent transparency.
This is one of the most important concepts when learning how to paint bubbles.
Choosing the Right Paper
White paper is ideal because it provides a natural background for transparent effects.
For watercolor, choose watercolor paper that can handle moisture without excessive buckling. Cold-pressed paper provides a slightly textured surface, while hot-pressed paper is smoother and works well for detailed bubble paintings.
For acrylic or gouache, heavyweight mixed-media paper can also be useful.
A bright white surface gives you more flexibility because you can use the untouched paper as part of the artwork.
Choosing Your Paint
Different mediums create different bubble effects.
Watercolor
Watercolor is excellent for transparent bubbles because its natural translucency allows you to create soft, delicate color.
Acrylic
Acrylic provides stronger pigmentation and makes it easier to add opaque highlights.
Gouache
Gouache offers a combination of transparency and opacity, making it useful for layering soft colors with bright highlights.
Colored Pencils
Colored pencils can create extremely controlled bubble details, especially when combined with white paper and a white pencil or gel pen.
For beginners, watercolor and gouache are particularly enjoyable options.
How to Paint Bubbles on White Paper Step by Step
Step 1: Prepare Your Workspace
Set up a clean, well-lit workspace.
Place your white paper on a flat surface and gather your brushes, paints, water, palette, and paper towels.
Good lighting is especially important because bubble highlights can be extremely subtle.
Step 2: Lightly Sketch the Bubbles
Use a graphite pencil to draw several circles.
Don’t make every bubble perfectly identical. Vary the sizes and positions to create a more natural composition.
You can overlap some circles to make the scene more interesting.
Keep your pencil pressure very light because dark outlines can make transparent bubbles look like solid objects.
Step 3: Avoid Heavy Outlines
One of the biggest mistakes beginners make is outlining the entire bubble with a dark line.
Real bubbles rarely have a uniformly dark edge.
Instead, create a broken outline using extremely light color.
Leave sections of the circle almost invisible.
Step 4: Choose a Light Color Palette
Bubble colors are usually subtle.
Consider using:
- Pale blue
- Soft pink
- Lavender
- Mint green
- Turquoise
- Yellow
- Peach
- Light purple
Avoid applying all of these colors heavily.
The goal is to create small areas of reflected color rather than coloring the entire bubble.
Step 5: Paint the Outer Rim
Begin by adding a thin, broken ring around the bubble.
Use a diluted color rather than a strong pigment.
For example, a pale blue or lavender wash can create a subtle edge.
Leave gaps in the ring to make it appear transparent.
Step 6: Add Curved Color Patches
Bubbles often reflect colors in curved shapes.
Add small patches of different colors around the interior edge.
Try placing pink near blue, purple near green, or yellow beside lavender.
Keep the transitions soft.
Step 7: Leave the Center Mostly White
Don’t fill the center of the bubble with paint.
The white paper should remain visible.
This negative space helps create the illusion that the bubble is transparent.
If you cover the entire circle with paint, it can start looking like a colored ball instead of a soap bubble.
Step 8: Blend the Colors
Use a clean, slightly damp brush to soften the edges of the color patches.
Blend gently rather than scrubbing the paper.
The colors should appear to fade gradually into the white surface.
Step 9: Add a Soft Shadow
If the bubbles are floating above a surface, add a very subtle shadow underneath them.
Use a pale gray, blue, or lavender wash.
Keep the shadow soft and faint.
A strong shadow can make the bubble appear heavy.
Step 10: Add Bright Highlights
Highlights are one of the most important details.
Use white gouache, white acrylic paint, or a white gel pen to add tiny highlights.
Try:
- Small dots
- Curved lines
- Crescent shapes
- Tiny clusters
- Broken highlights
Avoid putting identical highlights on every bubble.
Step 11: Add Reflections
For a more realistic effect, add curved reflections around the upper or side portions of the bubbles.
Use pale colors rather than harsh lines.
Reflections can follow the circular shape of the bubble.
Step 12: Add Darker Edge Areas
A few sections of the bubble can be slightly darker.
Use a diluted version of your chosen color.
Place darker areas around selected sections of the rim while leaving other areas extremely light.
This contrast gives the bubble more dimensionality.
Step 13: Paint Overlapping Bubbles
When bubbles overlap, their edges interact visually.
Don’t simply draw one complete circle over another.
Instead, allow some edges to disappear where the bubbles intersect.
This makes the arrangement feel more natural.
Step 14: Add Tiny Bubble Details
Small bubbles can be added around the larger ones.
Use very thin circular marks and tiny white highlights.
Vary their size to create depth.
Step 15: Strengthen the Best Highlights
Once the painting is dry, inspect it from a distance.
Choose a few highlights to make brighter.
This creates focal points without making every bubble equally intense.
Step 16: Clean Up the Background
If you accidentally created unwanted marks, carefully remove pencil lines with a kneaded eraser once the paint is completely dry.
Avoid aggressively rubbing wet watercolor paper.
Step 17: Let the Painting Dry Completely
Allow the artwork to dry before adding final details.
Watercolor, gouache, and acrylic can look different while wet.
Waiting helps you judge the actual intensity of the finished colors.
How to Paint Realistic Watercolor Bubbles
Watercolor is particularly effective for bubble paintings.
Start with extremely diluted colors and gradually build intensity.
Use a small round brush for the rim and a clean damp brush for blending.
One useful technique is to paint a pale circular wash and then lift small sections with a clean, damp brush. This can create soft highlights while preserving the white paper underneath.
Remember that watercolor bubbles should generally remain light and airy.
How to Paint Bubbles With Acrylic
Acrylic gives you greater control over opacity.
Start with a very thin transparent layer of color. Once it dries, add additional translucent layers.
Use a small brush to create curved reflections.
For highlights, use slightly thicker white paint.
Acrylic is especially useful if you want bold, colorful bubbles against a simple white background.
How to Paint Bubbles With Gouache
Gouache is excellent for combining transparent washes with opaque highlights.
Begin with diluted color for the bubble’s body.
Once dry, use more opaque gouache to create:
- Bright reflections
- White dots
- Crescent highlights
- Curved light streaks
The ability to layer light colors over darker ones makes gouache particularly forgiving.
Creating a Bubble With a Rainbow Effect
Rainbow bubbles are visually striking.
Instead of using strong bands of rainbow color, create small curved transitions between different hues.
For example, you might blend:
- Pink into purple
- Purple into blue
- Blue into green
- Green into yellow
Keep the colors pale and transparent.
The white paper should remain visible throughout most of the bubble.
Painting Bubble Reflections
Reflections can make a simple bubble look much more realistic.
Imagine a light source coming from one direction.
If the light comes from the upper left, place your strongest highlights toward that area.
Then add smaller reflected colors around the lower and opposite edges.
Keeping the light direction consistent makes the entire painting feel more believable.
Painting Bubbles With a Dark Background
Although this guide focuses on white paper, you can experiment with adding a very light background wash.
A pale blue, gray, or lavender background can make the bubbles easier to see.
However, white paper provides a beautiful minimalist effect because the transparent portions of the bubbles blend naturally into the page.
Common Mistakes to Avoid
Drawing Dark Circles
A dark outline can make your bubble look like a balloon or ball.
Use broken, delicate edges instead.
Using Too Much Paint
Heavy color reduces the illusion of transparency.
Build color gradually.
Filling the Entire Bubble
The center should generally remain light.
Leave plenty of untouched paper.
Making Every Bubble Identical
Natural bubbles vary in size, shape, and reflection.
Vary your circles and details.
Adding Highlights Everywhere
If every section is bright white, the painting can lose depth.
Choose a few strong highlights and keep the rest subtle.
Ignoring Light Direction
Random highlights can make the bubbles look unrealistic.
Choose one primary light source and keep your highlights consistent.
Tips for Making Bubbles Look Three-Dimensional
Use contrast strategically.
A bubble can appear more dimensional when one side has a slightly stronger edge while another side nearly disappears.
Combine:
- Pale shadows
- Broken edges
- White highlights
- Curved reflections
- Transparent color
You don’t need strong shading to create depth.
In fact, subtle differences often work better.
Easy Bubble Painting Ideas for Beginners
If you’re new to painting bubbles, start with a simple composition.
Try painting:
- Three large bubbles
- A cluster of overlapping bubbles
- Small bubbles floating upward
- Rainbow bubbles
- Blue bubbles
- Pink and purple bubbles
- Bubbles with tiny highlights
- A bubble-filled corner design
Once you’re comfortable with the basic technique, combine several ideas into one painting.
Advanced Bubble Painting Techniques
More experienced artists can experiment with reflected environments.
For example, imagine bubbles floating near flowers, water, or a colorful background. Tiny distorted reflections of those surroundings can be painted along the bubble’s surface.
You can also experiment with varying the opacity of individual bubbles.
Some can be barely visible while others have stronger reflections and highlights. This creates depth and prevents the composition from looking repetitive.
How to Make White Highlights Stand Out
White highlights work best when they contrast against a slightly darker area.
Instead of adding white paint everywhere, first establish pale color around the highlight.
Then add the brightest white mark.
This makes the highlight appear luminous.
A white gel pen can be particularly useful for tiny finishing details, while gouache or acrylic works better for larger highlights.
FAQs
What paint is best for painting bubbles?
Watercolor, gouache, and acrylic can all work well. Watercolor is particularly effective for soft transparent effects.
Do I need to outline the bubbles?
No. A broken, subtle edge usually looks more realistic than a dark continuous outline.
How do I make bubbles look transparent?
Leave large areas of white paper visible and use very diluted colors around the edges.
How do I add realistic highlights?
Use white gouache, acrylic, or a white gel pen to add small dots, crescents, and curved reflections.
What colors should I use?
Soft blues, pinks, purples, greens, yellows, and turquoise are excellent choices.
Can beginners paint bubbles?
Absolutely. Bubbles have a simple basic shape, making them an excellent subject for beginners practicing light and transparency.
How do I paint overlapping bubbles?
Allow some edges to disappear where the bubbles overlap rather than drawing complete circles for every bubble.
Can I paint bubbles with acrylic?
Yes. Use thin transparent layers for the bubble and opaque white paint for the brightest highlights.
Creative Ways to Use Bubble Paintings
Bubble paintings can become more than simple practice exercises.
You can use them for:
- Greeting cards
- Wall art
- Scrapbook pages
- Journaling
- Children’s artwork
- Art prints
- Handmade stationery
- Mixed-media projects
- Decorative illustrations
A collection of small bubble paintings can also become a colorful abstract artwork.
Final Words
Learning how to paint bubbles on white paper is a wonderful exercise for understanding transparency, reflection, color, and light. Instead of treating each bubble as a solid circle, focus on delicate edges, pale color patches, curved reflections, soft shadows, and bright highlights. The untouched white paper is one of your most important artistic tools.
Start with simple circles and a limited palette, then gradually experiment with overlapping bubbles, rainbow colors, different paint mediums, and more detailed reflections. With practice, you’ll discover that even a few subtle brushstrokes can transform a simple circle into a convincing, luminous bubble.