
Drawing a cape is a great way to learn how fabric moves and flows. It may look tricky at first, but once you break it into simple shapes and folds, it becomes much easier.
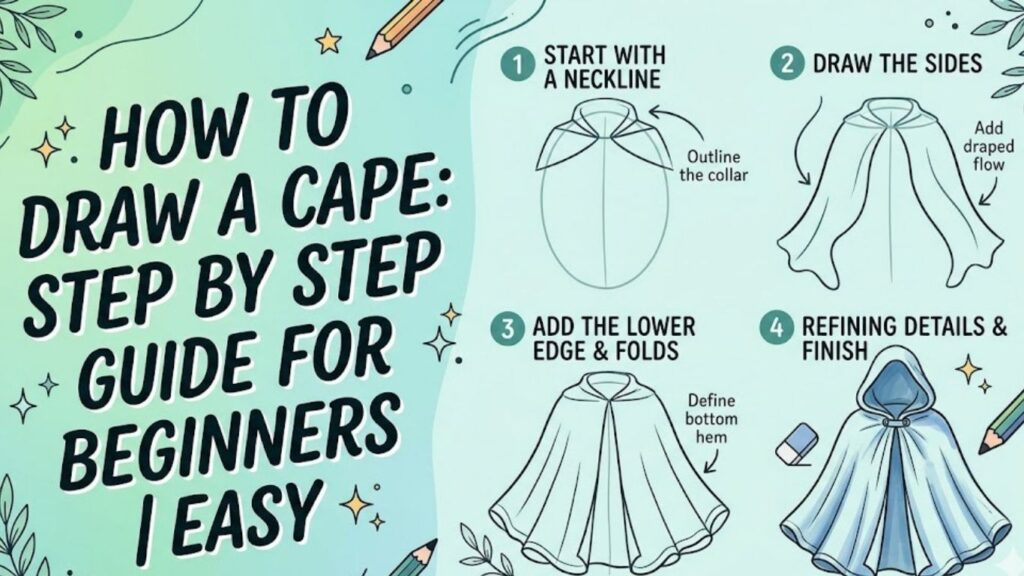
In this guide, you’ll learn how to draw a cape step by step in a clear and beginner-friendly way. With practice, you’ll be able to draw dynamic and realistic capes with confidence.
Essential Drawing Supplies You Should Have
Sketchbook
HB and 2B pencils
Eraser
Black fineliner pen
Colored pencils or markers
Simple Tips Before You Start Drawing
Before starting, practice drawing curved lines and flowing shapes. A cape is not stiff—it moves naturally with gravity and motion.
Keep your strokes light in the beginning so you can adjust easily. Focus on flow and movement rather than perfection, especially in the early stages.
How to Draw a Cape Step by Step Guide for Beginners
1. Understanding the Shape of a Cape
Learn the Basic Structure
A cape is essentially a piece of fabric that hangs from the shoulders and flows downward. It usually wraps around the neck and drapes over the back.
The simplest way to understand a cape is to imagine a long, slightly curved shape that widens as it goes down.
Unlike rigid objects, a cape has movement. It bends, folds, and flows depending on how it is worn.
Breaking it into simple forms—like a top neckline and a flowing body—makes it easier to draw.
Understanding this basic structure will help you create a strong foundation before adding details like folds and shading.
2. Sketching the Basic Outline
Start with Light Guidelines
Begin by lightly sketching the overall shape of the cape. Draw a simple outline that shows how far the cape extends.
Many tutorials suggest starting with very light lines to map out the position and size before adding details.
You can think of the cape as a large triangle or teardrop shape that starts at the shoulders and expands downward.
Keep your lines loose and flexible.
This step is important because it helps you plan the proportions and flow of your drawing before committing to details.
3. Drawing the Neckline and Collar
Define the Top Area
Now draw the part of the cape that sits around the neck. This is often called the collar.
Use curved lines to create a soft shape around the shoulders.
Some guides suggest using simple curved or triangular shapes to form the collar before refining it.
The collar anchors the cape to the body, so it’s important to place it correctly.
Make sure it looks balanced and natural.
This step helps connect the cape to a character or gives it a realistic starting point.
4. Drawing the Side Edges
Create Flowing Lines
From the collar, draw two long curved lines going downward. These lines form the sides of the cape.
Avoid straight lines. Instead, use gentle curves to show movement.
The sides can flare outward or stay close to the body depending on the style.
This step defines the overall shape of the cape and gives it direction.
Smooth and flowing lines will make your drawing look more natural and dynamic.
5. Adding the Bottom Edge
Create a Natural Finish
Draw a wavy or slightly curved line at the bottom to connect both sides of the cape.
A straight line can make the cape look stiff, while a wavy line adds movement.
Some tutorials recommend using uneven or curved edges to show fabric flow.
You can experiment with different shapes—smooth curves for calm scenes or sharp waves for dramatic effects.
This step completes the basic outline of your cape.
6. Drawing Folds and Fabric Flow
Add Movement and Depth
Now it’s time to add folds. Draw long curved lines starting from the collar and flowing downward.
These lines show how the fabric hangs and moves.
Folds should follow the direction of gravity and the shape of the body.
According to drawing guides, adding fold lines helps create a more realistic and dynamic look.
Avoid drawing too many folds. Keep them simple and natural.
This step is key to making your cape look alive rather than flat.
7. Refining the Shape
Clean Up Your Drawing
Erase unnecessary guidelines and refine your lines.
Make the edges smoother and more defined.
Go over your drawing with a darker pencil or pen for a clean finish.
This step transforms your rough sketch into a polished drawing.
Take your time to ensure everything looks balanced and clear.
8. Adding Details and Texture
Enhance the Design
You can add extra details like patterns, seams, or decorative edges.
Some capes have clasps, buttons, or embroidery near the collar.
Adding these small elements makes your drawing more interesting and unique.
Keep the details simple if you’re a beginner.
This step allows you to add personality and creativity to your design.
9. Shading and Depth
Make It Look 3D
Shading brings your cape to life. Decide where your light source is coming from.
Add shadows along the folds and under overlapping areas.
Use soft strokes and blend gently.
Drawing guides recommend adding shadows to give the cape a more realistic and voluminous look.
This step helps your drawing look more three-dimensional and visually appealing.
10. Coloring Your Cape
Bring Your Drawing to Life
Choose colors that match your style. Red, black, and blue are common cape colors, especially in fantasy or superhero designs.
Add darker shades for shadows and lighter tones for highlights.
Blend colors smoothly to create depth.
Coloring enhances your drawing and makes it more engaging.
Take your time and enjoy this step.
11. Drawing Capes in Different Styles
Explore Creative Ideas
Once you understand the basics, try drawing different types of capes.
You can create superhero capes, fantasy cloaks, or royal garments.
Experiment with different lengths, shapes, and textures.
Some capes are short and simple, while others are long and dramatic.
Trying different styles helps you improve your skills and develop your own artistic style.
12. Common Mistakes to Avoid
Learn and Improve
One common mistake is drawing the cape too stiff. Always use flowing lines.
Another mistake is ignoring folds, which can make the cape look flat.
Avoid making both sides perfectly symmetrical—natural fabric is slightly uneven.
Skipping shading can also reduce realism.
Being aware of these mistakes helps you improve faster.
13. Practice Tips for Beginners
Build Your Skills
Practice drawing capes regularly using simple shapes.
Start with quick sketches to build confidence.
Observe how fabric behaves in real life.
Try different tools like pencils, pens, and markers.
Consistency is key to improvement.
Frequently Asked Questions
Is drawing a cape difficult for beginners?
No, it becomes easy when you break it into simple shapes and follow step-by-step methods.
What is the first step in drawing a cape?
Start by sketching the basic outline and positioning it on your page.
How can I make my cape look realistic?
Focus on folds, shading, and smooth flowing lines.
Should I draw folds in detail?
Keep them simple at first, then add more detail as you improve.
How long does it take to learn?
With regular practice, you can improve within a few days.
Final Words
Drawing a cape is a great way to understand fabric movement and improve your drawing skills. By following simple steps, you can create dynamic and realistic designs.
Keep practicing, experiment with styles, and enjoy the process. Every drawing you complete helps you grow as an artist.