
Drawing a key is a simple and rewarding way to practice shapes, symmetry, and small details. It may look basic, but it helps you improve precision and control.
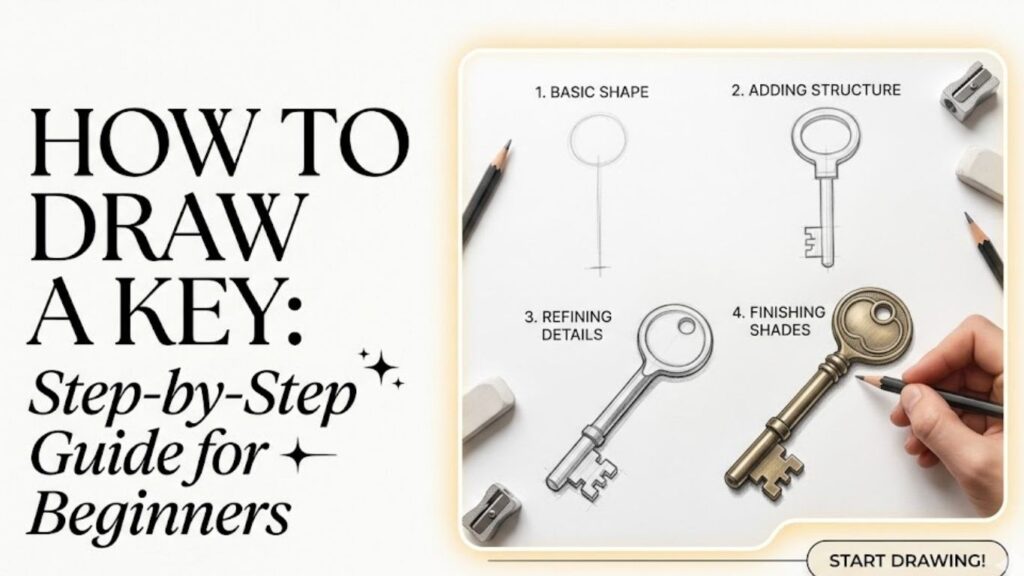
In this guide, you’ll learn how to draw a key step by step in an easy and beginner-friendly way. With practice, you’ll be able to draw both simple and decorative keys confidently.
Essential Drawing Supplies You Should Have
Sketchbook
HB and 2B pencils
Eraser
Black fineliner pen
Colored pencils or markers
Simple Tips Before You Start Drawing
Before you begin, practice drawing straight lines, circles, and rectangles. A key is made from these simple shapes combined together.
Keep your strokes light at first so you can easily fix mistakes. Focus on proportions and spacing rather than making everything perfect right away.
How to Draw a Key Step by Step Guide for Beginners
1. Understanding the Structure of a Key
Learn the Basic Parts
A key is made up of three main parts: the bow (handle), the shaft (long middle section), and the teeth (notched end).
The bow is usually circular or oval, making it easy to hold. The shaft is straight and narrow, connecting the handle to the teeth.
The teeth are small, detailed shapes at the end of the key that interact with a lock.
Understanding these parts helps you break the drawing into manageable sections.
Once you know the structure, drawing becomes easier because you can focus on one part at a time instead of the whole object.
2. Drawing the Basic Outline
Start with Simple Shapes
Begin by sketching a circle or oval for the bow of the key.
Next, draw a long rectangle extending from the bow. This will form the shaft.
At the end of the shaft, sketch a small rectangular area where the teeth will be added later.
Keep your lines light and simple.
This step creates a basic framework that helps you place all parts correctly before adding details.
3. Shaping the Bow (Handle)
Add Style and Detail
Refine the shape of the bow by smoothing the circle or oval.
You can make it thicker or add an inner cut-out shape for a more realistic look.
Some keys have decorative designs in the handle, such as patterns or curves.
Keep it simple if you’re a beginner, focusing on clean and smooth lines.
This part of the key is often the most noticeable, so take your time to make it look balanced.
4. Refining the Shaft
Keep It Straight and Clean
Go over the shaft and make sure it is straight and evenly sized.
You can slightly round the edges to make it look more realistic.
The shaft connects the bow and the teeth, so it should look sturdy and aligned.
Avoid making it too thick or too thin.
This step helps maintain proper proportions and keeps your drawing neat.
5. Drawing the Teeth
Add the Key Details
Now draw the teeth at the end of the shaft. These are small rectangular or square shapes cut into the edge.
Each key has a unique pattern, so you can create your own design.
Keep the shapes simple and clean.
The teeth are what make a key functional, so they are an important detail.
Take your time to draw them carefully and evenly.
6. Adding Small Details
Enhance the Design
You can add small details like grooves along the shaft or decorative patterns on the bow.
These details make your drawing more interesting and realistic.
Keep them subtle so they don’t overwhelm the main shape.
Adding details gradually helps you improve your observation and drawing skills.
This step allows you to personalize your key design.
7. Refining the Outline
Clean Up Your Drawing
Erase any unnecessary guidelines and smooth out your lines.
Go over the final outline with a darker pencil or pen.
Make sure all parts are clear and well-defined.
This step transforms your rough sketch into a clean and polished drawing.
Take your time to make everything look neat and balanced.
8. Adding Shading and Depth
Create a 3D Effect
Shading helps your key look more realistic. Decide where your light source is coming from.
Add darker shading on one side and lighter shading on the other.
Focus on edges and corners to create depth.
Use soft strokes and blend gently.
Even simple shading can make your drawing look more three-dimensional.
9. Coloring Your Key
Bring It to Life
Keys are usually metallic, so you can use shades of yellow, gold, or gray.
Add highlights to show reflections and make the metal look shiny.
Use darker tones for shadows and lighter tones for bright areas.
Coloring enhances your drawing and makes it more visually appealing.
Take your time blending colors smoothly.
10. Drawing Different Types of Keys
Explore Variations
Once you’ve learned the basic key, try drawing different styles.
You can draw old-fashioned keys with decorative bows or modern keys with simple designs.
Experiment with different shapes and sizes.
Trying different styles helps you improve your creativity and skills.
The more you practice, the more confident you’ll become.
11. Common Mistakes to Avoid
Improve Faster
One common mistake is uneven proportions between the bow, shaft, and teeth.
Another mistake is drawing crooked lines. Keep your shapes straight and aligned.
Avoid adding too many details too early.
Skipping shading can make your drawing look flat.
Learning from these mistakes helps you improve quickly.
12. Practice Tips for Beginners
Build Your Skills
Practice drawing keys regularly using simple shapes.
Start with quick sketches to improve control.
Observe real keys to understand their structure.
Try different tools like pencils, pens, and markers.
Consistency is key to improvement.
Frequently Asked Questions
Is drawing a key easy for beginners?
Yes, it’s very beginner-friendly because it uses simple shapes like circles and rectangles.
What is the easiest way to draw a key?
Start with a circle for the handle and a rectangle for the shaft, then add details.
How can I make my key look realistic?
Focus on clean lines, proper proportions, and shading.
Can I draw decorative keys?
Yes, you can add patterns and creative designs to make your key unique.
How long does it take to learn?
With regular practice, you can improve within a few days.
Final Words
Drawing a key is a simple and enjoyable way to practice shapes, details, and shading. By following step-by-step techniques, you can create clean and attractive drawings.
Keep practicing, experiment with styles, and enjoy the process. Every drawing helps you grow and become more confident in your artistic journey.