
Drawing clothing can feel challenging at first, but breaking it into simple steps makes it much easier. A coat, in particular, is a great subject because it combines structure and flow in one design.
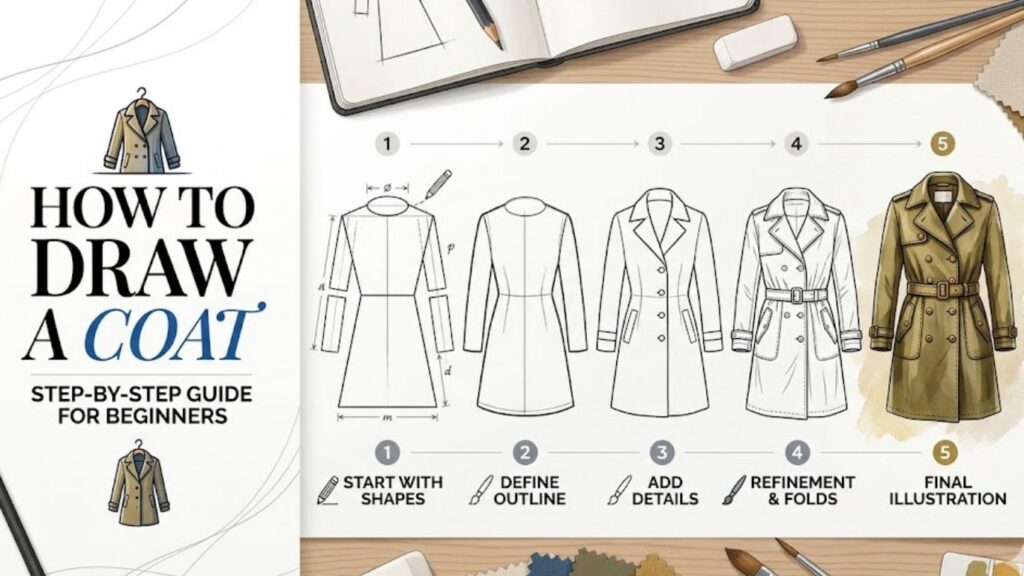
In this beginner-friendly guide, you’ll learn how to draw a coat from scratch using clear steps, helpful tips, and easy techniques. Whether you’re sketching for fashion or just for fun, this guide will help you build confidence.
Essential Drawing Supplies You Should Have
Here are a few helpful items to get started:
- Sketchbook
- Pencils
- Eraser
- Fine liner pens
- Colored pencils or markers
How to Draw a Coat Step by Step Guide for Beginners
1. Understanding Coat Structure
Learn the Basic Shape
Before you start drawing details, focus on the overall structure of a coat. Most coats follow a simple silhouette that resembles a long rectangle or a slightly tapered shape. Begin by visualizing how the coat sits on the body.
Think about the shoulders, torso, and length. Is it a long winter coat or a short jacket? These decisions will shape your drawing. Keeping the structure simple at first helps avoid mistakes later.
Start by lightly sketching a vertical guideline for symmetry. Then add horizontal lines for shoulders and waist. This creates a base to build on.
Understanding structure is key because it keeps your drawing balanced. Beginners often jump into details too quickly, but starting with shapes ensures a solid foundation and makes your coat look realistic and well-proportioned.
2. Sketching the Basic Outline
Draw the Coat Frame
Now that you understand the structure, it’s time to sketch the outline. Use light pencil strokes so you can easily adjust as needed.
Start with the shoulders by drawing slightly curved lines. Then extend lines downward to create the body of the coat. Keep the lines loose and natural. Avoid making them too stiff.
Add the sleeves next. Coats usually have slightly wider sleeves than regular shirts. Sketch them extending outward and then tapering toward the cuffs.
Don’t worry about perfection at this stage. The goal is to map out the shape. Think of this step as building a skeleton for your drawing.
Once the outline is complete, step back and check proportions. Make sure both sides are symmetrical and the coat looks balanced. Adjust if necessary before moving forward.
3. Adding the Collar and Neck Area
Define the Upper Details
The collar is one of the most noticeable parts of a coat. It adds character and style. Start by deciding what type of collar you want: a simple lapel, a high collar, or a hooded design.
Sketch the neckline first. Then draw the collar around it. Keep the lines soft and slightly curved to give a natural look.
If you’re drawing a lapel, make sure it folds outward realistically. Study how fabric bends and overlaps. This will make your drawing more believable.
Adding this detail early helps anchor the rest of your design. It also gives your coat a clear identity.
Take your time here, as the collar often draws attention. A well-drawn collar can instantly improve the overall appearance of your coat sketch.
4. Drawing Sleeves with Realistic Flow
Create Natural Fabric Movement
Sleeves are where you can show movement and realism. Instead of drawing straight lines, think about how fabric falls and folds.
Start by refining the sleeve outline you sketched earlier. Add slight curves and bends to show how the arms would naturally rest.
Next, add folds near the elbow and shoulder. Fabric tends to bunch up in these areas. Use soft, curved lines to represent wrinkles. Avoid overdoing it—less is often more.
Pay attention to symmetry, but remember that natural folds are not perfectly identical on both sides.
Practicing sleeves will greatly improve your clothing drawings overall. Once you master this step, your coats will start to look much more lifelike and dynamic.
5. Adding Buttons, Zippers, and Details
Bring Your Coat to Life
Details are what transform a basic sketch into a finished drawing. Start with buttons or a zipper along the center line. Make sure they are evenly spaced.
Add pockets next. Think about their placement—side pockets, chest pockets, or decorative ones. Draw them with clean, simple shapes.
You can also include stitching lines, seams, and belts. These small additions create realism and depth.
Be careful not to overcrowd your drawing. Choose details that match the style of the coat.
At this stage, your coat should start to feel complete. These finishing touches add personality and make your design unique.
6. Refining Lines and Cleaning Up
Improve the Overall Look
Now it’s time to clean up your drawing. Go over your sketch and erase unnecessary guidelines.
Refine your lines by making them smoother and more confident. You can use a darker pencil or pen for final outlines.
Check for uneven areas or proportions that need fixing. This step is all about polishing your work.
Take your time and focus on clarity. Clean lines make a huge difference in how professional your drawing looks.
This stage may seem simple, but it’s one of the most important parts of the process. A clean drawing always stands out.
7. Adding Shading and Depth
Make Your Coat Look 3D
Shading adds depth and realism to your coat drawing. Start by deciding where your light source is coming from.
Add shadows on the opposite side of the light. Focus on areas like under the collar, inside folds, and beneath sleeves.
Use soft pencil strokes and blend gently for a smooth effect. You can build layers gradually instead of pressing hard.
Highlight areas where light hits the fabric. This contrast makes your drawing more dynamic.
Shading takes practice, but even simple shading can dramatically improve your artwork. It helps your coat look more three-dimensional and visually appealing.
8. Experimenting with Different Coat Styles
Explore Your Creativity
Once you understand the basics, try drawing different types of coats. Each style offers something new to learn.
You can experiment with trench coats, winter coats, hooded jackets, or oversized designs. Each has unique features and shapes.
Play with lengths, textures, and patterns. Try adding fur collars, belts, or unique stitching designs.
This is where your creativity shines. Don’t be afraid to make mistakes—every drawing helps you improve.
Exploring different styles will build your confidence and expand your artistic skills. It also makes drawing more fun and engaging.
9. Common Mistakes to Avoid
Learn What Not to Do
Beginners often make a few common mistakes when drawing coats. One of the biggest is skipping the basic structure. Without it, drawings can look uneven.
Another mistake is drawing stiff lines. Clothing should look soft and flexible. Use curves instead of straight lines whenever possible.
Overloading details is also a problem. Too many elements can make your drawing look messy. Keep it simple and balanced.
Ignoring proportions can lead to unrealistic results. Always check your measurements as you draw.
Being aware of these mistakes will help you improve faster and create better drawings.
10. Practice Tips for Beginners
Improve Your Skills Faster
Practice is the key to improving your drawing skills. Start by sketching coats regularly, even if they’re simple.
Use reference images to understand how real coats look. Observe how fabric folds and how different styles are designed.
Try quick sketches to build confidence. Don’t aim for perfection every time.
Experiment with different tools like pencils, pens, and markers. Each tool gives a different effect.
Most importantly, stay patient. Progress takes time, but consistent practice will lead to noticeable improvement.
Frequently Asked Questions
How long does it take to learn drawing coats?
It depends on how often you practice. With regular practice, beginners can see improvement within a few weeks. Mastery takes longer, but progress is steady.
Do I need expensive tools to start?
No, simple tools like a pencil and paper are enough. You can upgrade your supplies later as you improve.
Why do my coat drawings look flat?
This usually happens due to lack of shading or depth. Adding shadows and highlights can make your drawing more realistic.
How can I make fabric folds look natural?
Observe real clothing and practice drawing curved lines. Avoid straight lines, as fabric naturally flows and bends.
Should I trace images to learn?
Tracing can help you understand shapes, but it’s better to practice freehand drawing to build real skills.
Final Words
Drawing a coat may seem difficult at first, but with the right approach, it becomes simple and enjoyable. By following step-by-step techniques, you can create realistic and stylish designs.
Keep practicing, stay patient, and enjoy the process. Every sketch you make brings you closer to becoming a better artist.