
Drawing a lighthouse is a great way to practice structure, perspective, and scenery all in one sketch. Its tall shape and simple design make it perfect for beginners who want to improve step by step.
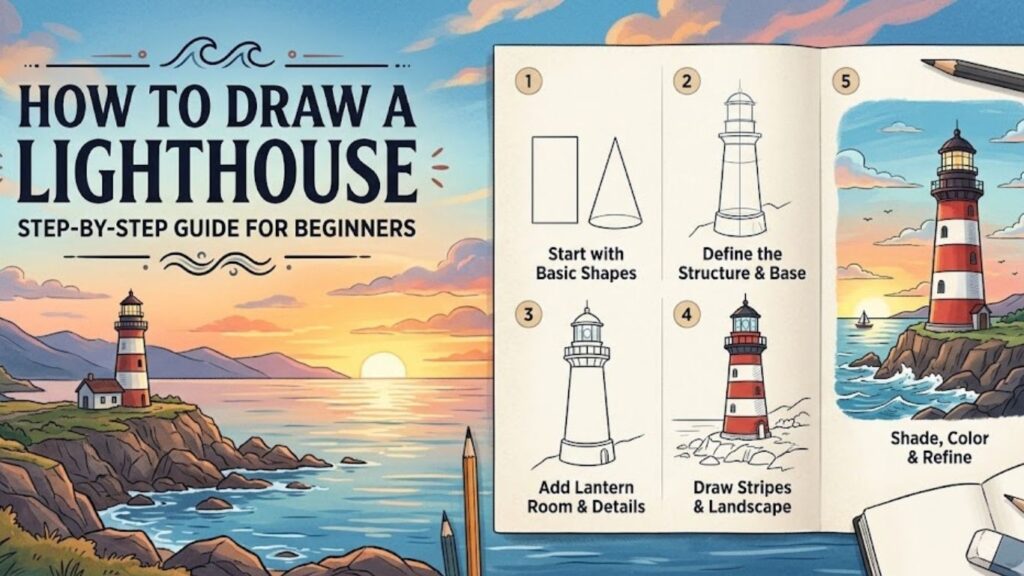
This guide will walk you through the entire process, from basic shapes to detailed shading, helping you create a clean and beautiful lighthouse drawing with confidence.
Essential Drawing Supplies You Should Have
Sketchbook
HB and 2B pencils
Eraser
Black fineliner pen
Colored pencils or markers
How to Draw a Lighthouse Step by Step Guide for Beginners
1. Understanding the Basic Shape of a Lighthouse
Learn the Structure First
Before you begin drawing, it’s important to understand what a lighthouse looks like. A lighthouse is typically a tall tower that slightly narrows toward the top, often sitting on rocks near the sea.
Think of it as a simple geometric form. The tower resembles a long cylinder or tapered rectangle, while the top section includes a small room where the light is placed.
Breaking it down into simple shapes makes it easier to draw. Beginners often struggle when they try to draw everything at once, but focusing on structure first makes the process smoother.
By understanding the basic form, you create a strong foundation for your drawing. This step helps you maintain balance and proportion as you move forward.
2. Sketching the Base and Ground
Start with the Foundation
Begin by lightly sketching a flattened oval or uneven base at the bottom of your page. This represents the rock or land where the lighthouse stands.
Add wavy lines around it to suggest water or rough terrain. This gives your drawing context and makes it more interesting.
The base is important because it anchors the lighthouse. Without it, your drawing may look like it’s floating.
Keep your lines light and loose so you can adjust them easily. This stage is all about placement and composition.
A well-drawn base sets the tone for the rest of your artwork and helps you build upward confidently.
3. Drawing the Main Tower
Create the Tall Structure
From the base, draw two slightly slanted vertical lines going upward. These lines should get a little closer together at the top.
This creates the classic lighthouse shape. Keep the lines smooth and even.
Add horizontal curved lines across the tower to represent stripes or sections. These are common in lighthouse designs and add visual interest.
Make sure the height of the tower is proportionate to the base. A lighthouse is usually tall, so don’t be afraid to extend it upward.
This step forms the core of your drawing. Take your time to ensure it looks balanced before moving on.
4. Adding the Door and Windows
Build Realistic Features
Now it’s time to add small details that make your lighthouse look real. Start by drawing a small door at the bottom of the tower.
Above the door, add a few windows. These can be simple rectangles or slightly curved shapes depending on your style.
Space them evenly along the tower. These elements help break up the large surface and make your drawing more interesting.
Keep the details simple and clean. Avoid overcrowding your design with too many features.
Adding these elements gives your lighthouse character and makes it feel like a real structure rather than just a shape.
5. Drawing the Top Section
Create the Lantern Room
At the top of the tower, draw a small platform or balcony. This is where the light source is located.
Add a circular or polygonal room above the platform. This is called the lantern room, where the light shines.
Include small vertical lines to represent railings around the balcony.
Finally, draw a dome-shaped roof on top. This completes the lighthouse structure.
This section is the most recognizable part of a lighthouse, so take your time to get the proportions right.
A well-drawn top section instantly makes your drawing look complete and professional.
6. Adding Surroundings
Bring Your Scene to Life
To make your drawing more interesting, add elements around the lighthouse. Draw waves, rocks, or even clouds in the sky.
You can also include birds or a small boat in the distance. These additions create a full scene rather than just a single object.
Adding surroundings helps tell a story. A lighthouse is usually located near the ocean, so including water and rocks makes your drawing more realistic.
Keep the background simple if you’re a beginner. Focus on enhancing the main subject without overwhelming it.
This step adds depth and personality to your artwork.
7. Refining Your Sketch
Clean Up the Lines
Go over your drawing and erase any unnecessary guidelines.
Refine your lines by making them smoother and more defined. You can use a darker pencil or pen for the final outline.
Check proportions and fix any uneven areas.
This step is about polishing your work. Clean lines make your drawing look more professional and visually appealing.
Take your time here, as small improvements can make a big difference in the final result.
8. Adding Shading and Depth
Make It Look Realistic
Shading is what brings your drawing to life. Decide where your light source is coming from.
Add shadows on one side of the lighthouse and under the balcony. This creates depth and dimension.
Use soft pencil strokes to blend the shading smoothly.
You can also add darker tones to the rocks and waves for contrast.
Even simple shading techniques can make your drawing look three-dimensional and much more engaging.
9. Coloring Your Lighthouse
Add Vibrant Colors
Use white, red, or striped patterns for the lighthouse tower. Many lighthouses have bold colors to stand out.
Color the sky blue and the water in shades of blue or green. Add highlights for reflections.
Use darker shades for shadows and lighter tones for areas exposed to light.
Coloring enhances your drawing and makes it visually appealing.
Take your time to blend colors smoothly for a polished look.
10. Practicing Different Styles
Explore Your Creativity
Once you’re comfortable with the basics, try drawing different lighthouse styles.
Experiment with cartoon versions, realistic sketches, or detailed scenic drawings.
You can also change the environment, such as drawing a lighthouse during sunset or in a storm.
Practicing different styles helps you grow as an artist and keeps the process exciting.
The more you experiment, the more confident you will become in your drawing skills.
Frequently Asked Questions
Is drawing a lighthouse easy for beginners?
Yes, because it uses simple shapes like lines and cylinders, making it ideal for beginners.
What is the first step in drawing a lighthouse?
Start with the base or foundation, then build the tower upward step by step.
How can I make my lighthouse look realistic?
Add shading, proper proportions, and small details like windows and textures.
Should I draw the background too?
Yes, adding elements like water, rocks, and sky enhances your drawing and makes it more complete.
How long does it take to learn drawing a lighthouse?
With regular practice, you can improve within a few days and create detailed drawings over time.
Final Words
Drawing a lighthouse is a rewarding and enjoyable experience that helps you understand structure, shading, and creativity. By following simple steps, you can create impressive artwork even as a beginner.
Keep practicing, experiment with new ideas, and most importantly, enjoy the process. Every drawing you complete brings you closer to mastering your skills.