
Drawing a coffee cup is one of the easiest and most enjoyable ways to start learning object sketching. Its simple shapes and smooth curves make it perfect for beginners who want to practice form and shading.
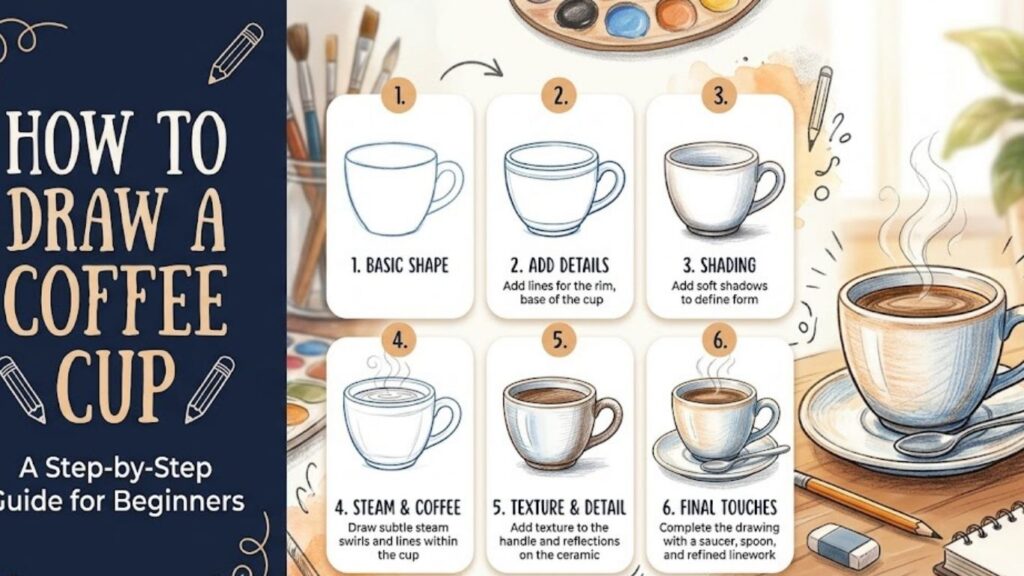
In this guide, you’ll learn a complete step-by-step process to draw a coffee cup clearly and confidently, even if you are just starting your drawing journey.
Essential Drawing Supplies You Should Have
Sketchbook
HB and 2B pencils
Eraser
Black fineliner pen
Colored pencils or markers
How to Draw a Coffee Cup Step by Step Guide for Beginners
1. Understanding the Shape of a Coffee Cup
Learn the Basic Structure
Before drawing, take a moment to observe a coffee cup. Most cups are made of simple shapes like ovals and cylinders. The top opening is usually an oval because of perspective, while the body is slightly curved downward.
Understanding this helps you draw more accurately. According to drawing tutorials, starting with a horizontal oval forms the rim, which acts as the foundation of the cup .
Think of the cup as a 3D object instead of a flat shape. This mindset will help you create depth and realism.
Beginners often rush into details, but focusing on structure first ensures better proportions. Once you understand the shape, the rest becomes much easier to build step by step.
2. Drawing the Top Rim
Start with an Oval
Begin by drawing a horizontal oval near the top of your page. This represents the opening of the cup. Keep your lines light so you can adjust them easily.
The oval should not be perfectly round. Instead, it should be slightly stretched horizontally. This gives the illusion of perspective.
Many beginner guides emphasize using light strokes first, so mistakes can be corrected before finalizing the drawing .
Take your time with this step. The rim sets the foundation for your entire drawing. If it looks off, the rest of the cup may appear uneven.
A well-drawn oval makes your coffee cup look more realistic right from the beginning.
3. Sketching the Body of the Cup
Build the Main Shape
From both sides of the oval, draw two curved lines going downward. These lines should slightly taper inward as they reach the bottom.
Then connect the ends with a curved line to form the base. This creates the cylindrical shape of the cup.
Make sure both sides are symmetrical. You can lightly draw a vertical guideline in the center to help maintain balance.
This step transforms your drawing from a simple oval into a recognizable cup.
Keeping your lines smooth and slightly curved is important. Straight lines can make the cup look stiff and unrealistic. A gentle curve gives it a natural appearance.
4. Adding the Inner Liquid Line
Show the Coffee Surface
Inside the top oval, draw another curved line that follows the same shape. This represents the surface of the coffee.
Adding this detail makes your drawing more interesting and realistic. It shows that the cup is filled with liquid rather than empty.
You can also add small curved lines to suggest ripples or movement in the coffee .
Keep the line subtle and clean. Overdoing it can make the drawing look messy.
This step is simple but very effective. It adds depth and gives your coffee cup a more complete look.
5. Drawing the Handle
Create a Smooth Curved Shape
The handle is an important feature of a coffee cup. Start by drawing a large “C” shape on one side of the cup.
Then draw a smaller curved line inside it to create thickness. Connect the ends smoothly to the cup.
Handles should look rounded and comfortable to hold. Avoid sharp corners or uneven lines.
Some tutorials suggest drawing the handle at a slight angle to create a 3D effect .
Take your time with this part. A well-shaped handle makes your drawing look more balanced and realistic.
6. Adding a Saucer (Optional)
Enhance the Composition
To make your drawing more detailed, you can add a saucer beneath the cup. Draw a large oval under the base of the cup.
Then add another smaller oval inside it to create the rim.
This gives your drawing a complete and polished look. It also adds depth and perspective.
Keep the saucer aligned with the cup to maintain balance.
Although optional, this step is great for beginners who want to practice drawing multiple objects together in one composition.
7. Refining the Outline
Clean Up Your Sketch
Now go over your drawing and erase unnecessary guidelines.
Darken the main lines using a pen or a darker pencil. Make sure the lines are smooth and consistent.
Check for uneven areas and fix them carefully.
This step helps transform your rough sketch into a clean drawing.
Refining your lines is important because it improves the overall presentation and makes your artwork look more professional.
8. Adding Details and Texture
Make It More Interesting
You can add small details to make your coffee cup unique. For example, draw patterns, logos, or simple designs on the cup.
You can also add steam rising from the coffee using soft, wavy lines.
These small touches bring life to your drawing and make it more engaging.
Keep the details simple if you are a beginner. Focus on enhancing the drawing without overcrowding it.
Adding texture and details helps you develop your creativity and personal style.
9. Shading and Depth
Create a 3D Effect
Shading is what makes your drawing look realistic. Decide where your light source is coming from.
Add shadows on the opposite side of the light. Focus on areas like the inside of the cup, under the rim, and beneath the handle.
Use soft pencil strokes and blend gently.
Shading adds depth and makes your drawing look three-dimensional.
Even simple shading techniques can greatly improve the final result and make your coffee cup look more lifelike.
10. Coloring Your Coffee Cup
Bring Your Drawing to Life
Use brown shades for the coffee and any color you like for the cup.
You can use bright colors for a fun look or soft tones for a realistic style.
Add highlights to show light reflection, especially on the cup’s surface.
Layer your colors to create depth and richness.
Coloring is one of the most enjoyable parts of drawing. It allows you to express creativity and make your artwork visually appealing.
11. Practicing Different Styles
Explore Your Creativity
Once you’ve mastered the basic coffee cup, try experimenting with different styles.
Draw cartoon cups, realistic mugs, or takeaway coffee cups.
You can also play with perspective, making the cup appear closer or farther away.
Adding backgrounds like a table or café setting can make your drawing more interesting.
Practice regularly and try new ideas to improve your skills and confidence.
12. Common Mistakes to Avoid
Improve Faster by Learning
One common mistake is drawing the rim as a perfect circle instead of an oval. This can make the cup look flat.
Another mistake is uneven sides, which can distort the shape. Always check symmetry.
Avoid making lines too dark in the early stages. Light sketching allows easy corrections.
Ignoring shading can also make your drawing look flat.
Being aware of these mistakes helps you improve faster and create better drawings.
Frequently Asked Questions
Is drawing a coffee cup easy for beginners?
Yes, it’s one of the easiest objects to draw because it uses simple shapes like ovals and curves.
What is the first step in drawing a coffee cup?
Start with a horizontal oval to form the rim of the cup.
How can I make my drawing look realistic?
Focus on shading, proportions, and smooth curves.
Should I add a background?
You can, but it’s optional. A simple background can enhance your drawing.
How long does it take to learn?
With regular practice, you can improve within a few days.
Final Words
Drawing a coffee cup is a simple yet powerful way to improve your drawing skills. By following clear steps and practicing regularly, you can create beautiful and realistic artwork.
Stay patient, keep experimenting, and enjoy the process. Every drawing you complete brings you closer to becoming a better artist.