
Learning how to draw a croissant is a fun beginner-friendly art project that combines simple curved lines, overlapping shapes, and light shading. You don’t need advanced drawing skills to create a convincing croissant. By breaking the pastry into a few basic sections, you can build a recognizable shape and gradually add flaky layers and texture.
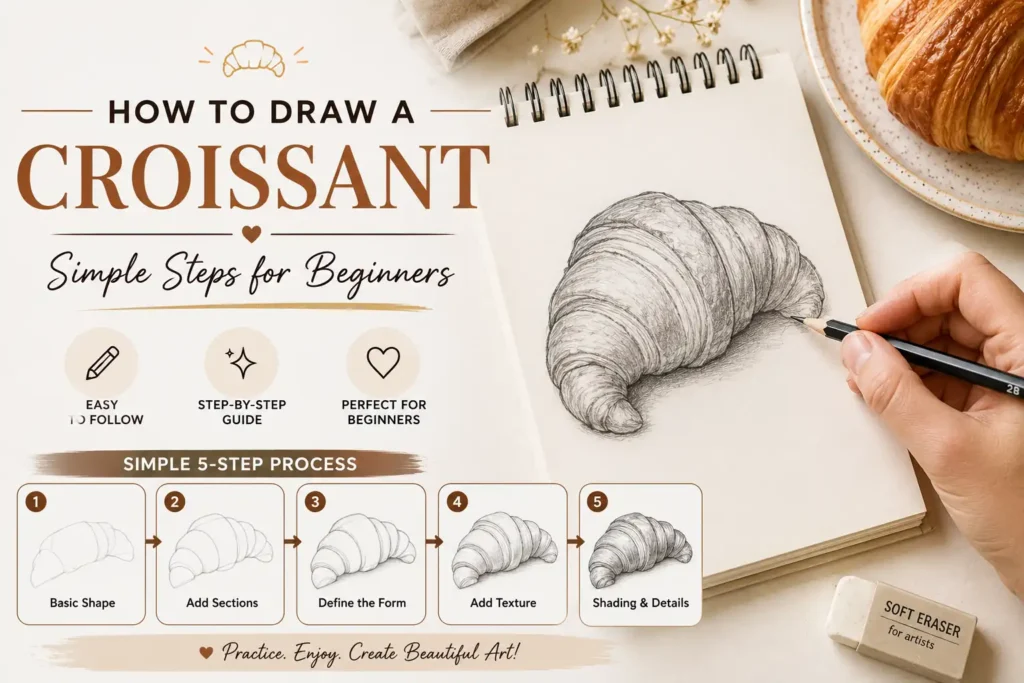
A croissant is also an excellent subject for practicing organic shapes. Instead of worrying about making every curve perfect, focus on creating a relaxed crescent silhouette and then build the pastry’s folded layers inside it. With a pencil, eraser, and a few colors, you can turn a simple outline into a warm, bakery-style illustration.
Items to Buy
- Drawing paper
- HB pencil
- 2B pencil
- Eraser
- Sharpener
- Fine-tip black pen
- Colored pencils
- Yellow marker
- Light brown marker
- Brown colored pencil
- Blending stump, optional
Why Draw a Croissant?
A croissant may look complicated at first, but its overall shape is surprisingly simple.
Drawing one helps you practice:
- Curved lines
- Organic shapes
- Symmetry
- Overlapping forms
- Texture
- Light and shadow
- Basic food illustration
Once you understand the basic structure, you can create realistic, cartoon, cute, or colorful croissant drawings.
How to Draw a Croissant Step by Step
Step 1: Lightly Sketch the Overall Shape
Begin with your pencil rather than a pen.
Draw a long, curved crescent shape that resembles a soft banana.
Don’t make the ends too sharp.
A croissant usually has slightly tapered ends, while the center is fuller.
Keep your lines light because you’ll adjust the shape as you continue.
Step 2: Create the Outer Crescent
Refine the outer contour.
Start from one end and curve upward toward the middle.
Then continue the curve downward toward the opposite end.
Try to keep the bottom edge slightly fuller than the top.
Don’t worry about perfect symmetry.
A handmade croissant naturally has an irregular appearance.
Step 3: Divide the Croissant Into Sections
Now add curved lines across the pastry.
These lines represent the folded sections that give a croissant its distinctive appearance.
Instead of drawing straight lines, make each division slightly curved.
The sections should follow the direction of the crescent.
You can create around five to seven major sections depending on the size of your drawing.
Step 4: Shape the Individual Layers
Turn each section into a slightly rounded, folded form.
The center sections should generally appear larger.
The sections near the ends can gradually become narrower.
Use overlapping curved lines to suggest that the dough has been rolled and folded.
Avoid making every section identical.
Small differences make the pastry look more natural.
Step 5: Refine the Ends
Croissant ends are usually narrower than the middle.
Shape each end so it gently tapers.
One end can curve slightly inward while the other extends outward.
This asymmetry can make the drawing feel more realistic.
Don’t make the tips excessively pointed.
Step 6: Add Flaky Texture
Now begin adding small details.
Draw short curved lines along the pastry sections.
These can represent:
- Flaky layers
- Folded dough
- Crust texture
- Small cracks
- Baked ridges
Keep the marks relatively subtle.
Too many lines can make the croissant look messy.
Step 7: Add the Inner Curve
For a stronger crescent shape, refine the inside opening.
The inner edge should follow the general curve of the outer silhouette.
Make the center opening relatively wide and allow it to narrow toward the ends.
This helps the drawing read immediately as a croissant.
Step 8: Erase Unnecessary Guidelines
Once the structure looks right, use your eraser to remove construction lines.
Be gentle.
You don’t want to erase the important layer details you’ve already created.
Leave the main outline and selected texture lines visible.
Step 9: Strengthen the Outline
Use a fine-tip pen or darker pencil to reinforce the important contours.
Trace:
- Outer edges
- Inner curve
- Major folds
- Selected section boundaries
Don’t outline every texture mark equally.
Varying line weight can make the illustration more interesting.
Step 10: Add Shadows
A little shading can transform a flat outline into a three-dimensional pastry.
Choose a light source from one direction.
Then place darker shading:
- Under folded layers
- Between sections
- Along the inner curve
- Near the bottom
- Around the tapered ends
Keep the center surfaces lighter.
Step 11: Add Highlights
Leave small areas of the pastry lighter.
You can use your eraser to lift graphite from selected areas.
Highlights work especially well along the upper curves of the croissant.
This creates the appearance of a slightly glossy baked surface.
Step 12: Color Your Croissant
A traditional croissant can be colored using several warm shades.
Start with a pale yellow or cream base.
Then add:
- Golden yellow
- Warm orange
- Light brown
- Medium brown
Use darker brown in the recessed areas.
Blend the colors gradually rather than creating hard blocks of color.
How to Draw a Cute Croissant
For a cute illustration, simplify the shape.
Make the croissant:
- Rounder
- Smaller
- Softer
- More symmetrical
Then add a simple face.
Two small dots can become eyes.
A tiny curved line can become a smile.
You can also add rosy cheeks or little decorative marks.
This style works particularly well for stickers, journals, cards, and children’s artwork.
How to Draw a Realistic Croissant
For a realistic croissant, focus more on structure and shading.
Start with an irregular crescent shape.
Then carefully develop the overlapping dough sections.
Use darker values between the folds.
Add small cracks and flaky marks around the baked surface.
The key is value contrast.
The folds should not all have the same brightness.
Some areas need to be light, while recessed sections should be noticeably darker.
How to Draw a Croissant With Colored Pencils
Colored pencils are excellent for creating pastry texture.
Start with a light cream base.
Layer yellow over it.
Then gradually introduce warm orange and brown.
Use short strokes that follow the curves of the pastry.
For the darkest areas, use brown sparingly.
Avoid pressing extremely hard at the beginning.
Building color gradually gives you greater control over the final appearance.
How to Draw a Croissant With Markers
Markers can create a bold bakery illustration.
Start with a light yellow marker.
Add a second layer of golden yellow around the edges.
Use a warm brown marker for the folds and shadows.
Finally, add a darker brown sparingly to the deepest recesses.
Because markers can be difficult to erase, lightly sketch your croissant with pencil before adding color.
How to Draw a Croissant With a Pencil
A pencil-only croissant can look surprisingly realistic.
Use an HB pencil for the initial outline.
Switch to a softer 2B or 4B pencil for shadows.
Use light pressure for the highlights and gradually increase pressure for darker areas.
A blending stump can soften selected shadows, but don’t blend everything.
Some visible pencil texture can actually make the pastry look more natural.
How to Make Your Croissant Look 3D
The easiest way to create dimension is to think about the croissant as a series of overlapping forms.
Each section should have:
- A lighter upper surface
- A curved transition
- A darker recessed area
This creates the illusion that one dough layer overlaps another.
Keep the deepest shadows between the folds rather than covering the entire pastry with dark shading.
Common Mistakes to Avoid
Making the Croissant Too Symmetrical
Natural pastries aren’t perfectly symmetrical.
Small differences make your drawing more believable.
Using Straight Section Lines
The folds should generally follow the curved structure.
Making the Tips Too Pointy
Keep the ends tapered but soft.
Adding Too Much Texture
A few carefully placed marks are better than hundreds of random lines.
Using One Flat Color
Layering several warm shades creates much more dimension.
Forgetting the Inner Curve
The opening is an important part of the recognizable crescent shape.
Making Every Fold Identical
Vary the width and curvature of the sections.
Easy Croissant Drawing Ideas
Once you’ve mastered the basic shape, try different variations.
Croissant on a Plate
Draw your croissant sitting on a simple round plate.
Add a few crumbs around it for extra detail.
Croissant and Coffee
Place a steaming cup beside the pastry.
This creates a cozy breakfast illustration.
Croissant With Jam
Add a small dish of jam beside your pastry.
Use red or berry colors to create contrast.
Chocolate Croissant
Add darker chocolate sections inside the pastry.
This is a fun variation on the classic shape.
Croissant Sticker
Use a bold outline, simple colors, and minimal shading.
Add a cute face for a playful sticker-style drawing.
How to Draw a Croissant From Different Angles
Front View
Use a broad crescent shape with clearly visible folds.
This is the easiest view for beginners.
Side View
Make the croissant appear thicker.
Show the layered interior along the cut or exposed edge.
Three-Quarter View
Combine the front and side views.
This can create a more dimensional illustration.
Top View
Focus on the crescent silhouette and overlapping layers.
Keep the shadows between the sections.
How to Draw a Croissant for Beginners
If you’re completely new to drawing, simplify the process.
Start with only three stages:
Stage 1: Draw the crescent silhouette.
Stage 2: Divide it into several curved sections.
Stage 3: Add simple shading.
Don’t worry about realistic texture during your first attempt.
Once the basic shape looks recognizable, repeat the drawing and gradually add more detail.
Practice is more valuable than trying to make the first drawing perfect.
How to Improve Your Croissant Drawing
Try drawing the same pastry several times.
On each attempt, focus on one improvement.
For example:
- First drawing: overall shape
- Second drawing: better folds
- Third drawing: stronger shading
- Fourth drawing: realistic texture
- Fifth drawing: color and highlights
This approach helps you understand which parts of the drawing are causing difficulty.
FAQs
Is a croissant easy to draw?
Yes. A croissant can be broken into a simple crescent shape and several curved sections, making it a good subject for beginners.
What pencil should I use to draw a croissant?
An HB pencil works well for the initial sketch. A softer pencil such as 2B can be useful for adding darker shadows.
How many sections should a croissant have?
There is no exact number. Around five to seven major sections is a good starting point for a simple illustration.
How do I make my croissant look realistic?
Focus on curved overlapping layers, varied section sizes, strong shadows between folds, and warm color variations.
What colors should I use for a croissant?
Try cream, pale yellow, golden yellow, orange, and several shades of brown.
How do I draw a cute croissant?
Use a simplified crescent shape, rounded sections, bold outlines, and a small face with simple eyes and a smile.
Can I draw a croissant with colored pencils?
Absolutely. Colored pencils are especially useful for layering golden and brown tones and creating flaky texture.
How do I shade a croissant?
Place darker values between the folded sections and along the underside while keeping the upper ridges lighter.
How can I make the pastry look flaky?
Add short, curved strokes that follow the direction of the dough layers. Keep them varied and relatively subtle.
What should beginners avoid when drawing a croissant?
Avoid making every section identical, using straight fold lines, adding excessive texture, or making the pastry completely symmetrical.
Final Words
Learning how to draw a croissant becomes much easier when you stop thinking of it as a complicated pastry and instead break it into simple curved forms. Start with the crescent silhouette, divide it into overlapping sections, refine the tapered ends, and then add texture and shading. Even a basic outline can quickly become recognizable with just a few carefully placed details.
Once you’re comfortable with the basic structure, experiment with realistic shading, colored pencils, markers, cute faces, different viewing angles, and breakfast-themed illustrations. Most importantly, don’t worry about making your first croissant perfect. Draw it several times, adjust the curves, and gradually add more detail. With practice, you’ll be able to create charming croissant illustrations in your own style.