
Drawing bird wings can seem complex at first, but once you break them into simple shapes and layers, they become much easier to understand. Wings are all about flow, structure, and repeating feather patterns.
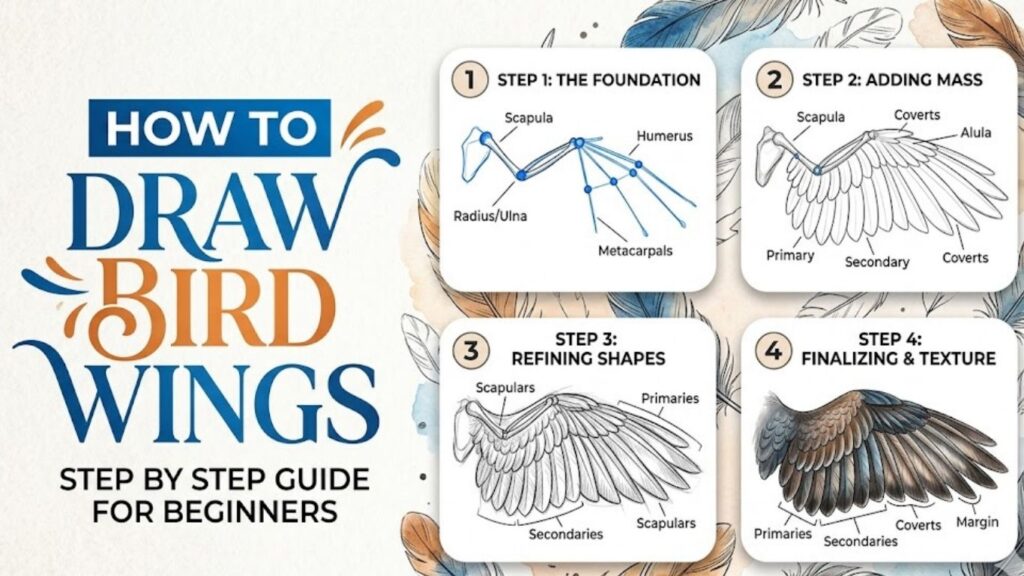
In this complete guide, you’ll learn how to draw bird wings step by step in a simple and beginner-friendly way. With practice, you’ll be able to draw wings that look natural and full of life.
Essential Drawing Supplies You Should Have
Sketchbook
HB and 2B pencils
Eraser
Black fineliner pen
Colored pencils or markers
Simple Tips Before You Start Drawing
Before you begin, practice drawing curves and layered lines. Bird wings are not straight or stiff—they flow smoothly and naturally.
Keep your strokes light and loose in the beginning. This allows you to adjust shapes easily and build your drawing step by step without stress.
How to Draw Bird Wings Step by Step Guide for Beginners
1. Understanding the Structure of Bird Wings
Learn the Basic Anatomy
Before drawing wings, it’s important to understand how they are built. Bird wings are not just flat shapes—they are made of layered feathers attached to a bone structure.
A wing has two main parts: the upper section near the body and the outer section that extends outward. The outer part usually has longer feathers, while the inner part has shorter and softer ones.
Feathers are arranged in layers, including primary feathers (long outer feathers) and secondary feathers (shorter inner ones).
Understanding this structure helps you draw wings more realistically. Instead of guessing, you’ll know where each part belongs and how it connects.
2. Drawing the Basic Wing Shape
Start with Simple Lines
Begin by sketching a long curved line. This will act as the top edge of the wing.
Then draw another curved line below it to form the lower edge. These two lines create the basic outline.
Think of the wing as a stretched triangle with soft curves. Many tutorials recommend starting with simple outlines before adding details.
Keep your lines light and smooth.
This step creates the foundation of your wing and helps you understand its overall shape.
3. Dividing the Wing into Sections
Break It into Parts
Now divide the wing into sections. Draw a line near the base to separate the inner wing from the outer wing.
The inner section is thicker and closer to the body, while the outer section is longer and tapers outward.
This division helps you place feathers correctly later on.
Breaking complex shapes into smaller parts makes drawing much easier, especially for beginners.
Take your time to understand how these sections connect and flow together.
4. Sketching the Primary Feathers
Draw the Long Outer Feathers
Primary feathers are the longest feathers on the wing. They extend outward and are slightly curved.
Draw several long, narrow shapes along the outer edge of the wing. Make them slightly different in length to keep the drawing natural.
These feathers should overlap each other slightly.
According to drawing guides, overlapping feathers create depth and realism.
This step adds movement and flow to your wing drawing.
5. Adding Secondary Feathers
Fill the Middle Section
Now draw shorter feathers in the middle section of the wing. These are called secondary feathers.
They are rounder and smaller than the primary feathers.
Arrange them in a layered pattern, slightly overlapping each other.
This layering effect is important because it shows how real wings are structured.
Keep the shapes simple and consistent.
6. Drawing Coverts (Inner Feathers)
Add Soft Feather Layers
Closer to the body, draw smaller feathers known as coverts.
These feathers are softer and more rounded compared to the outer feathers.
You can represent them using short, curved lines or small shapes.
These layers help fill the wing and make it look full and natural.
Adding these details gradually helps you build complexity without overwhelming yourself.
7. Refining the Outline
Smooth and Define
Now go over your drawing and refine the shape.
Smooth out any rough lines and adjust the proportions if needed.
Erase unnecessary guidelines.
This step is important because it transforms your rough sketch into a cleaner drawing.
Take your time to make the lines clear and confident.
8. Adding Feather Details
Create Texture
Add small lines inside each feather to show texture.
These lines should follow the direction of the feathers.
Use light strokes to avoid making the drawing look too busy.
Experts suggest using simple strokes instead of drawing every single feather in detail.
This keeps your drawing clean while still showing texture.
9. Shading and Depth
Make It Look 3D
Shading brings your wing to life. Decide where your light source is coming from.
Add shadows under overlapping feathers and along the lower edge of the wing.
Use soft strokes and blend gently.
Darker shading near the base and lighter shading toward the tips creates depth.
This step helps your wing look more realistic and three-dimensional.
10. Drawing Wings in Different Positions
Explore Movement
Wings can look very different depending on their position.
Try drawing wings spread wide, folded, or slightly raised.
Each position changes the shape and angle of the feathers.
Practicing different poses helps you understand how wings move and function.
This will improve your overall drawing skills and creativity.
11. Common Mistakes to Avoid
Improve Faster
One common mistake is drawing wings as flat shapes. Always remember they have layers.
Another mistake is making all feathers the same size. Variation makes your drawing look natural.
Avoid stiff lines—wings should flow smoothly.
Skipping structure can also lead to poor proportions.
Learning from these mistakes will help you improve quickly.
12. Practice Tips for Beginners
Build Your Skills
Practice drawing wings regularly using simple shapes.
Start with quick sketches to build confidence.
Observe real bird wings to understand their structure.
Try different tools like pencils, pens, and markers.
Consistency is key to improvement.
Frequently Asked Questions
Is drawing bird wings difficult for beginners?
It may seem complex at first, but breaking it into simple shapes and layers makes it much easier.
What is the easiest way to draw bird wings?
Start with a basic outline, then add feather layers step by step.
Why do my wings look flat?
This usually happens when shading or layering is missing. Adding depth helps a lot.
How can I improve feather details?
Use light strokes and follow the natural direction of feathers.
Should I draw every feather individually?
No, it’s better to suggest feathers with simple shapes and lines to keep the drawing clean.
Final Words
Drawing bird wings becomes much easier when you understand their structure and break them into simple steps. With practice, you’ll be able to create wings that look natural and dynamic.
Keep practicing, stay patient, and enjoy the process. Every drawing you complete brings you closer to mastering your skills.