
Drawing clothing can be a fun way to practice shapes, proportions, folds, and fashion illustration. How to Draw a Collared Shirt becomes much easier when you break the garment into simple geometric shapes before adding details.
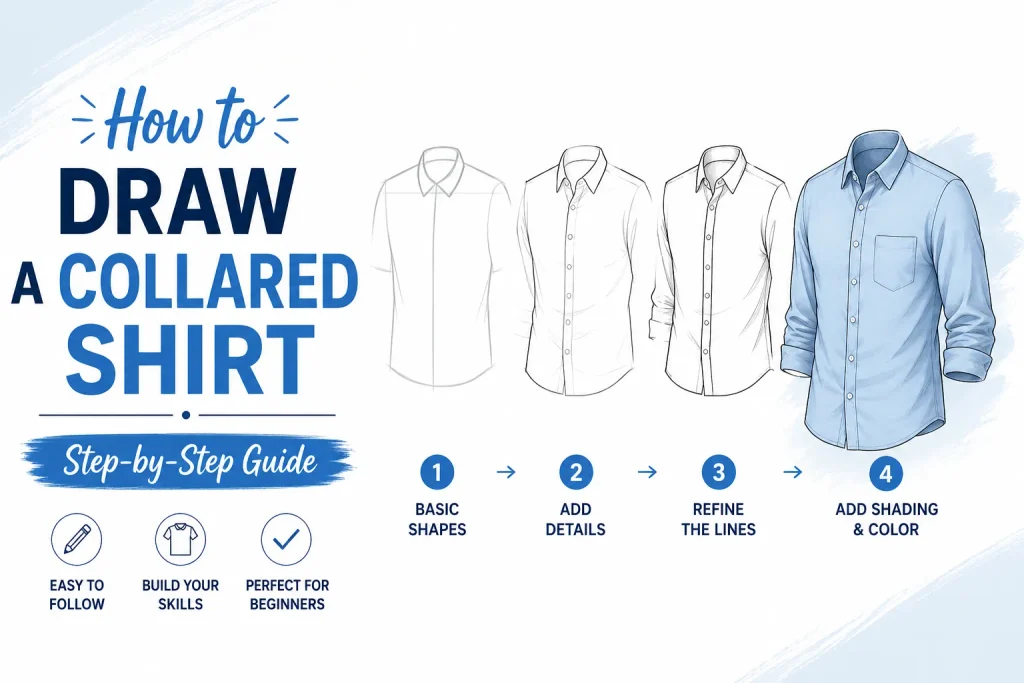
A collared shirt is also a great beginner drawing project because it has recognizable features such as a collar, buttons, sleeves, cuffs, and fabric folds. With a pencil and a little patience, you can create a simple shirt illustration and gradually make it look more realistic.
Items to Buy
- Drawing Pencil
- Eraser
- Sketchbook
- Ruler
- Fine-Line Pen
- Colored Pencils
- Markers
- Watercolor Paints
- Blending Pencil
- Pencil Sharpener
Why Learn How to Draw a Collared Shirt?
A collared shirt is an excellent subject for learning fashion illustration. It teaches you how clothing sits on the body, how symmetrical garments are constructed, and how fabric changes shape around seams and joints.
Once you understand the basic structure, you can use the same techniques to draw dress shirts, school uniforms, office shirts, casual button-ups, and many other clothing designs.
How to Draw a Collared Shirt Step by Step
Step 1: Draw the Basic Shirt Shape
Begin with a light pencil sketch of the overall shirt. Draw a simple vertical centerline to help keep both sides balanced. Around the centerline, sketch the general outline of the torso section.
Do not worry about details yet. Think of the shirt as a loose geometric shape with a wider upper section for the shoulders and a slightly narrower lower section. Keep your lines light so you can easily erase and adjust them later.
Step 2: Sketch the Shoulder and Neckline
Next, add the shoulders and neckline. Draw two gently sloping shoulder lines extending from the neck toward the outer edges of the shirt.
Create a small opening for the neck in the middle. The neckline does not need to be perfectly round because a collared shirt will cover much of this area. Focus on keeping the shoulders approximately equal on both sides.
Step 3: Draw the Shirt Collar
The collar is one of the most recognizable parts of the shirt. Start near the neckline and draw two collar sections extending outward and slightly downward.
For a traditional button-up shirt, create two pointed collar pieces. Add an inner line beneath each collar section to show where the collar folds over the shirt.
Keep the collar symmetrical if you are drawing the shirt from the front. If the shirt is slightly turned, make one collar side appear larger than the other.
Step 4: Add the Front Opening
Draw a straight vertical line from beneath the collar toward the bottom of the shirt. This represents the front opening where the shirt buttons together.
Keep this line close to the center of the garment. If you want a more casual look, you can make the shirt slightly open near the top by leaving a small gap between the collar pieces.
Step 5: Add Buttons and Buttonholes
Now add the buttons along the center opening. Use small circles or ovals and space them evenly from top to bottom.
You can also draw tiny horizontal or vertical marks beside the buttons to represent buttonholes. Keep these details subtle because they should complement the main shirt shape rather than overpower it.
Step 6: Draw the Sleeves
Sketch the sleeves extending from each shoulder. For short sleeves, create a slightly tapered shape that ends around the upper arm. For long sleeves, extend them farther downward.
Pay attention to the sleeve openings. They should not look like perfectly straight tubes. Add a little curve at the edge to make the fabric appear natural.
Step 7: Add the Cuffs
If you are drawing a long-sleeved collared shirt, add cuffs at the ends of the sleeves. Draw a band around each wrist area and include a small button or seam detail.
For short sleeves, you can create a simple folded hem instead. A second curved line near the sleeve opening can make the fabric edge look more realistic.
Step 8: Draw Fabric Folds and Seams
Clothing looks much more natural when you add folds. Draw a few soft lines around the armpits, elbows, sides, and beneath the collar.
Avoid adding too many folds. A handful of carefully placed curved lines is usually more effective than covering the entire shirt with random marks. Make folds follow the direction in which the fabric would naturally bend or stretch.
Step 9: Refine the Shirt Outline
Go over the best parts of your sketch with a darker pencil or fine-line pen. Strengthen the collar, shoulders, sleeves, cuffs, seams, buttons, and outer edges.
Erase unnecessary construction lines carefully. At this stage, look at both sides of the shirt and adjust anything that appears uneven. You can also add a slightly curved bottom hem to give the garment a softer appearance.
Step 10: Add Color and Shading
Finish your drawing by adding color. Choose any shirt color you like, from classic white and blue to pink, green, black, or a patterned design.
Use slightly darker shading beneath the collar, around the sleeves, beside the buttons, and inside deeper fabric folds. Keep the lightest areas where the fabric would naturally catch light. This simple combination of highlights and shadows can make your collared shirt look much more three-dimensional.
How to Draw a Dress Shirt
To draw a formal dress shirt, use a structured collar, straight button placket, long sleeves, and defined cuffs. Keep the overall silhouette relatively clean and symmetrical.
Add subtle folds around the elbows and under the arms rather than creating many loose wrinkles. A slightly longer shirt body can also help create a traditional formal appearance.
How to Draw a Short-Sleeve Collared Shirt
Start with the same basic shirt structure, but make the sleeves shorter. The sleeve openings should end around the upper or middle arm depending on the design.
You can make the shirt look casual by adding a relaxed hem, slightly wider sleeves, or a small chest pocket. Light folds around the shoulders and armpits will make the short-sleeve design feel more natural.
How to Draw a Polo Shirt
A polo shirt has a softer, more casual appearance than a traditional button-up shirt. Begin with a rounded neckline and add a short collar around the opening.
Instead of drawing buttons all the way down the shirt, add two or three small buttons beneath the collar. Use short sleeves and a relaxed body shape to complete the polo design.
How to Draw a Shirt Pocket
A pocket is easy to add once the main shirt has been completed. Draw a small rectangular or slightly curved shape on one side of the chest.
Add a top opening and a few subtle seam lines. If you want a realistic appearance, make the pocket follow the angle and perspective of the shirt rather than appearing completely flat.
How to Draw a Collared Shirt on a Person
When drawing a collared shirt on a person, start with the body underneath the clothing. Lightly sketch the head, neck, shoulders, chest, arms, and waist before adding the shirt.
The collar should sit around the neck, while the shoulders and sleeves should follow the body’s proportions. Add fabric folds wherever the shirt bends around the elbows, waist, shoulders, and chest.
How to Draw a Collared Shirt from the Side
For a side view, begin by drawing the person’s body profile. Then place the shirt around the torso and shoulder.
The collar will appear narrower from the side, and only part of the front opening may be visible. Pay special attention to the sleeve because its shape changes significantly when the arm is viewed from the side.
How to Make Your Shirt Drawing Look Realistic
Realistic clothing depends heavily on folds, thickness, seams, and shading. Avoid making every line perfectly straight because fabric naturally bends and curves.
Use darker values in areas where fabric overlaps or gathers. Keep highlights on raised areas and lighter surfaces. You can also vary your line weight by using darker outlines around the outside of the garment and lighter lines for interior folds.
Easy Collared Shirt Drawing Ideas
Once you are comfortable with the basic design, experiment with different shirt styles:
- Classic white button-up shirt
- Blue office shirt
- Plaid collared shirt
- Striped dress shirt
- Short-sleeve casual shirt
- Long-sleeve flannel shirt
- Oversized button-up shirt
- School uniform shirt
- Denim collared shirt
- Patterned vacation shirt
Common Mistakes to Avoid
One common mistake is making the collar too large compared with the rest of the shirt. Keep the collar proportional to the neck and shoulder width.
Another mistake is drawing sleeves as simple straight tubes. Sleeves should respond to the shape and position of the arms. Also avoid placing fabric folds randomly. Think about where the material would naturally bunch, stretch, or hang.
Tips for Better Shirt Drawings
Start with light construction lines and only darken your drawing after you are satisfied with the proportions. This makes corrections much easier.
Practice the collar separately before drawing the entire shirt. Try different collar shapes, sleeve lengths, button placements, and fabric textures. With repeated practice, you will be able to design your own shirts instead of simply copying a basic template.
FAQs
Is drawing a collared shirt difficult for beginners?
No. A collared shirt can be broken into simple shapes, making it a good beginner drawing exercise. Start with the body, shoulders, collar, sleeves, and buttons before adding folds and shading.
What pencil is best for drawing a shirt?
A standard HB pencil is a good starting choice. You can use a softer pencil such as 2B for darker outlines and shadows.
How do I make shirt folds look realistic?
Follow the movement of the fabric. Place folds near areas such as the elbows, armpits, waist, shoulders, and collar instead of adding random lines everywhere.
Can I draw a collared shirt without a ruler?
Yes. A ruler can help with straight button plackets and seams, but practicing freehand lines can make your drawings more natural over time.
How can I add patterns to a shirt?
Finish the basic shirt shape first, then add stripes, checks, dots, flowers, or other patterns. Make sure the pattern follows the direction and folds of the fabric.
What should I practice after drawing a collared shirt?
Try drawing different collars, sleeves, pockets, jackets, sweaters, and other garments. You can also practice putting the shirt on people in different poses.
Final Words
Learning how to draw a collared shirt is a simple and useful way to improve your fashion illustration skills. By starting with basic shapes and gradually adding the collar, buttons, sleeves, cuffs, seams, folds, and shading, you can create a convincing shirt drawing without complicated techniques.
Keep practicing different styles and perspectives. Once you understand the basic construction, you can experiment with colors, patterns, fabrics, and poses to create your own unique clothing designs.