
Learning how to draw a volleyball is a fun project for beginners because the ball can be built from a simple circle and a few curved panel lines. The challenge is making those lines wrap around the ball so it looks round rather than flat. With a pencil, eraser, and a little shading, you can create anything from a simple cartoon volleyball to a more realistic sports illustration.
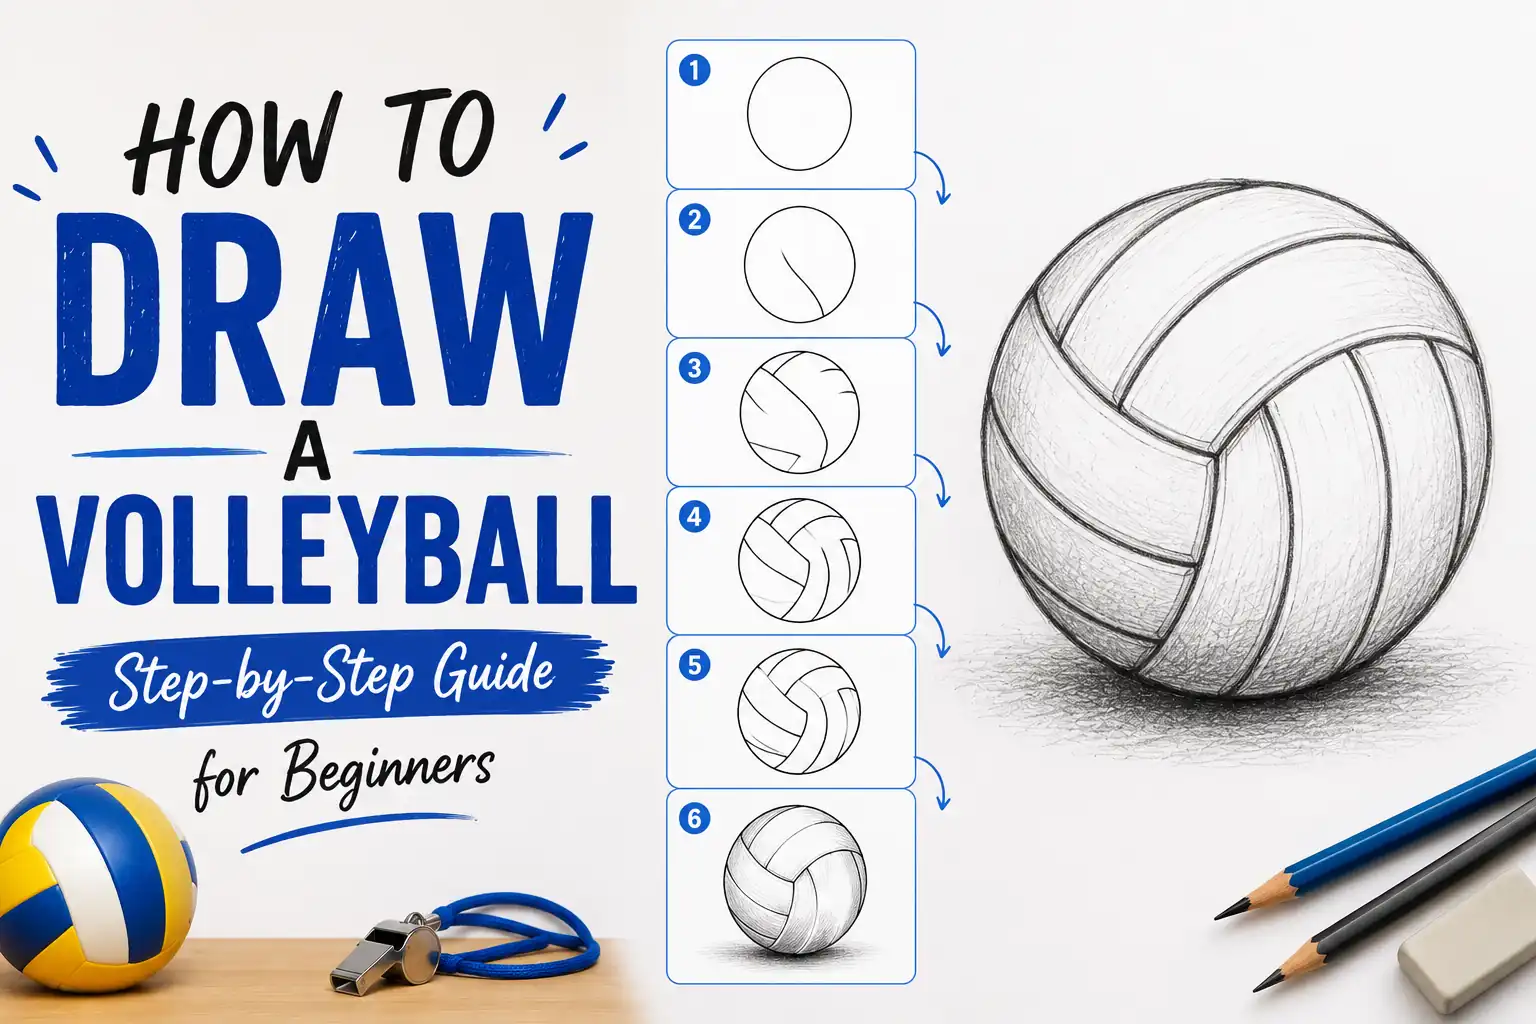
The key is to work from basic shapes before adding details. Start with a clean circular outline, divide it with curved sections, then use shading and highlights to create dimension. You don’t need advanced drawing skills or expensive supplies. Follow the steps below and practice the shape a few times to develop a confident, balanced volleyball drawing.
Items to Buy
- Drawing paper
- HB pencil
- 2B pencil
- Eraser
- Sharpener
- Ruler
- Fine-tip black pen
- Colored pencils
- Yellow colored pencil
- Blue colored pencil
- Gray colored pencil
- Blending stump, optional
Why Draw a Volleyball?
A volleyball is an excellent subject for practicing basic drawing techniques.
It helps you learn:
- Circles and curved shapes
- Perspective
- Panel construction
- Line control
- Light and shadow
- Highlights
- Texture
- Sports illustration
Once you understand the basic construction, you can draw volleyballs from different angles and incorporate them into larger sports scenes.
How to Draw a Volleyball Step by Step
Step 1: Draw a Light Circle
Start with a light pencil sketch.
Draw a circle approximately the size you want your volleyball to be.
Don’t press too hard.
If drawing a perfect circle is difficult, lightly sketch it several times until you’re happy with the shape.
You can use a circular object as a guide, but freehand practice will help improve your drawing skills.
Step 2: Refine the Outline
Look at your circle carefully.
Smooth out any uneven areas with your pencil.
A volleyball doesn’t have to be a mathematically perfect circle, but the outline should feel balanced.
Keep the pencil pressure light because you’ll add darker lines later.
Step 3: Mark the Center
Very lightly mark the approximate center of the volleyball.
This doesn’t necessarily need to be an exact dot.
The center gives you a reference point for positioning the panel lines.
Remember that volleyball panels are curved, so don’t use straight lines radiating from the center.
Step 4: Add the First Curved Panel Line
Begin with one broad curved line across the ball.
Instead of drawing a straight stripe, curve the line as if it is wrapping around a three-dimensional sphere.
The curve should follow the rounded form of the volleyball.
This is one of the most important steps for making the drawing look realistic.
Step 5: Add the Second Panel Curve
Add another curved section that intersects or approaches the first panel.
Keep the curve flowing naturally.
The lines should feel like they are sitting on the surface rather than floating inside the circle.
If a panel line approaches the outer edge, let it follow the perspective of the ball.
Step 6: Build the Remaining Panels
Continue adding curved lines around the volleyball.
You don’t need to reproduce every tiny construction detail.
Focus on creating several recognizable sections.
Keep the lines:
- Smooth
- Rounded
- Consistent
- Slightly varied
- Connected to the ball’s perspective
Avoid making the sections perfectly identical.
Step 7: Check the Panel Perspective
Pause before adding more details.
Look at the ball as a whole.
Do the panel lines appear to wrap around it?
If they look completely straight, erase and reshape them.
The curves should become more pronounced as they approach certain parts of the spherical surface.
This gives the impression that the lines are following the ball’s volume.
Step 8: Add the Volleyball Seams
Volleyballs often have visible seams or panel boundaries.
Add slightly darker lines along the major divisions.
Keep the seams relatively narrow.
Don’t make every panel boundary extremely thick because this can make the ball look more like a cartoon than a realistic volleyball.
Step 9: Erase Construction Lines
Once the panel structure looks correct, erase unnecessary guidelines.
Be careful not to remove your final panel lines.
Your drawing should now have a clean circular outline with curved sections across its surface.
Step 10: Strengthen the Outer Outline
Use a darker pencil or fine-tip pen to reinforce the outer edge.
You can make the outline slightly stronger around the lower portion of the ball.
Keep the line lighter around areas where you plan to place a bright highlight.
Step 11: Add a Light Source
Choose where the light is coming from.
For example, imagine the light coming from the upper-left side.
The upper-left portion of the volleyball should remain relatively bright.
The opposite side can gradually become darker.
Having a consistent light source makes the ball look three-dimensional.
Step 12: Add Basic Shading
Use your 2B pencil to add soft shading.
Darken areas:
- Between panel sections
- Around the lower edge
- On the side opposite the light source
- Near overlapping seams
Keep your strokes light at first.
Build the darkness gradually rather than pressing hard immediately.
Step 13: Create a Highlight
Leave a small area near the light source mostly white.
You can gently erase a soft highlight after shading.
A highlight helps create the appearance of a smooth, slightly reflective surface.
Don’t make the highlight perfectly circular.
A soft irregular shape usually looks more natural.
Step 14: Add Volleyball Texture
If you want a realistic drawing, add subtle surface texture.
Use very small pencil marks across the panels.
You don’t need to cover every square inch.
Keep the texture especially subtle near the brightest areas.
The goal is to suggest the slightly textured material without making the surface look rough.
Step 15: Add Color
Traditional volleyballs often feature white combined with colored panels.
You can use:
- White
- Yellow
- Blue
- Gray
- Light green
- Orange
Start with light layers.
Gradually build stronger colors in selected sections.
Leave some areas lighter to maintain the three-dimensional appearance.
How to Draw a Volleyball in Color
For a colorful volleyball, first divide the ball into its panel sections.
Choose two or three colors that work together.
For example, you might use white, blue, and yellow.
Apply the lightest color first.
Then gradually add darker tones toward the edges and seams.
Avoid coloring every section with exactly the same intensity.
Variation makes the volleyball look more dimensional.
How to Draw a Realistic Volleyball
A realistic volleyball depends more on shading and perspective than on adding hundreds of details.
Focus on:
Correct Circular Form
The outer shape should feel round.
Curved Panel Lines
Panel lines need to follow the sphere.
Gradual Shading
Avoid harsh transitions unless you’re deliberately creating dramatic lighting.
Surface Texture
Use subtle marks to suggest the ball’s material.
Highlights
A controlled highlight creates the impression of a rounded, slightly reflective surface.
How to Draw a Volleyball for Beginners
If you’re completely new to drawing, simplify the process.
Start with:
- A circle
- Three or four curved panel lines
- A simple outline
- Light shading
Don’t try to reproduce every panel in your first attempt.
Once you can consistently draw a convincing spherical ball, add more detailed panel patterns.
How to Draw a Cute Volleyball
For a cartoon-style volleyball, simplify the details.
Draw a slightly imperfect circle.
Add several bold curved panel lines.
Then give your volleyball:
- Large eyes
- A small smile
- Blushing cheeks
- Tiny arms
- Tiny legs
You can also add a little sweatband or sports-themed accessories.
This style works well for stickers, children’s illustrations, notebooks, and digital artwork.
How to Draw a Volleyball With a Pencil
A pencil is enough to create a convincing volleyball.
Start with HB for the construction.
Use 2B for darker shadows.
Use your eraser to create highlights.
For a soft appearance, lightly blend selected areas.
However, avoid blending the entire drawing because preserving some pencil texture can make the surface look more natural.
How to Draw a Volleyball From Different Angles
Front View
Use a nearly circular outline with evenly distributed curved panels.
This is the easiest view for beginners.
Slight Side View
Make the circle slightly narrower.
Adjust the panel curves to follow the changed perspective.
Three-Quarter View
Use a slightly oval-looking silhouette.
The panel sections should appear compressed on the sides and broader toward the visible center.
Volleyball in Motion
Tilt the ball slightly and add motion lines around it.
You can also draw small shadows beneath it to suggest movement through the air.
How to Draw a Volleyball on the Ground
Start with your volleyball drawing.
Then add a simple ground plane underneath.
Place a soft cast shadow beneath the ball.
The shadow should be darker near the point where the ball is closest to the ground and softer farther away.
This instantly makes the volleyball appear grounded.
How to Draw a Volleyball in the Air
Draw the ball without a ground shadow.
Add a few curved motion lines behind it.
You can also draw a player’s hand or arm nearby to create a volleyball-game scene.
Keep the motion lines lighter than the volleyball itself so they don’t overpower the main subject.
How to Make Your Volleyball Look 3D
The panel lines should follow the spherical surface.
Imagine each line wrapping around a balloon.
Then use shading to reinforce that idea.
Keep one side lighter and gradually darken the opposite side.
The combination of curved panels + gradual shading + highlight creates most of the three-dimensional effect.
Common Mistakes to Avoid
Drawing Straight Panel Lines
Straight lines can make the ball look flat.
Making Every Panel Identical
Realistic panel patterns usually have variation and perspective.
Using Heavy Lines Everywhere
Too much outlining can flatten the drawing.
Forgetting the Light Source
Random shading makes the ball look inconsistent.
Overdoing Texture
Too much texture can distract from the basic form.
Making the Volleyball Perfectly Flat
Use curved lines and shading to create volume.
Pressing Too Hard Too Early
Light construction lines are easier to correct.
Easy Volleyball Drawing Ideas
Volleyball With a Net
Draw the ball in front of a simple volleyball net.
Volleyball on a Beach
Place your volleyball on sand and add a beach background.
Volleyball With a Player
Draw a simplified player reaching toward the ball.
Volleyball With a Shadow
Practice realistic lighting by adding a soft cast shadow underneath.
Volleyball Sticker
Use a bold outline and bright colors for a simple sticker design.
Volleyball With Motion Lines
Tilt the ball and add curved lines to show movement.
How to Practice Drawing Volleyballs
Try drawing several volleyballs on one page.
Make each one slightly different.
Practice:
- Different sizes
- Different angles
- Different panel patterns
- Different light directions
- Different shading levels
Don’t erase every mistake.
Studying your earlier drawings can help you see how your proportions and panel placement improve over time.
FAQs
Is a volleyball easy to draw?
Yes. Beginners can start with a simple circle and add curved panel lines before introducing shading and texture.
What shape should I start with?
Start with a circle or slightly rounded sphere. This gives you the basic structure of the volleyball.
How do I make volleyball panel lines look curved?
Imagine the lines wrapping around a balloon. Curve them according to the spherical surface instead of drawing them straight across.
What pencil is best for drawing a volleyball?
An HB pencil is useful for sketching, while a 2B pencil works well for darker shading.
How do I make my volleyball look realistic?
Use curved panel lines, gradual shading, subtle texture, and a clear light source.
What colors can I use?
White, blue, yellow, green, orange, and gray can all work. Choose colors that complement each other.
Can I draw a volleyball without a ruler?
Absolutely. In fact, freehand circles and curves are useful practice for improving your drawing control.
How do I draw a cute volleyball?
Simplify the panel design, use bold outlines, and add features such as eyes, a smile, and rosy cheeks.
How do I add realistic volleyball texture?
Use tiny, subtle pencil marks rather than heavy lines. Keep the texture lighter in highlighted areas.
How do I draw a volleyball in motion?
Tilt the ball slightly and add a few curved motion lines. A player’s hand or a volleyball net can make the scene more dynamic.
How do I make a volleyball look three-dimensional?
Use curved panel lines, gradual shadows, and a bright highlight on the side facing your imaginary light source.
Final Words
Learning how to draw a volleyball is a great way to practice circles, curved lines, perspective, shading, and texture. Start with a simple outline and don’t worry about reproducing every panel perfectly. Once the basic sphere looks balanced, gradually add curved seams, shadows, highlights, and subtle surface texture.
With practice, you can turn the same basic drawing into a realistic volleyball, colorful sports illustration, cute cartoon character, or action scene. The most important technique is to make the panel lines follow the rounded surface of the ball. Once you master that detail, your volleyball drawings will immediately look more convincing and three-dimensional.