
Learning how to draw a frog is a fun and simple project for beginners. Frogs have rounded bodies, large eyes, long legs, and distinctive webbed feet, making them excellent subjects for practicing basic shapes and proportions. You don’t need advanced drawing skills to create a recognizable frog. By breaking the animal into circles, ovals, and curved lines, you can build the basic structure before adding details.
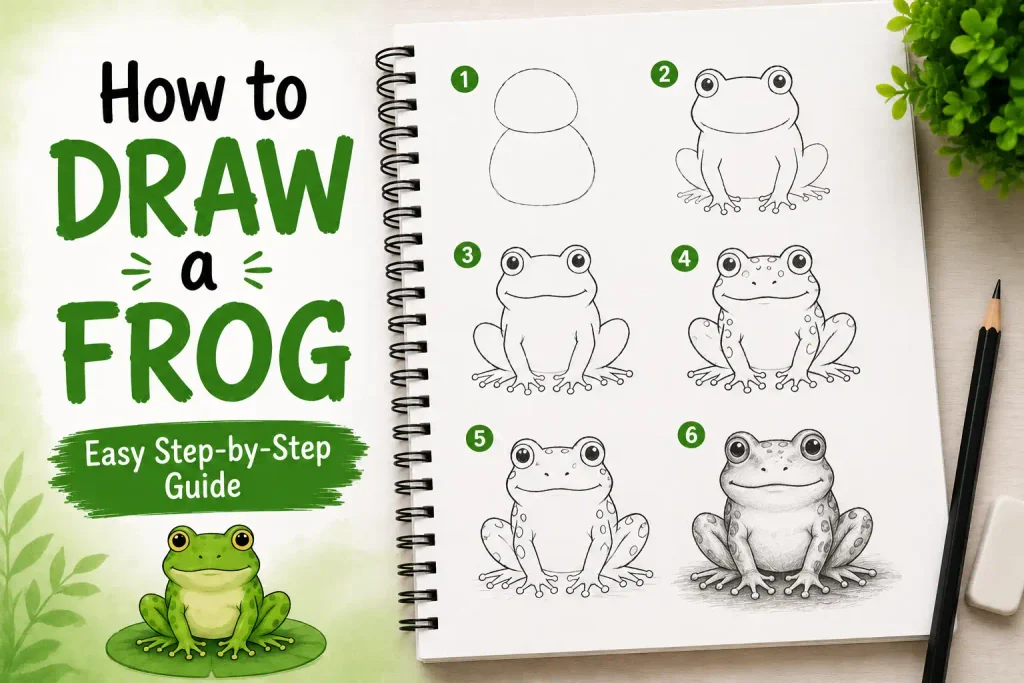
The easiest approach is to sketch the frog’s body and head first, then add the eyes, mouth, legs, and feet. Once your outline is complete, use simple shading and texture to give your frog more dimension. You can also experiment with cute cartoon frogs, realistic frogs, jumping poses, or frogs sitting on lily pads.
Items to Buy
- Drawing paper
- HB pencil
- 2B pencil
- 4B pencil
- Eraser
- Kneaded eraser
- Sharpener
- Fine-tip black pen
- Colored pencils
- Green colored pencil
- Dark green colored pencil
- Yellow colored pencil
- Brown colored pencil
- Black colored pencil
- White colored pencil
- Blending stump
Why Draw a Frog?
Frogs are excellent drawing subjects because their bodies can be created from a few simple shapes.
Drawing a frog can help you practice:
- Basic shapes
- Animal proportions
- Symmetry
- Curved lines
- Large eyes
- Long legs
- Webbed feet
- Skin texture
- Shading
- Natural poses
You can draw a frog sitting, jumping, swimming, hiding among plants, or resting on a lily pad.
How to Draw a Frog Step by Step
Step 1: Choose Your Frog’s Pose
Before you begin, decide what position you want your frog to have.
A frog sitting with its legs folded is one of the easiest poses for beginners.
You can also draw a frog:
- Jumping
- Sitting on a lily pad
- Swimming
- Facing forward
- Looking sideways
- Standing on its legs
- Resting beside flowers
Start with a simple pose before attempting an action scene.
Step 2: Draw the Main Body
Begin with a large oval for the frog’s body.
Keep your pencil strokes light.
The body should be wider than it is tall for a typical sitting frog.
Don’t worry about getting the shape perfect because you’ll refine it later.
Step 3: Add the Head
Draw a wide, rounded shape above the body.
A frog’s head is broad and blends naturally into its torso.
For a front-facing frog, make the head relatively symmetrical.
Step 4: Add the Eye Bumps
Frogs have prominent eyes that sit slightly above the head.
Draw two rounded bumps near the top of the head.
These can be represented with circles or small ovals.
Keep them similar in size.
Step 5: Draw the Eyes
Add a smaller circle inside each eye bump.
Darken the pupils.
Leave a tiny white highlight inside each pupil to make the eyes look lively.
For a realistic frog, keep the eyes proportional to the head.
For a cartoon frog, you can make them larger.
Step 6: Draw the Mouth
Add a curved horizontal line across the lower portion of the head.
The mouth doesn’t need to be very dark.
For a smiling cartoon frog, curve the line slightly upward at the corners.
For a realistic frog, keep the mouth more subtle.
Step 7: Add the Nostrils
Place two tiny dots or short curved marks above the mouth.
Keep them relatively close together.
Small nostrils can add a surprising amount of character to the face.
Step 8: Sketch the Front Legs
Draw the front legs on either side of the body.
Frog forelegs are relatively short.
Use curved lines to indicate the elbows and wrists.
Keep the limbs relaxed for a sitting pose.
Step 9: Draw the Hind Legs
The hind legs are much larger and stronger than the front legs.
Sketch the large folded thigh first.
Then add the lower leg extending toward the foot.
Use curved shapes rather than straight lines.
Step 10: Add the Feet
Frog feet are distinctive because of their long toes.
Draw the feet extending from the hind legs.
Add several long, thin toes.
For a realistic frog, the toes can have small rounded tips.
For a cartoon frog, simplify them into curved lines.
Step 11: Add the Front Toes
Add smaller toes to the front feet.
Keep them shorter than the hind toes.
Spread them slightly apart to make the feet look natural.
Step 12: Refine the Body Shape
Now examine your frog’s overall silhouette.
Check that:
- The head is wide
- The eyes are balanced
- The body is rounded
- The hind legs are large
- The front legs are shorter
- The feet connect naturally
Erase unnecessary construction lines.
Step 13: Add Frog Skin Texture
Frog skin can be represented with small irregular shapes and subtle bumps.
Add a few curved marks around the:
- Head
- Back
- Legs
- Sides
Don’t cover the entire frog with texture.
Keep some areas relatively smooth.
Step 14: Add Spots and Patterns
Many frogs have distinctive markings.
Add irregular spots across the body.
Vary their size and shape.
Avoid making the spots perfectly symmetrical unless you’re drawing a stylized cartoon.
Step 15: Add Shading
Choose a light source before you begin shading.
Darken areas underneath:
- Head
- Body
- Legs
- Chin
- Belly
Also add shadows between the folded sections of the hind legs.
Build the shading gradually.
Step 16: Add Highlights
Use a kneaded eraser or white pencil to add highlights.
Good areas include:
- Eyes
- Top of the head
- Back
- Nose
- Upper legs
Small highlights can make the frog look moist and three-dimensional.
Step 17: Strengthen the Main Outline
Once you’re happy with the drawing, darken selected parts of the outline.
Focus on:
- Head
- Eyes
- Mouth
- Legs
- Feet
- Toes
Keep the internal skin texture lighter.
How to Draw a Cute Frog
For a cute cartoon frog, simplify the anatomy and exaggerate its features.
Make the:
- Eyes larger
- Body rounder
- Mouth wider
- Legs shorter
- Feet simpler
You can give the frog a smile and add a tiny crown, flower, or bow for a playful illustration.
How to Draw a Realistic Frog
For a realistic frog, focus on anatomy and texture.
Start with the broad head and compact body.
Pay attention to the large folded hind legs.
Add subtle bumps and spots across the skin.
Use darker shadows underneath the body and legs.
Keep the eyes glossy with small highlights.
How to Draw a Frog From the Front
Start with a wide rounded head.
Draw two symmetrical eye bumps at the top.
Add the eyes inside them.
Then draw the mouth and nostrils.
Add the rounded body beneath the head.
Place the front legs on both sides and the large hind legs underneath.
Use a light vertical guideline to maintain symmetry.
How to Draw a Frog From the Side
Begin with an oval body.
Add the head at one end.
Draw one prominent eye.
Then sketch the folded front and hind legs.
Extend the toes toward the ground.
This view makes the frog’s powerful hind legs especially easy to see.
How to Draw a Jumping Frog
Start with the body angled upward.
Stretch the hind legs backward.
Extend the front legs forward.
Point the toes outward.
Curve the body slightly to show movement.
Add a few simple motion lines if you’re creating a cartoon illustration.
How to Draw a Frog on a Lily Pad
Begin by drawing the frog using the steps above.
Then create a large oval lily pad underneath it.
Add a few curved lines across the pad.
You can decorate the scene with:
- Water ripples
- Flowers
- Reeds
- Leaves
- Small insects
- Water droplets
Keep the background simple so the frog remains the main subject.
How to Draw a Frog in Water
Place the frog’s body partly below the waterline.
Show only the head and eyes above the surface for a classic frog pose.
Add gentle horizontal ripples around the head.
Use reflections and small highlights to make the water look realistic.
How to Draw a Frog With Colored Pencils
Start with a light green base.
Layer darker green around the back and sides.
Use yellow-green around the face and belly.
Add brown or dark green spots.
Use black for the pupils and small facial details.
Blend colors gradually rather than pressing heavily from the beginning.
How to Draw a Frog With Watercolors
Begin with a light pencil sketch.
Apply a pale green wash over the body.
Add darker green around the back and legs.
Use yellow-green for lighter areas.
Add small spots with a fine brush.
Leave tiny sections of white paper visible around the eyes and upper body for natural highlights.
How to Make Frog Skin Look Realistic
The key is to combine color variation, texture, and soft shading.
Start with a basic green base.
Then add:
- Light and dark green patches
- Irregular spots
- Small skin bumps
- Darker areas around folds
- Soft highlights
Avoid using one flat green color across the entire frog.
Common Mistakes to Avoid
Making the Eyes Too Small
The eyes are one of the frog’s most recognizable features.
Making the Hind Legs Too Thin
Frogs have powerful, folded rear legs.
Forgetting the Toes
The long toes help establish the frog’s identity.
Making the Body Too Long
A sitting frog generally has a compact, rounded body.
Adding Too Much Texture
Use skin markings selectively.
Making the Frog Perfectly Symmetrical
Small natural differences make a realistic frog more interesting.
Using Only One Shade of Green
Layer several related tones to create depth.
Easy Frog Drawing Ideas
Cute Cartoon Frog
Create a round body with oversized eyes and a cheerful expression.
Frog on a Lily Pad
Place a sitting frog above calm water.
Jumping Frog
Stretch the legs outward to capture movement.
Tree Frog
Draw a small frog with large toe pads sitting on a branch.
Frog in a Pond
Add water plants, ripples, and lily pads.
Realistic Frog Portrait
Focus closely on the eyes, skin texture, spots, and shading.
FAQs
Is a frog easy to draw?
Yes. Frogs can be built from simple rounded shapes, making them a great subject for beginners.
What should I draw first?
Start with the main body and head. Then add the eye bumps, legs, feet, and facial details.
How do I draw frog eyes?
Draw two rounded eye bumps on top of the head, then place smaller circles inside them for the eyes and pupils.
How do I draw frog legs?
Start with the large folded hind thighs, then add the lower legs and long toes. Keep the front legs shorter.
How do I make a frog look realistic?
Pay attention to its body proportions, folded hind legs, glossy eyes, skin texture, spots, and gradual shading.
How do I draw a cute frog?
Make the body rounder, enlarge the eyes, simplify the feet, and add a friendly expression.
What colors should I use?
Green, yellow-green, dark green, brown, black, and cream work well for traditional frog illustrations.
How do I draw a frog jumping?
Extend the powerful hind legs backward and the front legs forward. Slightly curve the body to make the pose feel dynamic.
Can beginners draw a realistic frog?
Absolutely. Begin with simple shapes and gradually build the anatomy, texture, spots, and shadows.
What pencil should I use?
Use an HB pencil for the initial sketch and 2B or 4B pencils for darker shadows and details.
Final Words
Learning how to draw a frog becomes much easier when you break the animal into simple shapes. Start with the rounded body, broad head, raised eyes, short front legs, powerful hind legs, and distinctive toes. Once the basic silhouette is correct, add skin texture, spots, shadows, and highlights to make your frog more lifelike.
After mastering the basic drawing, experiment with different poses and settings. Try a cute cartoon frog, a jumping frog, a realistic frog on a lily pad, or a frog partly hidden beneath the surface of a pond. With regular practice, you’ll become more confident drawing animal anatomy, textures, expressions, and natural environments.