
Learning how to draw an otter is a fun beginner-friendly art project that helps you practice animal proportions, curved shapes, facial features, fur texture, and shading. Otters have long, streamlined bodies, rounded heads, small ears, short legs, and expressive faces. Although their anatomy may seem complicated, you can create a convincing otter by breaking the body into a few simple shapes.
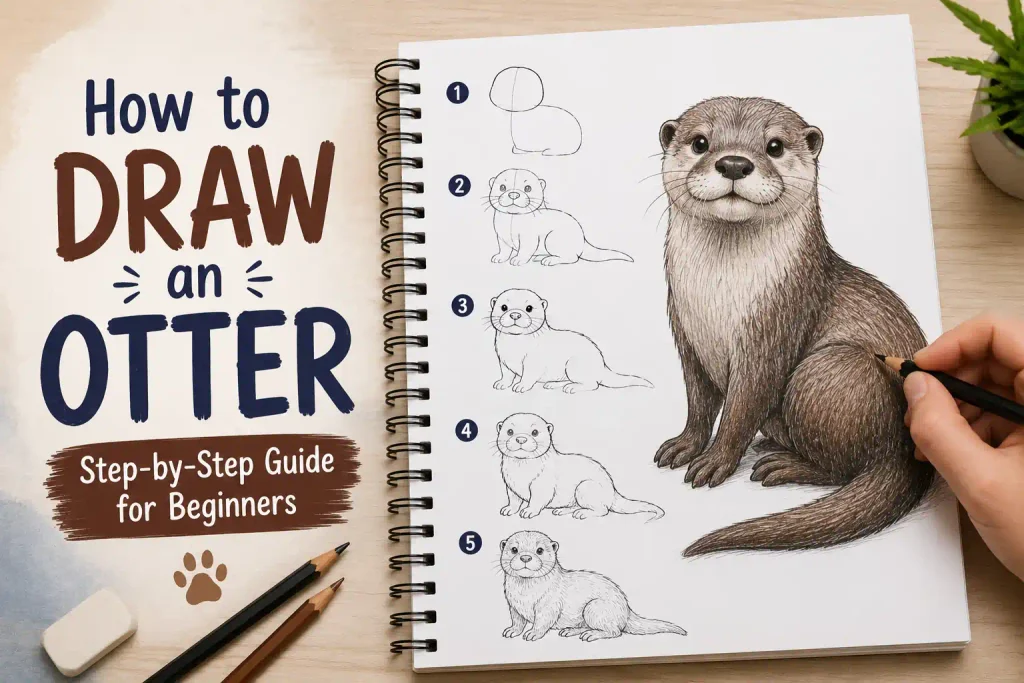
The easiest approach is to sketch the body and head first, then add the muzzle, ears, paws, tail, and facial features. Once the basic outline is complete, you can build the fur using short strokes and add shadows to create depth. You can also experiment with swimming, sitting, floating, or playful cartoon otter poses.
Items to Buy
- Drawing paper
- HB pencil
- 2B pencil
- 4B pencil
- Eraser
- Kneaded eraser
- Sharpener
- Fine-tip black pen
- Ruler, optional
- Colored pencils
- Brown colored pencil
- Dark brown colored pencil
- Beige colored pencil
- Black colored pencil
- Gray colored pencil
- Blending stump
Why Draw an Otter?
Otters are excellent subjects for beginners because their bodies are mostly made from smooth, rounded shapes.
Drawing an otter can help you practice:
- Animal proportions
- Curved body shapes
- Facial features
- Fur texture
- Paws and claws
- Whiskers
- Shading
- Highlights
- Water reflections
- Simple animal poses
You can draw a realistic river otter, a cute cartoon otter, or an otter floating on its back.
How to Draw an Otter Step by Step
Step 1: Choose the Otter’s Pose
Before starting your sketch, decide what position you want.
A side-facing standing or sitting otter is a good option for beginners.
You can also draw an otter:
- Swimming
- Floating on its back
- Sitting upright
- Walking
- Holding food
- Looking forward
- Playing in water
Choose a simple pose for your first drawing.
Step 2: Draw the Main Body
Start with a long horizontal oval for the body.
Otters have elongated bodies, so make the oval noticeably longer than it is tall.
Keep your pencil strokes light.
This shape will act as the foundation for the torso.
Step 3: Add the Head
Draw a rounded shape near one end of the body.
The head should be smaller than the torso.
Keep it slightly rounded rather than perfectly circular.
Leave enough space between the head and body for the neck.
Step 4: Shape the Neck
Connect the head to the body with a short, curved neck.
An otter’s neck should blend smoothly into its elongated torso.
Don’t make the connection too narrow.
Step 5: Draw the Muzzle
Add a smaller rounded shape at the front of the head.
The muzzle should project slightly outward.
Keep it compact and soft.
This will give your otter the characteristic rounded face.
Step 6: Add the Nose
Place a small dark oval or rounded shape at the end of the muzzle.
Leave a tiny lighter area if you want the nose to look shiny.
Keep the nose proportional to the face.
Step 7: Draw the Eyes
Add two small eyes if you’re drawing the otter from the front or three-quarter view.
For a side view, one eye may be visible.
Keep the eyes relatively small.
Add tiny highlights to give them a lively appearance.
Step 8: Add the Ears
Draw two small rounded ears near the upper sides of the head.
Otter ears are relatively small compared with their heads.
Add a smaller curved shape inside each ear.
Keep the ears close to the head.
Step 9: Add the Front Legs
Sketch the front legs beneath the upper portion of the body.
Otters have relatively short limbs.
Keep the legs close to the torso.
Depending on the pose, the paws can be pointed forward, downward, or toward the body.
Step 10: Draw the Hind Legs
Add the rear legs toward the back of the body.
If you’re drawing a swimming otter, the hind legs can extend outward.
For a sitting otter, keep them closer to the ground.
Step 11: Add the Paws
Draw small rounded paws at the ends of the legs.
Add a few short lines to suggest the toes.
If you want a more realistic illustration, you can lightly indicate the webbing between the toes.
Don’t over-detail the paws at this stage.
Step 12: Draw the Tail
The tail is an important part of the otter’s silhouette.
For a river otter, draw a long, tapered tail extending from the rear of the body.
Make the base thicker and gradually narrow it toward the tip.
For a swimming pose, let the tail curve naturally through the water.
Step 13: Refine the Body Outline
Now examine the entire silhouette.
Check that:
- The body is long enough
- The head is proportional
- The muzzle is rounded
- The legs are short
- The tail connects naturally
- The ears are small
Erase unnecessary construction lines.
Step 14: Add the Fur Texture
Now begin suggesting the otter’s fur.
Use short, curved pencil strokes.
Follow the direction of the body.
Keep the strokes relatively close together around the head and torso.
Don’t draw every individual hair.
Instead, create groups of fur.
Step 15: Follow the Fur Direction
Fur should follow the body’s shape.
Around the head, use shorter strokes.
Along the back, strokes can follow the body backward.
Around the chest and belly, change the direction slightly.
This makes the fur look more natural.
Step 16: Add Whiskers
Draw several thin whiskers extending outward from the muzzle.
Use very light lines.
Vary their length slightly.
A few delicate whiskers are enough to make the face more recognizable.
Step 17: Add Facial Details
Refine the:
- Eyes
- Nose
- Mouth
- Muzzle
- Ears
- Whiskers
Keep these features cleaner than the surrounding fur.
The face should remain the focal point.
Step 18: Add Shadows
Choose a light source before shading.
Add darker areas beneath the body and around overlapping parts.
Useful shadow areas include:
- Under the chin
- Beneath the belly
- Behind the legs
- Around the neck
- Under the tail
- Inside the ears
Build the shadows gradually.
Step 19: Add Highlights
Use a kneaded eraser to create subtle highlights.
Highlights can appear along:
- Forehead
- Nose
- Muzzle
- Shoulders
- Back
- Upper paws
Keep them soft and relatively small.
Step 20: Strengthen the Main Outline
Once your drawing is finished, reinforce important parts of the silhouette.
Darken the:
- Nose
- Eyes
- Outer head
- Back
- Feet
- Tail
Keep the fur strokes lighter.
This gives the drawing a clear structure without making it look overly outlined.
How to Draw a Cute Otter
For a cartoon otter, simplify the anatomy and exaggerate its adorable features.
Make the:
- Head slightly larger
- Eyes bigger
- Nose rounder
- Body plumper
- Paws smaller
Use simple curved lines for the fur.
You can also give the otter a cheerful expression or have it hold a small object.
How to Draw a Realistic Otter
Start with accurate body proportions.
The body should be long and streamlined.
Then build the fur using layered strokes.
Keep the face relatively smooth.
Use darker shading around the underside and between body sections.
Pay particular attention to the transition between the head, neck, and torso.
How to Draw an Otter Swimming
For a swimming otter, make the body horizontal.
Extend the head slightly above the water.
Place the front paws near the chest or stretched forward.
Extend the hind legs backward.
Let the tail curve behind the body.
Add gentle water lines around the otter to show movement.
How to Draw an Otter Floating on Its Back
Start with a long oval for the body.
Position the head at the upper end.
Turn the face upward.
Place the paws near the chest or belly.
The hind legs can extend outward.
Add water around the body and soft shadows underneath it.
This is a particularly charming otter pose.
How to Draw an Otter Holding Food
Draw the otter sitting upright.
Place both front paws near the chest.
Add a small object between the paws, such as a shell or piece of food.
Keep the object relatively small so the otter remains the main subject.
How to Draw an Otter From the Front
Start with a rounded head.
Add the muzzle in the center.
Place the eyes evenly above it.
Add the small ears on both sides.
Then draw the body underneath.
Use symmetrical guidelines during the initial sketch.
How to Draw an Otter From the Side
A side view is excellent for showing the otter’s long body and tail.
Start with the body oval.
Add the head and muzzle at one end.
Draw one prominent front leg and rear leg.
Extend the tail from the opposite end.
Use the visible silhouette to establish the pose before adding fur.
How to Draw an Otter in Water
After completing the otter, add a simple water environment.
You can include:
- Ripples
- Reflections
- Small waves
- Floating leaves
- Water plants
- Rocks
Keep the water lines lighter than the animal’s outline.
This keeps the otter as the main focal point.
How to Draw an Otter With Colored Pencils
Start with a light brown or warm gray base.
Add darker brown around the back, ears, paws, and tail.
Use beige or cream around the muzzle and throat.
Layer colors gradually rather than pressing heavily from the beginning.
Leave small lighter areas to create natural highlights.
How to Draw an Otter With Watercolors
Begin with a light pencil sketch.
Apply a pale brown wash over the body.
Keep the muzzle slightly lighter.
Add darker brown layers around the back and underside.
Use a fine brush to suggest selected fur strokes.
For the water, use loose horizontal strokes and leave small areas of white paper visible for reflections.
How to Make Otter Fur Look Realistic
The most important technique is layering.
Start with the overall body color.
Then add medium-length fur strokes.
Finally, add a few darker strokes in areas where the fur is denser.
Don’t try to draw every hair.
Instead, focus on:
- Fur direction
- Light and shadow
- Texture variation
- Darker areas
- Highlighted sections
This creates the impression of detailed fur without making the drawing overwhelming.
Common Mistakes to Avoid
Making the Body Too Short
Otters have noticeably elongated bodies.
Making the Ears Too Large
Keep them small and rounded.
Drawing the Tail Too Thin
The tail should have a substantial base and taper gradually.
Making the Fur Uniform
Vary the length and direction of your strokes.
Overdrawing the Whiskers
Use a few delicate lines instead of many heavy ones.
Making the Face Too Dark
Keep the muzzle and facial details clear.
Forgetting Water Perspective
If your otter is swimming, add subtle ripples around the body to establish its position in the water.
Easy Otter Drawing Ideas
Cute Baby Otter
Create a round body, large eyes, and tiny paws.
Swimming Otter
Draw a streamlined otter moving through calm water.
Floating Otter
Show the otter lying on its back with its paws raised.
Otter With a Shell
Place a small shell between its front paws.
Cartoon Otter
Use simple shapes, bold outlines, and playful expressions.
Realistic Otter Portrait
Focus on the face, fur, whiskers, and subtle shading.
FAQs
Is an otter easy to draw?
Yes. Start with a long oval body, rounded head, short limbs, and tapered tail. Add details gradually.
What should I draw first?
Begin with the body and head. Then add the muzzle, ears, legs, paws, and tail before working on fur.
How do I draw otter fur?
Use short, directional strokes that follow the body’s shape. Build the texture in layers rather than drawing every hair.
How do I make an otter look realistic?
Focus on its elongated body, small ears, rounded muzzle, tapered tail, fur direction, and natural shading.
How do I draw a cute otter?
Make the head and eyes slightly larger, simplify the fur, and use rounded body shapes.
What colors should I use?
Brown, dark brown, beige, cream, gray, and black work well for traditional otter illustrations.
How do I draw an otter swimming?
Use a horizontal body, extend the limbs naturally, curve the tail behind it, and add gentle ripples around the body.
How do I draw an otter floating?
Place the otter on its back with the face pointing upward and the paws near its chest or belly.
Can beginners draw a realistic otter?
Absolutely. Begin with simple construction shapes and gradually build the anatomy, fur, and shading.
What pencil should I use?
Use an HB pencil for the initial sketch and 2B or 4B pencils for darker shadows and fur details.
Final Words
Learning how to draw an otter becomes much easier when you break the animal into simple rounded shapes. Start with the long body, rounded head, muzzle, small ears, short legs, paws, and tapered tail. Once the silhouette is correct, gradually add fur, whiskers, shadows, and highlights to bring the otter to life.
After mastering the basic pose, try drawing an otter swimming, floating on its back, holding food, or playing in the water. With regular practice, you can develop better control over animal proportions, soft fur textures, expressive faces, and natural movement while creating charming otter illustrations.